
As a tile contractor and consultant, I’ve had plenty of opportunity to observe failed tile installations. But I’m also aware of tile work that is centuries old and still looks fresh and new. Why? Maybe because most of the ancient tile work was done for pharaohs and kings, and the penalty for less than perfect craftsmanship was death. About the worst that can happen today is to have an installation red-flagged by the inspector.
Most of the installation failures I’ve seen have resulted from a failure to follow directions. Whether the directions are in the form of specifications, industry recommendations, or the printed instructions on a container, failure to heed the advice will almost guarantee problems. Most contractors don’t intentionally ignore instructions, but they often fail to make themselves aware of the recommended methods. What follows are the instructions and recommendations most often ignored by tilesetters, and the problems that result.
Allowing for Movement
Probably 90% of the tile installation problems I’ve encountered are a result of the tilesetter failing to allow for substrate movement. Typical problem spots are vertical wall planes that intersect with horizontal surfaces, concrete substrates with control joints or random cracks, and the junctures of dissimilar materials. In these situations, a “movement joint” (my term for a broad class of expansion or control joints) should be used. Inside corners should be left free of grout, then caulked after the grout has cured. Use a high-quality silicone caulk, and install a foam backer rod in the open joint before caulking. It’s also important that all “hard” material be cleaned out of an open joint before caulking. Small bits of hardened adhesive or grout can apply point pressures to adjacent wall surfaces, causing cracks as the substrate expands.
When installing tile over a concrete slab, creating movement joints can be a little trickier. One approach is to position an open tile joint directly above any slab joints, install backer rod, and caulk. The trouble with this approach is that the location of this open joint may disrupt a patterned tile layout, or you may be forced to follow a slab joint that is crooked or out of square.
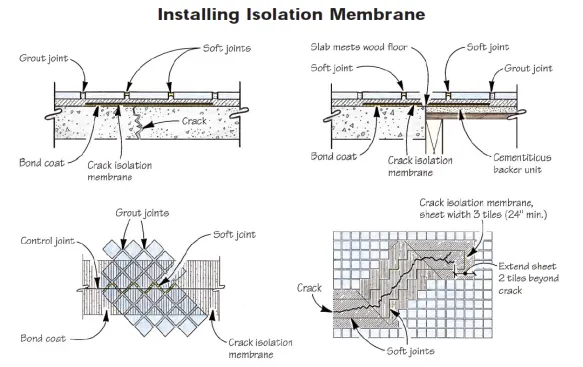
Install an isolation membrane over slab cracks and control joints (top left) and at the juncture of dissimilar materials (top right). Use a movement joint on each side of the crack. In the case of diagonal tiles (bottom left), use a zigzag movement joint. For random cracks (bottom right), movement joints should be located on both sides, following the direction of the crack.
A more adaptable approach is to use a crack isolation membrane like the one manufactured by the Noble Company (614 Monroe St., Grand Haven, MI 49417-0350; 800/878-5788). Although its use will not completely eliminate cracks, the 1/32-inch membrane material isolates the tile from the substrate movement and allows tile movement joints to be located near the slab joint instead of directly over it. The width of the membrane should be three times the tile size, and it should be bonded to the slab using either Noble’s proprietary latex-based adhesive or an acrylic or polymeric modified thinset mortar.
After the membrane is installed, the tile is bedded in thinset adhesive and two movement joints are located on either side of the slab joint (Figure 2). When the slab joint is covered by angled pattern tile, the movement joint is zig-zagged over the slab joint.
This isolation membrane is also ideal for bridging random slab cracks (a difficult item to work into a tile pattern) and joints created when two dissimilar substrates meet. The same ratio of membrane width to tile size applies, and movement joints must be located on either side of the random slab crack.
Unless you’re using a white grout, you may have difficulty finding an off-the-shelf caulk for the movement joint that matches the grout color. Color Caulk (723 W. Mill St., San Bernardino, CA 92410; 909/888-6225) carries an inventory of colored and sanded caulks that will match just about any manufactured grout on the market.
Substrate Deflection
Most contractors understand that a bouncy floor will result in cracked tile. The allowable deflection (or “sag”) for a tile floor system is generally limited to L/360. What many contractors fail to understand is that the L/360 tolerance also applies to the floor areas located between individual joists. Before you start looking for tables that list the deflection of plywood substrates, it would pay to review the Handbook for Ceramic Tile Installation (Tile Council of America, P.O. Box 1787, Clemson, SC 29633; 864/646-8453). According to the Handbook, there is no approved method for installing tiles over joists spaced more than 16 inches on-center. The prudent approach when dealing with wider joist spacing is to install additional joists between the existing ones.
If you install tile on floor systems with joist spacing that exceeds 16 inches on-center, be prepared to shoulder the liability, or get assurance from all involved manufacturers that the system you intend to use will perform adequately (see “Durable Substrates for Thinset Tile,” 8/96).
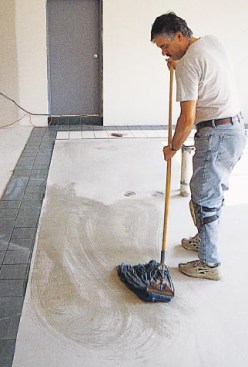
Dirty substrates create poor bonding conditions. Concrete substrates should be wet mopped and plywood substrates damp mopped, with the mop water changed regularly.
Getting Adhesives to Stick
Whether you’re using an organic mastic adhesive or a Portland-cement-based thinset adhesive, there is an important sentence found in the instructions that most builders ignore. It usually reads something like this: “The approved substrate should be free from dust, dirt, oil, and grease.” Bedding tile in a dirty substrate will result in a weakened bond (and in extreme cases, a nonexistent bond), and it sets the stage for cracking when the inadequate bond fails to hold the tiles in place.
Before you reach for the adhesive, all floors should be scraped and thoroughly vacuumed, using a heavy-duty shop vac. Concrete floors should be wet mopped (Figure 3), and plywood substrates damp mopped, changing the mop water as it gets dirty. If you fail to change the mop water, you’ll be creating a homogeneous bond-breaking layer that contributes to, rather then prevents, bonding problems. I’ve had to mop floors as many as four times before the water came up clean.
In most cases, these intense cleaning chores can be avoided by placing a protective covering over the substrate as soon as possible. For a few days’ protection, red rosin paper may be all that’s needed. When long-term protection is needed, I often put down a layer of polyethylene, followed by rosin paper topped with protective tarps.
The Advantage of Additives
Many tilesetters argue that there is no need to add an acrylic latex additive to thinset mortar. Some parts of their argument may have merit, but the overriding reason to use an additive is that it eliminates the need for damp curing (a seven-day affair involving wet tarps and repeated trips to the job site). Some brands of thinset mortar have the acrylic latex additive mixed in at the factory (all you do is add water). If you’re using a brand of thinset mortar that is not latex modified, you’ll need to substitute a liquid latex additive for a portion of the mixing water.
Mixing thinset mortar is another area where contractors often stumble. A new batch of thinset should never be mixed in with a previous mix, and mixing buckets should be emptied and sponged out between mixes. This prevents remnants of a previous mix from “heating up” the fresher batch, causing an accelerated setting time that weakens the bond.
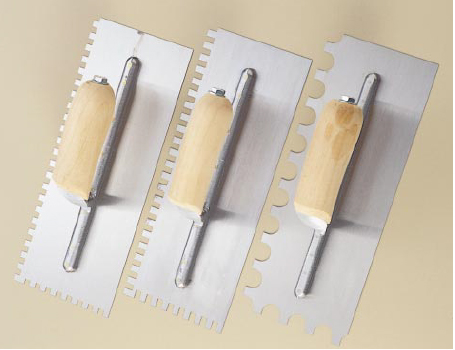
Notched trowels come in many configurations. Shown here, from left, are a 1/4×1/4-inch notch, for tiles up to 6 inches square, a 1/4×3/8-inch notch, for tiles up to 12 inches square, and a 3/4×9/16-inch U-notch, used for irregular handmade tiles.
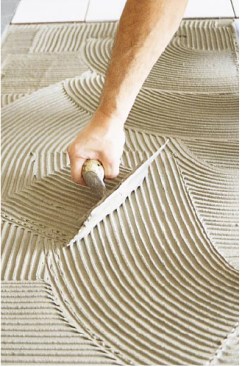
After applying the setting adhesive with the straight edge and bottom of the trowel, the tilesetter combs the setting bed with the trowel held at a 45-degree angle.
Match the Trowel to the Tile
Notched trowels are used to spread tile adhesive, and while there are no hard-and-fast rules when choosing notch configurations, there are some guidelines. For standard wall and floor tile up to 6 inches square, a 1/4×1/4-inch notch configuration is recommended. For tiles up to 12 inches square, a 1/4×3/8-inch configuration will work.
Keep in mind that tile size is not the only factor to consider when choosing a trowel. Hand-formed tiles are often irregular, and will require a deeper notch (I’ve used a 3/4×9/16-inch U-notch trowel to set handmade Mexican pavers). When in doubt, choose a larger notch size. You may use a little more setting material, but your chances of avoiding a starved mortar bed (and thus poorly bonded tile) are better.
When setting tile 12 inches square (or larger), I’m careful to comb the setting bed in a single direction. This provides a clear path for air to escape as the tile is pushed down into the setting bed. When combing the setting bed, hold the trowel at a 45-degree angle.
One last note on trowel technique: Before laying down the full setting bed, a thin layer of adhesive should be worked into the substrate using the straight edge of the trowel, with ample pressure to work the adhesive into cracks and voids.
Grouting Tips
If you’ve ever wondered whether you should use a latex additive when mixing grout, stop wondering: A latex additive should always be used. Latex increases bonding strength and water resistance, improves color retention, produces denser grout joints, increases stain resistance, and eliminates the need to damp cure. About the only downside to using a latex additive is that when it’s used with an absorptive tile (cement-bodied tile, for example), the additive makes it more difficult to clean the residual grout haze. You may need to apply a grout-release product to prevent the grout from getting a “bite” on the surface of the tile.
Always follow the recommended powder-to-liquid ratios when mixing grout. The latex additives create a mix that is much more sensitive to variations in water content, and tilesetters must be careful when adjusting the “feel” of the mix. Too much liquid results in a weak grout that is more porous when it dries, while a mix that is too dry will have trouble bonding to the sides of the tile and may not cure properly, resulting in powdery joints.
Grout containers carry instructions recommending that freshly mixed grout be allowed to “slake” for 10 to 15 minutes before remixing and applying. Slaking provides time for the powdered portion of the mix to absorb and react with the newly introduced liquid. Impatient tilesetters who bypass this step will be working with inconsistent grout, and face the prospect of explaining to a customer why spot defects have occurred in the grout joints.
Colored grouts raise the level of difficulty by introducing a color consistency issue. Maintaining the same color throughout numerous mixes can be challenging. The first line of defense against mismatched batches is to empty all the bags of powdered mix into a common container and thoroughly mix them together while dry. This will defuse any color variations on the manufacturer’s side. The next step is to carefully measure out the liquid-to-powder ratio and scrupulously follow the same measuring method every time a batch is mixed.
Finally, make sure that all the peripheral conditions are the same for each mix. If mixing by hand, count the number of strokes. If you’re using a paddle mixer attached to a drill, note the run time of the drill. If the first mix is slaked in the shade, make sure all remaining mixes are slaked under the same conditions. Spread the same amount of grout over the tile each time and be careful not to let any errant water drip on the grout joints (as from a wet sponge, for example. The edge of the rubber grout trowel should be used to remove excess grout, not a wet sponge.) The color consistency may look fine as you’re working, but water-induced color variations can show up a week or more later.
Premature Traffic
No matter how careful you are with a tile installation, premature traffic can instantly create problems, often causing the grout to crack and come loose. Many mortar manufacturers offer an accelerated setting system that will match a required “in use” deadline. Generally, the quicker you need to get on the floor, the more expensive the setting material. Before making any promises to your customer, check with your supplier to be certain the product will perform to your customer’s expectations. Remember, the penalty for inferior tile work may no longer be death, but it can kill your reputation.


