In many states, the statute of limitations is 10 years for construction and design defects. Can the design or construction practice you are using last this length of time without a problem?
Callbacks typically result from three things: poor design, faulty construction, or the actions of a clueless homeowner. While this is true everywhere, coastal environments are a whole lot less forgiving of errors. Wind-driven rain, combined with longer periods of wetting and shorter periods when materials can dry, means moisture gets driven deeper into building cavities and the materials stay wet longer. The result is a much higher incidence of moisture-related problems.
In my work for home builders, I walk a lot of sites, looking for potential problems and explaining the best practices that will fend off an expensive callback. Usually my job includes addressing a company’s construction managers — and sometimes the entire crew or invited trade partners — explaining the problems and advising what to do to avoid them. It’s critical that this information gets to everyone, because a home is only as good as the knowledge and attention of your worst sub or employee.
Over the years, I’ve seen the same mistakes made over and over again. Here is a collection of some frequent blunders on exterior details, with a few simple solutions that will help fend off moisture problems.
Drainless Designs
Designers love intersecting roof planes, but the intersections must be capable of handling a tremendous amount of water: a 1-inch rain on a 2,000-square-foot roof will deposit about 1,250 gallons of water. If that water is obstructed by any intersecting roof, wall, dormer, or eaves detail, and thus does not have a clear path to drain away, that water will back up and probably find its way inside the home.
1
of 5
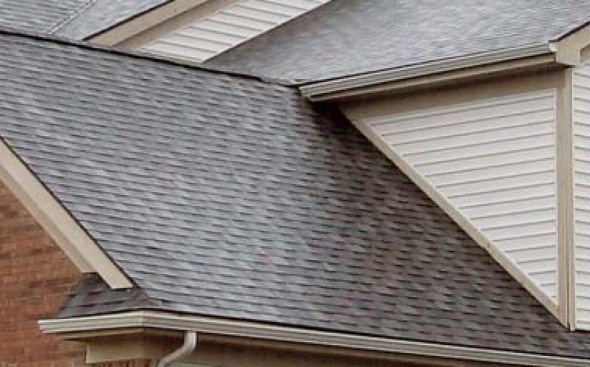
Ridge intersecting eaves. The problem with this design is that a…
Ridge intersecting eaves. The problem with this design is that all the water that runs off the higher roof is collected into the gutter. Note that there is no downspout, so all the water that runs off the higher roof runs toward the poorly flashed ridge cap of the intersecting roof. The solution is to drop the ridge so the eaves and the gutter of the higher roof can run uninterrupted above the lower roof ridge. And, of course, pitch the upper gutter to a downspout at the corner.
Whenever a valley runs into a horizontal plane, the water flowin…
Whenever a valley runs into a horizontal plane, the water flowing down that valley will become trapped. If there’s enough water at one time (or it turns to snow), it’s likely to back up under the shingles and flashing. A whole series of horizontal valleys has been created between these condo units.
Such poor-draining roofs means the builder is more likely to fac…
Such poor-draining roofs means the builder is more likely to face a lawsuit from the homeowner’s association. Another common mistake is a roof sloping into a vertical wall, creating a horizontal valley condition that leads to leaks.
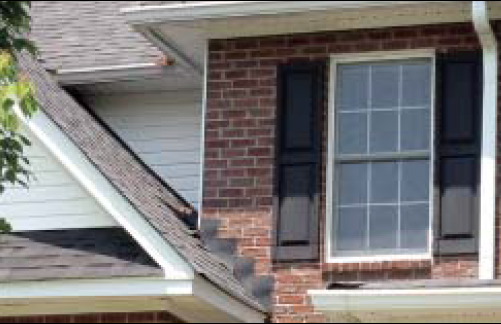
Poorly conceived roof intersections. Wherever two roofs of diffe…
Poorly conceived roof intersections. Wherever two roofs of different pitches intersect, it’s important to detail the intersection so that water can shed away from the structure. In this example, there’s no way for water to drain off the lower roof (in the foreground) without getting funneled into the wall, where the eaves of the second roof blocks its way.
Design solution. Here’s one example of how to detail intersect…
Design solution. Here’s one example of how to detail intersecting roofs to
avoid a horizontal valley. By keeping the gable ends on different planes, the valley is allowed to run unbroken, so water can drain away freely.
Reverse Shingling
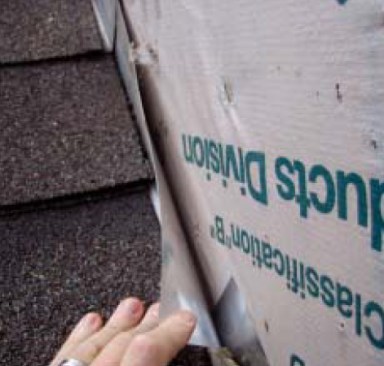
Treat your walls just like roofs. Few builders would ever install roof shingles without an underlayment or flashing, and they would never lap the bottom shingles over the courses above. In the same way, walls should always be covered by a secondary moisture barrier, and that layer should be installed “shingle fashion” so the upper layers overlap the lower layers. Too often, however, layers of flashing and housewrap are “reverse shingled.”
1
of 3
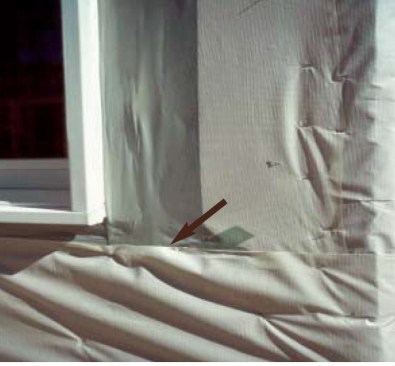
Reverse-shingled housewrap. If you follow the arrow above, you c…
Reverse-shingled housewrap. If you follow the arrow above, you can see that the secondary moisture barrier is reversed-shingled — the bottom layer overlaps the top layer, which means that any water that gets in behind the cladding can easily be funneled into the wall rather than draining away from it. When wrapping a wall, always start at the bottom so each successive layer overlays the layer below.
Reverse-shingled step flashing. Each piece of step flashing show…
Reverse-shingled step flashing. Each piece of step flashing shown in these two cases is applied over the one below it, which is correct. But they are all applied over the housewrap. Best practice calls for installing the step flashing over the wall sheathing, followed by a piece of flexible peel-and-stick flashing over this, so that the sheathing itself functions as a tertiary moisture barrier.
Housewrap — the secondary barrier — should overlap the peel-…
Housewrap — the secondary barrier — should overlap the peel-and-stick, and then cladding — the primary defense — would overlap the housewrap. The wall in this photo photo has the added problem that water has a chance to become trapped where the roof meets the brick veneer — an example of the drainless design described previously.
Wall Flashing Woes
After a heavy rain you can learn a lot about moisture flow by looking at the rain patterns on cladding materials. The tremendous moisture load visible after a heavy rain underscores the need to flash these heavily loaded intersections carefully. Some of the biggest moisture loads are where walls and roofs intersect.
1
of 4
The concentrated water flowing off a sloped roof can soak side w…
The concentrated water flowing off a sloped roof can soak side walls, concentrating the moisture load right at vulnerable window headers (not a great design).
The solution is to divert the water away from the wall using kic…
The solution is to divert the water away from the wall using kickouts — small pieces of sheet metal placed at the end of the step flashing and sealed to the wall and roof sheathings with some peel-andstick flexible flashing.
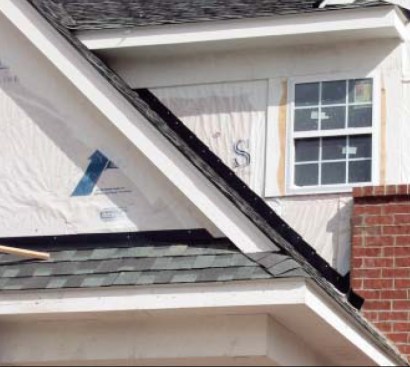
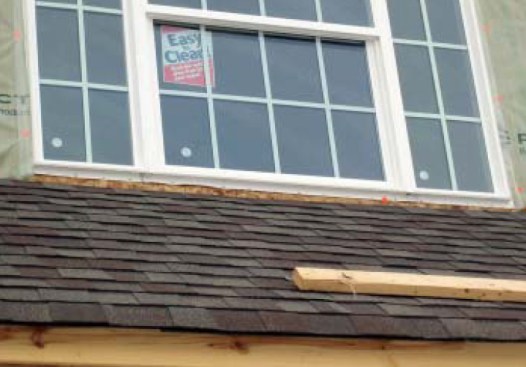
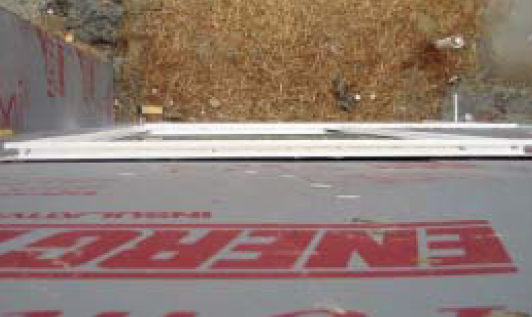
On this dormer below, step flashing should be installed undernea…
On this dormer below, step flashing should be installed underneath the shingles on the roof and underneath a waterresistive barrier on the wall of any sloped roof that intersects a wall.
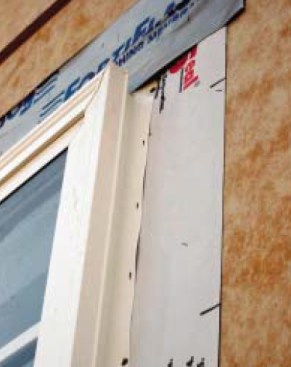
This window at right has neither sill flashing underneath the wi…
This window at right has neither sill flashing underneath the windowsill (to direct water that leaks through the window to the exterior) nor step flashing underneath the roofing shingles where it intersects the wall (to protect against splashback).
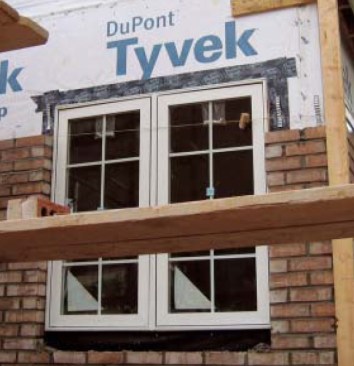
Wrong WRB Details
All claddings leak, and the more wind pressure you have, the more water leaks in. Rather than attempt to fight this fact using caulk to try to make the cladding watertight, the best strategy is to design the wall system to drain quickly and freely. This is accomplished with a well-detailed water-resistive barrier (WRB) that provides a second line of defense. The guiding principle for detailing this barrier is to make sure that water flowing across it always travels down and away from the building.
1
of 10
Like all cladding, vinyl siding leaks. By design, it is made wit…
Like all cladding, vinyl siding leaks. By design, it is made with weep holes to allow for drainage, but it needs a good drainage plane behind it to protect the wall. In this example, the secondary moisture barrier is doing its job, shedding enough water that wet spots are clearly visible underneath the vinyl siding.
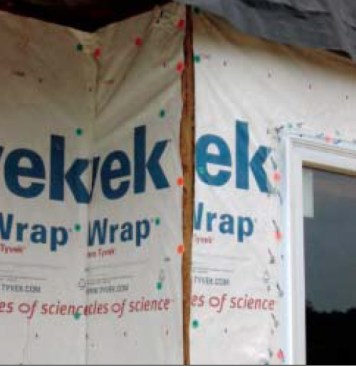
Incomplete coverage. Water-resistive barriers must be installed …
Incomplete coverage. Water-resistive barriers must be installed correctly. The rips and gaps in the WRB shown here will allow any water blowing through to leak into the wall at the corners. The housewrap should be overlapped approximately 12 inches at the corners and sealed with an acrylicbacked tape. Note that the tape used for the window flashing is not an approved flashing material. It will probably fail as a result of differential movement.
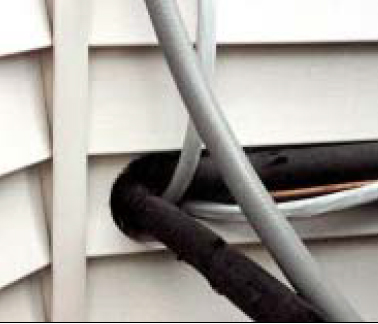
Unprotected wall penetrations. It takes only minutes for wall co…
Unprotected wall penetrations. It takes only minutes for wall components to get wet, but it takes days weeks or months for them to dry out. If the wetting rate exceeds the drying rate of building materials, mold and decay can occur. Notice that there is no flashing around the air conditioner line set and electrical wires coming through the wall.
It would be very easy for water to run down the wires and flow d…
It would be very easy for water to run down the wires and flow directly into the opening. The proper way to handle this penetration is to use a flashing boot that is tightly sealed with an acrylic-based tape or flashing materials.
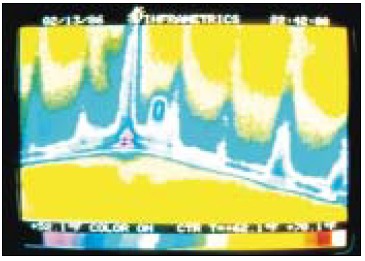
How to grow mold. This thermograph looks at the corner of the ho…
How to grow mold. This thermograph looks at the corner of the house from the inside. The fan of a blower door is depressurizing the house (sucking air out the door), so cold outdoor air is being drawn in through cracks in the exterior wall. The blue areas show where cold air is infiltrating underneath the wall plate and around an electrical outlet. This cold air will reduce the surface temperatures, thereby increasing the surface relative humidity and the chance for mold growth. The cure includes a breathable exterior housewrap with the seams taped as well as sill seal and other air-sealing measures — all elements of a good air-barrier system.
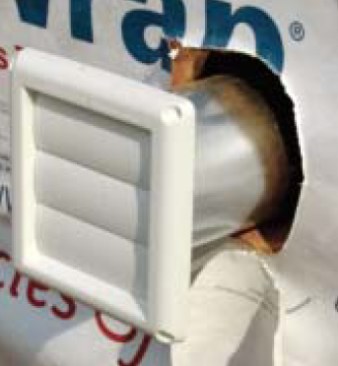
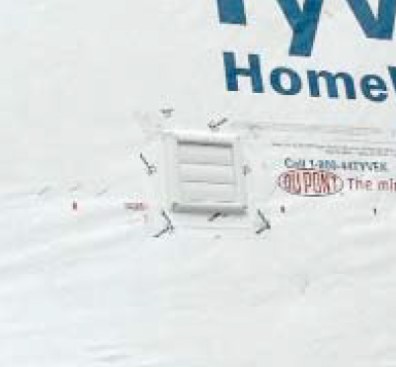
Unsealed wall penetration. Cutting a large round hole in the hou…
Unsealed wall penetration. Cutting a large round hole in the housewrap defeats its purpose.
The solution is to X-cut the housewrap, then slide the vent thro…
The solution is to X-cut the housewrap, then slide the vent through the X-cut and seal around the pipe with an acrylic tape before securing the face plate.
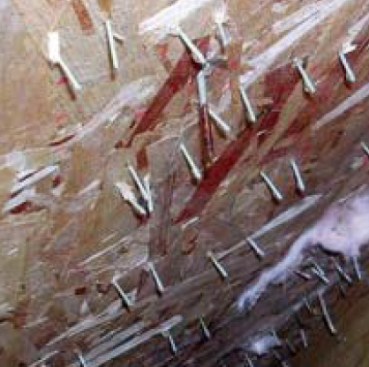
Every staple through the water-resistive barrier is a potential …
Every staple through the water-resistive barrier is a potential water leak, so don’t get trigger happy, as this installer did.
In this case, water can actually be seen dripping off the ends o…
In this case, water can actually be seen dripping off the ends of the staples inside the wall cavities. Best practice calls for a staple or cap nail every 12 to 18 inches along the vertical stud.
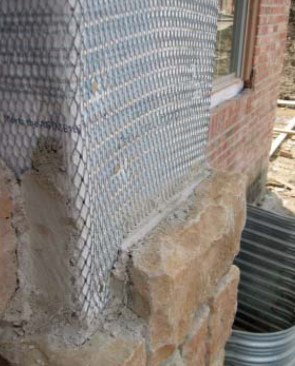
No capillary break. Synthetic stone creates a unique challenge: …
No capillary break. Synthetic stone creates a unique challenge: Unlike brick veneer, which is built in front of an air space, synthetic stone is buttered right to the wall and has no air space to promote drainage. Use two layers of housewrap before installing the lath. The outer layer protects the inner layer from bonding to the mortar holding the stone in place, which allows the inner layer to function as the drainage plane. The natural separation between the layers provides a capillary break to reduce the chance for water wicking through.
Poor Window and Door Flashing
While peel-and-stick flashing has become fairly popular, there is still enormous confusion in the field about the correct way to apply it around windows and doors. The biggest problems involve the flashing sequence. The sill of any opening must be flashed before the window or door unit is installed. Then install the window using a compatible sealant, apply jamb flashings, and finally, add a head flashing.
1
of 5
Improper head flashing. The head flashing on this window is reve…
Improper head flashing. The head flashing on this window is reverselapped with the housewrap. Before applying the head flashing, a flap needs to be cut in the housewrap so the head flashing can adhere directly to the wall sheathing and cover the nail fin. Once the flap is folded back down over the head flashing, water draining down the wall above the window will drain outside, not behind the head flashing.
How a window looks to a water drop. This is what water running d…
How a window looks to a water drop. This is what water running down a wall “sees” as it approaches the head of the window, underscoring how very important it is to properly flash at the window head. Sealant alone won’t keep the water out. If the sealant ever separates and fails, you would have a perfect entry point for water to invade the structure.
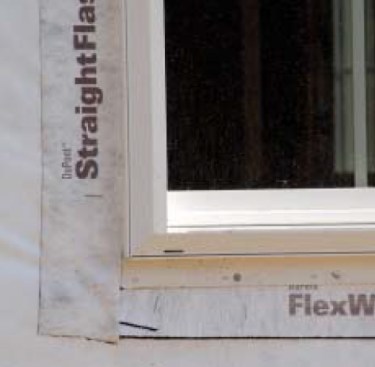
Proper window flashing. The sequence of flashing a window is cri…
Proper window flashing. The sequence of flashing a window is critical. Begin with a sill flashing that covers the rough sill and has a bottom flap that laps over the top of the housewrap as shown. This will ensure that any water that leaks through the window drains out. The jamb flashing should go on after the window has been installed, and should lap over the window flange to prevent wind-driven water from getting past the window into the rough opening.
Why “splines” don’t work. Applying jamb flashing before th…
Why “splines” don’t work. Applying jamb flashing before the window is installed meets the requirements of “Method B” of the ASTM window and door installation standard, but in my opinion it’s not the best way to flash a window. You can still end up with small gaps between the nail fin and the flashing as in this instance, which allow water to penetrate.
Improper sill flashing. Notice that the black sill flashing is s…
Improper sill flashing. Notice that the black sill flashing is stuck to the housewrap and then stuck over the top of the nail fin below the window. This is a mistake. The sill flashing always goes on before the window is installed.
Site Problems
Along with roof details, poor site drainage can dump an enormous quantity of water into homes. Builders can best prevent problems by first siting and grading to keeping runoff away from the home, and then by installing good perimeter drainage to carry groundwater away. But the homeowner must remain conscious of these issues as well.
1
of 3
Dreadful drainage. In this coastal subdivision, water running of…
Dreadful drainage. In this coastal subdivision, water running off one series of houses drains right into another. There is not enough natural drainage away from the lower structures to prevent subslab moisture.
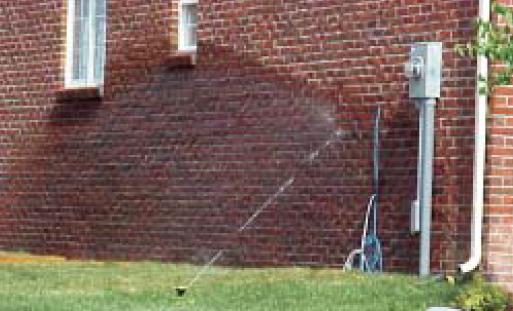
The homeowner factor. Imagine the force of this sprinkler and th…
The homeowner factor. Imagine the force of this sprinkler and the amount of water that is pouring into this wall. This is a perfect example of why redundancy is so important. The only way to avoid problems caused by the homeowner irrigating this wall is to make sure a WRB behind the brick is impeccably detailed, the drainage cavity and weep holes remain open, well-draining backfill is put in, and good perimeter drainage is installed.
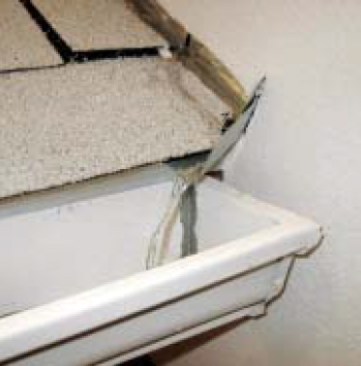
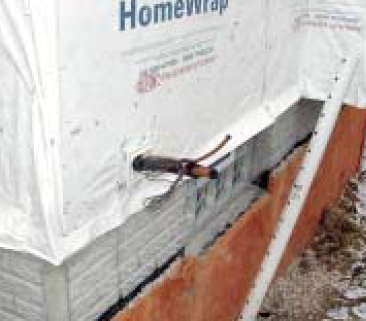
Maintaining drainage. When I inspect a home for moisture problem…
Maintaining drainage. When I inspect a home for moisture problems, I look for signs of lack of maintenance. For example, here the downspout is disconnected from the leader, so all the water that runs off the roof is being funneled near the foundation. This can create a tremendous moisture load on the home.
Steve Easley is principal of Steve Easley Associates, a company based in Scottsdale, Ariz., that provides building-science consulting, training, and quality assurance for builders nationwide.