by Ted Cushman
Using specially designed sets of removable aluminum forms, crews for Security Building Group can form and pour houses on the beach a story at a time, including the walls and floor slab.
Tougher coastal building codes have led stick builders to beef up structures using engineered lumber, structural wood panels, enhanced fastening schedules, and heavy-duty hold-down and connector hardware.
But there’s a limit to what you can accomplish using wood. If you want to resist the roughest stuff a hurricane can throw at you, it’s hard to beat reinforced concrete. Hurricane Katrina gave dramatic proof of that: 350 feet inland from the shore in Pass Christian, Miss., a partially completed concrete house on poured-concrete piers, owned and built by structural engineer Scott Sundberg, was the only building left standing after the storm surge scoured the surrounding area clear of buildings (Figure 1).
FIGURE 1. This poured-concrete house in Pass Christian, Miss., survived the storm surge of Hurricane Katrina while all the other homes in the surrounding area, built of wood, were swept away. The lesson has prompted some home buyers on the Mississippi coast to opt for elevated concrete houses, despite the higher cost of construction.
“That Sundberg house is a tribute to the strength of concrete construction,” says Dave Pfanmiller, who runs Security Building Group (www.securitybuildinggroup.com), a Gulfport, Miss., custom-home-building company. And it’s not the only example. “Up and down the Mississippi coast, the only structures left standing after the storm were the reinforced concrete ones,” says Pfanmiller. “Steel frame structures were twisted and bent, and of course the wood structures were simply gone.”
Pfanmiller’s company builds concrete homes that, like the Sundberg residence, can take the winds and storm surge of a major hurricane and remain structurally sound. His secret is an aluminum concrete forming system (Figure 2). His homes have 4-inch-thick steel-reinforced concrete walls and 6-inch-thick floor slabs. There are a half-dozen of his concrete houses in the Gulfport area, and more on the drawing board.
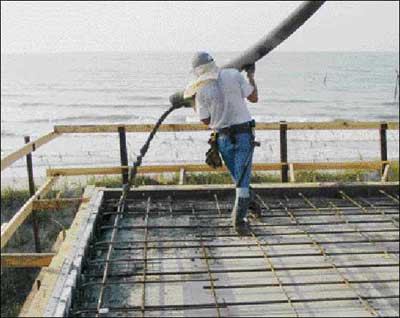
FIGURE 2. After the first elevated slab is set, crews can add as many as three more occupied stories in successive monolithic pours using the Wall Ties aluminum form system (top). Note the foam insulation (still exposed at this stage), which is placed against exterior forms before the pour and remains in place after forms are stripped. Pitched roofs are framed as a wood truss structure, on top of the main flat-topped concrete box (bottom).
The forms Pfanmiller uses are made by Kansas City-based Wall Ties and Forms, Inc. (www.wallties.com). While similar in concept to standard concrete forms, these are a bit more sophisticated. For one thing, the Wall Ties system lets the builder integrate 2-inch-thick, R-10 rigid foam insulation into the exterior walls, either on the outside face or in the center of the wall mass. It also includes a set of accessories for forming up a supported floor deck at the same time as the exterior walls and interior partitions. An entire story can be poured in one shot, complete with wiring conduit, window and door openings, and penetrations for mechanical systems.
Pfanmiller can build as many as three occupied stories above the open ground level, in a process that takes five to seven days per story, including setting the forms, pouring the concrete, and giving it time to cure.
The cost to the customer is 15% or 20% more than an equivalent-size wood-framed house. “I’ll be honest with you, it takes a special kind of buyer, because they’re going to pay a premium,” admits Pfanmiller. “You need a buyer who appreciates the staying power of the structure and values the reduced insurance and the energy savings.”
Pfanmiller hasn’t had trouble finding those buyers in the custom-home niche, but he believes there could be a wider market for concrete homes among production builders, who can use labor efficiencies to reduce costs. As an example he points to Mexico, where thousands of units of basic, affordable workforce housing have been built in recent years using Wall Ties forms exactly like the ones he owns.
A Custom Blend
For the custom market, Pfanmiller has worked with his friend Curt Fields of Tri-City Contractors in Raleigh, N.C., to come up with an approach that is flexible enough to build one-off home designs. Their solution blends simple methods from the basement wall industry with production techniques used in commercial concrete construction.
The deep foundation pilings, for example, are usually made with driven pressure-treated wood, because it’s easy to find local contractors to do that work. Once the pilings are driven, Pfanmiller’s own crew builds the wooden forms and ties the steel rebar cages for a grid of poured-concrete grade beams — again, a typical residential foundation technique (Figure 3).
FIGURE 3. The elevated foundation employs a mix of commercial and residential methods. Grade beams are formed with wood, and reinforced with rebar as specified by the project engineer (top left). Vertical rebar is placed for connecting the grade beams to columns. After the beams are poured, reinforced columns are formed and poured using conventional basement wall forms. A rented commercial shoring system is set up to support the first-floor elevated slab (top right), and crews form the slab with plywood (middle). Then floor insulation, rebar, conduit, and blockouts for floor penetrations are placed, and the concrete is delivered (bottom).
The piers (or “columns”) that will elevate the home’s first-floor deck are formed on top of the grade beams. The first-floor deck is then formed with plywood supported by rented shoring equipment. Slab shoring includes all the adjustable screw jacks, steel beams, brackets, and braces needed to temporarily support the plywood formwork and the freshly placed concrete until the reinforced slab has had time to set. Shoring is a commercial construction technique, but there are shoring suppliers in most local markets.
For the occupied stories above the first elevated slab — the “housing lifts” — Pfanmiller relies on the Wall Ties system.
Housing Lifts
Pfanmiller and Fields were among the first contractors to use Wall Ties aluminum forms. “I think we have the second set of housing panels that Wall Ties built,” says Pfanmiller. The system uses 2-foot-wide rugged wall panels with extra reinforcement to eliminate the bowing (or “pillowcasing”) that conventional basement forms typically experience with repeated use and wear. “Our forms give us a smooth, flat wall that we don’t have to mess with during finish work,” explains Pfanmiller.
To form up a story, the crew first sets the forms for exterior walls (Figure 4). They apply a 2-inch-thick layer of rigid foam insulation to the inner face of the forms, as well as special spreader ties that hold the foam tightly in place. The crew then cuts out the door and window openings, and screws treated-wood window and door bucks, or blockouts, to the exterior forms. (Additional screws are set into the sides of the blockouts, so that when concrete is placed, the screws will lock the wood framing to the concrete wall.) Rebar is placed and tied next and the plastic wiring conduit and electrical boxes are installed. Finally, the interior wall forms are erected.
FIGURE 4. Workers start to form walls (far left) for a “housing lift” pour. Note the exterior wall forms, foam insulation, form spreaders, rebar, and door blockout. The spreaders lock inside and outside wall forms (left) together and hold foam tight against the outside face. Plastic nailer strips are locked into a slot routed into the foam.
The interior and exterior forms are set 6 inches apart, so the result is a 4-inch-thick concrete wall, with 2 inches of insulation on the exterior of the building.
Interior partition walls are formed the same way, but the forms are set only 4 inches apart and no insulation is added.
Once the walls are in place, the crews install the accessory pieces that form the transition from the vertical wall to the horizontal floor, and that support the floor (Figure 5). These include:
• Interior ledger forms. These come either square-cornered, or profiled to create an integral crown molding. They are attached to the inside top of the wall form with special hammered-on “slide clips.” They also support the edges of the horizontal ceiling forms.
• Exterior cap forms. These are wider than the interior ledgers, and are used to form the edges of the 6-inch-thick ceiling slab.
• Floor slab forms. Slab forms are 3 feet wide, and come in lengths of 4 feet, 5 feet, or 6 feet, which can be combined along with the beam supports to create rooms of different sizes.
• Shoring beams. These are designed to support the slab forming system and are supplied in three widths — 4 inches, 6 inches, or 8 inches — in order to allow for a range of room dimensions.
Figure 5. Special ledger cap forms are clipped to the top of the inside wall forms (above). Shoring beams of various lengths and widths integrate with the slab forms to allow for a range of floor sizes (left). Crews set slab form panels to span between the ledger forms and the shoring beams (below), creating the form system for a monolithic wall-and-slab pour.
After the forming system has been set and leveled, the second-floor slab is equipped with the steel reinforcement, as well as with conduit for wiring and blockouts for openings and penetrations (Figure 6). As with the first-floor slab and the walls, this process takes time and care. “It requires a lot of planning,” says Pfanmiller. “So often in residential construction you’ve got a sketchy set of plans, and a lot of the mechanical stuff gets figured out on the fly. But with this system we have to know where the outlets, the plumbing, and the heat runs are going to be before we get started.”
Figure 6. Prepping the slab formwork is laborious and exacting. Wiring conduit has to be carefully positioned within the dense mat of heavy rebar (left). The treated-wood blockout for an air-duct register has screws in the back to lock it to the slab, and is chamfered at the bottom so that the exposed-wood edge will be narrow enough for the grille flange to cover. Plywood caps on the wood blockouts raise them to a good height for use in guiding the screeds used to strike off the fresh concrete slab.
When the pour finally happens, it goes fast — and Pfanmiller says that the concrete supplier needs to be prepared to keep the concrete flowing without interruption. “We absolutely don’t want a cold joint in a wall,” he explains. (A cold joint occurs when concrete in a form starts to set and harden before the next lift of concrete is placed next to it, creating what could be a critical weak spot.) “This can be a challenge with some ready-mix companies, because when we order 50 yards we want five 10-yard trucks in the street before we start the pour. Some of them are used to sending you two or three trucks, and then cycling back the first two, but we can unload 10 yards of concrete in 15 minutes, so we can’t wait for those trucks to cycle back.”
There’s an upside to this for the supplier. “It’s also our selling point for the ready-mix people and the pump people. We tell them that if we have a pour of 50 yards — five 10-yard trucks — scheduled for 8:00 in the morning, we will have the five trucks and the pump off the job by 9:00.”
After the first housing lift is poured and has set, the forms can be stripped and stacked on the deck, and forming can start for the next story. The exterior cap forms from the first story, however, are left in place; these serve as the base for installing the next story’s exterior wall forms. Other than that, forming and pouring a second or third occupied story is just a repetition of the first-story phase.
Roofs
Security Building Group likes to pour the uppermost ceiling of its top story as a flat horizontal slab. That makes the home’s concrete shell a flat-topped box. If the design calls for a pitched roof, Pfanmiller attaches wood trusses to the top of the box (Figure 7). “The roof is just a wood-framed architectural feature that’s securely bolted down to our concrete box,” he explains. The trusses allow the house to shed rainwater and may also house ductwork or HVAC equipment. But they aren’t really part of the home’s structural shell, and unlike in a wood-frame building, the loss of the roof in an extreme hurricane event would not necessarily lead to the loss of the rest of the home’s structural integrity — or even to extensive water damage of interior finishes and contents.
Figure 7. Pitched truss roofs for the concrete houses are set on treated-wood beams anchored to the flat top of the concrete box. Mechanicals can be installed in the attic if need be, and attic floors can receive deep blown fiber insulation for an air-tight, highly insulated lid. Damage to the roof structure during a severe windstorm does not compromise the structural integrity of the rest of the building.
Not every customer wants the full measure of physical security that comes with the concrete lid. Says Pfanmiller, “We have done several custom concrete houses where the owners have opted for architectural reasons to open up the ceiling for a vault. It comes down to personal preference.”
Finish Work
Once the concrete shell has been poured and the roof bolted on, there’s still a lot to do. Interior wall surfaces are typically skim-coated with plaster or drywall compound (Figure 8). Pfanmiller doesn’t like to furr out and hang drywall because the energy benefit of the thermal mass of concrete walls is optimized when the concrete is in direct contact with the occupied space. Despite the wall insulation’s relatively modest R-10 rating, Pfanmiller says that the air-tightness of the concrete envelope combined with the heat-cycling effect of the massive walls and floors has earned the Energy Star label for many of his homes.
FIGURE 8. Red-iron beams (top) allow the creation of larger open spaces inside the houses. Wood-framed chases (above) can be used for architectural detail and to hide steel or ductwork. Plaster or drywall compound (left) applied directly to the concrete walls leaves the thermal mass of the concrete in contact with the occupied space.
Trimwork can be glued to concrete surfaces, or installed with drilled or powder-driven fasteners. Interior architectural features such as dropped soffits are often used to conceal ductwork; they’re framed with wood and fastened to the concrete wall or ceiling with Tapcon fasteners (www.tapcon.com). Wood framing is also used for stair chases and to box out the steel beams used to increase the floor span of the reinforced slab.
Exterior cladding can be any common material. Plastic nailers embedded in the rigid foam insulation hold screws just as well for wood, vinyl, or fiber-cement siding. Steel stucco mesh can be screwed to the same embedded plastic and the wall topped with stucco.
When finished, Pfanmiller’s concrete houses don’t look much, if any, different from a wood-framed structure — unless, of course, that particular beach takes a direct hit from a powerful hurricane. If that happens, the difference will definitely be noticeable. ~
Ted Cushman covers the home building and remodeling industry from his base in the Berkshire Hills of Massachusetts. Photos by Dave Pfanmiller/Security Building Group unless otherwise noted.


