by Richard Reynolds
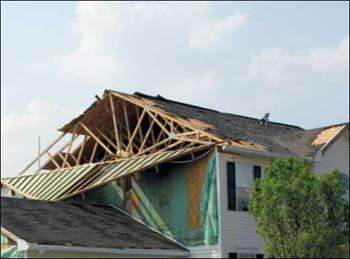
Negative pressure from hurricane-force winds pulled the top of the gable end outward after it ripped off the sheathing at the edge of the roof. The retrofit measures briefly described in this article can dramatically reduce the risk of such an occurrence.
Observations made in the aftermath of Category 3 and stronger hurricanes have clearly illustrated the vulnerability of gable ends. Failure comes in three varieties: The most common gable-end failure is one where the wall loses support along its top edge — typically because the sheathing gets blown off. The second most common failure is at the connection between the triangular gable-end wall and the rectangular wall below it. In this scenario, the wall gets pulled out by the negative pressure of the wind. The third potential failure is collapse of the actual framing members that make up the gable-end wall structure as a result of bending stresses from positive wind pressures. In any case, the damage is usually disastrous to the home and its contents. Not only is the structural damage severe, but a collapse of the gable-end opens the house to wind-driven rain, which can condemn a home to catastrophic damage.
In Florida, the vulnerabilities of gable ends have been recognized as so significant that the legislature mandated that the Florida Building Commission adopt voluntary methods for retrofitting gable ends of homes into its prescriptive building code. The code is available online from the Florida Department of Community Affairs (www.floridabuilding.org/
c/default.aspx). But much more helpful than the language in the code is a detailed, 78-page description of these prescriptive gable-end retrofits offered in the state of Florida’s online Hurricane Retrofit Guide (see “Retrofit Resource,”).
The Weakness of Gable Ends
A couple of decades ago, not much was typically done to secure gable-end trusses. Hurricanes were infrequent, and the strength of negative pressures and their prevalence were not commonly recognized. At most, the gable end might have gotten a few toe-nails, perhaps an occasional strap or diagonal brace. That leaves some deadwood for the drywall, and maybe a few rat runs and the wall sheathing for strength. But these measures prove insufficient in a high-wind event, where negative pressures are the most likely forces to pull apart such an underbuilt wall.
As a hurricane advances, the winds swirl around the eye of the storm, and a home near the track of a storm will see strong winds from a wide range of directions. If the eye passes over a home, it will be subjected to winds approximately half the time from one direction and half the time from the opposite direction. So at any given time, the windward face of a structure will experience positive pressures (pushing) while the leeward face will experience negative pressures (pulling). The negative pressures are actually about 20% higher, thanks to the aerodynamics of wind rising over and moving around the building.
The parts of gable ends less than 3 feet high are generally short enough to resist the bending stresses imposed by the push and pull of the wind. But members 3 feet or longer are subject to bending, and trusses are typically more vulnerable than stick-framed gable ends. The studs in a conventionally framed gable end are oriented perpendicular to the face of the wall, providing maximum strength in bending. In essence, each stud acts as a 3 1/2-inch-deep beam to the wind. The web members in a gable-end truss, however, are oriented flat against the wall, providing a beam depth of only 1 1/2 inches. In fact, the 3 1/2-inch-deep orientation is about 13 times stronger than the 1 1/2, assuming the lumber used for both have similar specific gravities. But while the studs of a conventionally framed gable end may be stronger, the ends of those studs still may not be well enough connected to the rest of the structure. Consequently, the retrofit process for reinforcing a gable end must not only brace the framing members but must also strengthen the connections.
Once the gable end goes, it can unzip a house, not only devastating the structure but also ruining the entire contents of a home, which become saturated with water.
Strengthening and Bracing a Gable-End Truss Each stud in a gable-end truss gets this basic retrofit assembly: Horizontal braces (each about 6 feet long) are first attached to the top and bottom chords of the roof, and then a retrofit stud is installed perpendicular to the gable-end truss. The L-straps must be preinstalled at the end of each retrofit stud before the stud gets secured to the horizontal braces.
Overview of the Retrofit Process
Retrofitting gable ends entails five distinct tasks. Three of these tasks strengthen and brace the gable end. The fourth connects the strengthened gable end to the rectangular wall below, while the fifth task aims at a better connection between the roof decking and the gable-end framing members and attempts to minimize the vulnerability of the overhang.
Tasks 1-3: Strengthening and bracing the gable end. There are a couple different methods that have been worked out for securing retrofit studs. The drawing (above) illustrates the basic procedures involved for the “L-strap method,” and the photo (left) shows the finished product.
The first step is to install 2×4 braces, called horizontal braces, which butt up against existing gable-end studs. These must extend at least 6 feet into the attic and be placed at each gable-end stud (typically every 24 inches). Horizontal braces distribute the wind loads on the gable-end wall to the ceiling and the roof diaphragms. Distributing the load over a large area like this avoids local failures of roof decking and of ceiling drywall or plaster.
The next step is to install an additional stud, called a retrofit stud, beside each existing gable-end stud that is more than 3 feet long. This supplemental stud, oriented perpendicular to the gable-end wall, provides the beam necessary to resist bending stressing.
The retrofit studs must be connected to the ceiling and roof diaphragms via the horizontal braces. The transfer of force is accomplished by the use of straps, and perhaps with compression blocks, depending on the retrofit method selected. See table (below) for specific sizing and spacing of all the elements needed for the retrofit assembly, including strap sizes.
The goal of these tasks is to render the gable-end wall, attic floor, and roof structure as one “unitized” assembly. Retrofitting a gable-end like this will make it about as strong as one built to today’s building codes, and the cost of materials will be only about $300 for a 30-foot-wide gable end. Wider gable ends will cost disproportionately more but are still reasonable.
Task 4: Strengthening the wall-to-wall connection. The fourth task connects the gable-end wall to the rectangular wall below. Based on hurricane experience and observation of gable ends of older homes, it is assumed that the lower wall is not well enough connected to the gable-end wall, and that the upper part of the lower wall is apt to get pushed in or (more likely) pulled out by wind forces. This connection can be strengthened by installing straps, brackets, or screws between the walls. The particular connection method depends on the construction of the two walls. Generally, making a good connection is relatively easy once one decides on the appropriate method. A table (not included here, but available on the Web site) indicates the spacing of the connections that again are based on exposure and wind speed. Connections cost less than $2 per linear foot of wall.
This table, which is adapted from Table 1204.2 of the Florida Building Code and reproduced in the Hurricane Retrofit Guide, specifies the number of fasteners and minimum size for many of the elements in the retrofit framing assembly. As winds increase in severity (measured as both exposure conditions and wind speed), more fasteners and framing lumber are needed.
Task 5: Strengthening the sheathing connection. While in the attic, you may need to take steps to make sure the roof decking stays attached to the roof structure. If a roof has been reroofed and had the roof decking renailed to the latest code requirements, a major step has been taken toward reducing the likelihood that roof decking at a gable end will become detached. However, if a roof has not been nailed in accordance with today’s building code requirements, apply wood strips secured with AFG-01-rated construction adhesive to the joints between the roof decking and all the structural members to which it is fastened, including rafters or truss top chords, gable-end walls, and the outlookers of overhangs. Construction adhesive in 32-oz. tubes is relatively inexpensive, goes a long way, and provides a reasonably effective bond. It is an imperfect connection, though, because the long-term effectiveness of construction adhesive is not known. But however imperfect, it will do a lot to hold decking in place and reduce the chance of the roof decking over the attic from getting peeled up in a high-wind event. The only surefire solution is to secure the roof decking when the roof covering is replaced.
Assembling the pieces: After the horizontal braces get installed, metal straps must be preinstalled on the retrofit studs. These retrofit studs can then be installed by bedding them in a generous bead of an AFG-01-rated structural wood adhesive along the edge of each gable-end stud.
Even with roof decking well fastened there may still remain a nontrivial vulnerability — the overhang. Often, overhangs are like sore thumbs waiting to a make a building “ouch” because they are so weak and exposed. Insuring good fastening of roof decking near the gable can help, but every means to strengthen the fastening of outlookers or otherwise reinforce the overhang must be considered.
A well-secured, well-sealed gable end should give a homeowner much more confidence in his or her home. Bear in mind, however, that opening protection must also be addressed. Even the best-framed roof structure will not be able to resist the extreme forces of internal pressurization. ~
Richard Reynolds is a contractor in Bradenton, Fla., and chairman of the Florida Home Builders Association Codes and Standards Committee. Photos by IBHS.
Retrofit ResourceThe 78-page Hurricane Retrofit Guide (www.floridadisaster.org/mitigation/rcmp/hrg/index.asp) devoted to gable-end retrofitting provides ample detail. The length of this guidebook is not a reflection on the difficulty or complexity of this work but rather an indication of the number of construction variations, all of which have been addressed in those pages to save retrofitters from having to scratch their heads to reinvent the wheel. Included are 22 drawings, many photographs and tables, and many helpful hints to guide one through the retrofit process. The document is downloadable as a PDF file so it can be printed in whole or part. In addition to covering gable ends, the Web site addresses many other retrofit measures, including the use of construction adhesive for securing roof and wall decking, attic ventilation considerations, securing gable-end overhangs, and soffits, among others. |


