Ever since Hurricane Andrew struck South Florida in 1992, the state has been making building codes tougher. That effort has been generally successful, with homes built to the new codes faring much better in subsequent storms than pre-Andrew structures.
Most of the new code requirements had applied to new construction only, but that began to change in 2006 when the Florida state legislature turned its attention to existing homes. Laws now require a variety of upgrades to homes built before the tougher codes took effect — measures that must be taken when certain parts of the home are remodeled. I’ve already described one of those requirements, gable-end bracing and reinforcing, in a previous article (“Gable-End Retrofits,” May 2008). In this article I will look at another new requirement: the need to reinforce the connections between the roof and wall framing.
This new requirement is triggered whenever a qualifying house gets a roof covering replacement. I say “qualifying” because the upgrade doesn’t apply to all houses. It’s only required for detached single-family structures valued at $300,000 or more that are in the “wind-borne debris region,” where design wind speeds exceed 120 miles per hour, a zone that extends about 5 miles inland in most of northern Florida, but includes almost half of the southern tip of the state (Figure 1).
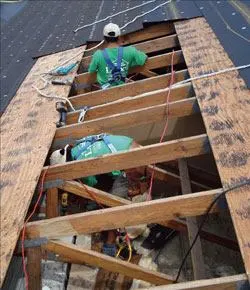
FIGURE 1. Workers with Legacy Contracting Solutions in Lake Park, Fla., retrofit hurricane hardware to the roof trusses of a residential building in North Palm Beach. New Florida codes require that homes valued at over $300,000 in the wind-borne debris region, as shown on this map, have their roof-wall connections upgraded when the roof covering is replaced.
If the house qualifies, the connections that tie rafters or trusses to the top of the wall plate must be inspected by a licensed engineer and, if necessary, reinforced by installing new hardware or adding nails to the existing hardware. The reinforced attachments must then be inspected by the local building official.
Recognizing the financial burden this requirement could place on homeowners, the legislature put a cost cap on it. Homeowners don’t have to spend more than 15% of the total cost of a reroof job on upgrading roof-wall connections. Because the outside roof corners get the most stress during high winds, the code requires those locations to be addressed first.
For example, on a $10,000 reroof, if you can’t tie down all the trusses for $1,500 or less, you have to tie down the corner trusses first, then keep tying down additional trusses until you have spent the entire $1,500.
WHY RETROFIT?
There are good reasons to improve roof-wall connections. In the past, rafters and trusses were typically fastened in place with three 10d or 16d toenails, a connection that was easily torn apart in a high wind. Even after hurricane clips became popular, some framers only put clips on every other truss or rafter, instead of on every member as required, while others used too few nails (Figure 2).
FIGURE 2. In this older home, a few trusses are secured to the wall using metal straps, but most are not. Where straps are present, they may not have the required four nails. Adding nails to existing straps may bring the connection up to code, but that must be determined by a structural engineer.
Like any structure, a house is stronger if it can act as a unit instead of a collection of isolated components that the wind can pick off one by one. Reinforcing the roof’s critical corner sections is a major step in “unitizing” a house, and it can be a substantial structural improvement (Figure 3).
FIGURE 3. Here, steel connectors have been added at stud-to-plate joints as well as truss-to-plate joints, greatly increasing the uplift resistance at these points. However, Florida code requires only the roof connection upgrade, not the wall reinforcement. The clips used here are Simpson H1 clips, which can handle over 1,000 pounds of uplift.
Of course, while reinforcing the roof-wall connection is a step in the right direction, it doesn’t address the connections between the wall plate and studs or between the wall and the foundation. Unfortunately, these extra steps would be cost prohibitive in most cases. The good news is that just tying roof framing to the wall plate will fix a weak point and make the house better able to survive a hurricane.
The downside of this new code requirement is the expense it creates for the roofing contractor and homeowner. In Florida, roofers aren’t licensed to do structural work, so they have to farm out the structural repairs to a contractor who has a license to do general construction. And because there’s no way to know if a roof will require these structural upgrades before it’s inspected, the contractor may not be able to give the customer a firm price until the job is already under way.
As chairman of the Florida Homebuilders Association’s Codes and Standards Committee, I have been following hurricane-related structural issues for years and have helped to develop some of the language in the new code. Realizing the problems involved for roofers and their customers, I have also devised some techniques and tricks that can reduce the financial and time burden for everyone involved.
What follows are some ideas that will make it easier to determine whether a roof needs fixing, to estimate the work, and to get the work done.
INSPECTING THE STRUCTURE
The first task is to find out whether the existing connections are already strong enough. The code assumes that if enough fasteners have been driven into the truss, enough have also been driven into the plate, even if you can’t see them. A hurricane strap or clip with four nails into the truss or rafter will meet code minimums, and you won’t have to expose the wall plate. If, on the other hand, there are not enough nails holding the clip to the truss, it’s up to the engineer to decide whether the wall plate must be exposed.
Sometimes it’s easy to inspect these connections, as when they’re exposed in an unfinished garage or attic. If that’s not the case, then you have to go through the roof or soffit.
The feasibility of inspecting the connections through the soffit depends on soffit construction. Even with a closed soffit, you can sometimes see through the soffit vents with the aid of a good flashlight. And if you can remove the soffit vents without damaging them, you may be able to get an excellent view.
If you can’t see through the soffit vents, and they won’t easily come off, you can peek into the structure with a camera probe, such as the Ridgid SeeSnake Micro, or the Milwaukee M-Spector Digital Inspection Camera. These probes cost around $250 and can be threaded through holes drilled in the soffit or the roof (Figure 4).
FIGURE 4. Contractors can inspect the roof connections through a small hole in the soffit, using an inexpensive camera probe. A 1.5- or 2-inch hole (top) is sufficient for inserting the probe, which displays a view on a small screen (middle). Aluminum louvers or plastic plugs can unobtrusively cover up the hole. If the connection is sufficient, retrofit won’t be necessary. The probe shown here is the Ridgid SeeSnake Micro.
Depending on the soffit material, you may be able to drill holes 1.5 to 2 inches in diameter between rafter tails, insert the camera probe, and get a view to where the rafter or truss rests on the wall. Because the nail tips usually poke through the back side of the truss or rafter, you can count the number of nails from either side. If you can get directly under one truss, the hose is long enough to see the trusses to the left and to the right, which means you could inspect up to three trusses per hole. If you drill these holes a consistent distance from the wall, they will be unobtrusive when filled with plastic plugs or metal louvers.
ADDING HARDWARE
If the roof-wall connection isn’t accessible from inside the attic and the inspection indicates that you have to add hardware, you will need more than just a peephole. One way to gain access is to take up roof decking at the eaves, as shown in Figure 2. But that leaves the house exposed to any rain that comes along while you are working or waiting for the inspector to show up. And according to code, you cannot reuse the decking you pulled off; you need fresh decking.
If you don’t want to have to replace the sheathing, an alternative method is to use a circular saw to cut rectangular openings just above the point you need to reinforce. Make the holes big enough to reach your arm in with a tool to install your connectors. (A palm nailer might come in handy in this case.) This method is laborious but you can reuse the pieces you cut out as patches, supporting them on ledgers nailed to the sides of the trusses (Figure 5). Cutting a hole between every other pair of rafters or trusses will give you access for all of the required connections.
FIGURE 5. To install connectors with minimal demolition, the author suggests cutting a rectangular hole between a pair of trusses. A connector can be attached to a truss on each side of the hole, allowing four trusses to be attached with just two holes. Holes are patched by resting the patch on scabs nailed to the sides of the trusses. You can also remove the soffits and work from below. To remove vinyl or aluminum perforated soffits, you typically have to start at a corner and slide the pieces out along the J-channel groove. Pulling the nails and staples, and wiggling or sliding the fascia pieces loose, is tricky to do without cracking the vinyl or crinkling the aluminum. But if the material is cooperative, removal can be quite easy once you get started.
MAKING ATTACHMENTS
If you can access the wall plate and roof from an unfinished ceiling, use a connector like the Simpson H1 clip (see Figure 3). The H1 has been shown to increase the strength of this connection to more than 1,000 pounds of uplift.
If you have to go in through the roof or perhaps through a wall, I recommend using an HGA10 Hurricane Gusset Angle connector (Figure 6), available from either USP Structural Connectors or Simpson Strong-Tie. This is a right-angle bracket that is attached with eight 1/4-inch-diameter self-tapping structural washer-head hex drive wood screws (provided by the manufacturer). In the case of masonry walls, you can use the HGAM10, which comes with special masonry fasteners (which require drilling holes).
FIGURE 6. Hurricane Gusset Angles, such as the one shown here from USP Structural Connectors, can be retrofitted to the roof-wall connection without the need to expose the wall plate. They’re available in versions for wood-framed and masonry walls.
WHAT TO CONNECT
For gable-end roofs, the Florida code requires that you start by tying down roof-framing members within 6 feet of each corner. For 16-inch on-center framing, that means connecting four trusses at each end of the house.
For hip roofs, the code specifies that hip and girder rafters or trusses be connected to exterior wall plates. The girder — which by definition supports the inboard end of other framing members — can be anywhere from 3 to 11 feet back from the corner. Determining which truss or rafter is the girder may require a trip into the attic. In some situations, the girder may be a double member, which makes it identifiable from the soffit or from the roof.
For houses with both hip and gable roofs, the code gives the following guidelines:
• If the width of the house at the hip is less than 1.5 times wider than the width of the house at the gable, start with the gable-end roof-wall connections.
• If the width of the house at the hip is more than 1.5 times wider than the width of the house at the gable, start with the hip.
• If it’s a complicated roof with different widths and profiles, work in descending order of priority, starting with wide hips, then gables, then narrow hips.
• When tying down a hip end, do the girder truss and the hip truss. Don’t worry about the jack trusses that are involved in that hip, but instead move on to the next hip or gable.
If, after completing the above, you haven’t exceeded 15% of the budget, you will need to continue with the other framing members until you reach the spending cap.
If the client can afford it, it’s better to tie down more trusses. This is an opportunity that only comes along every fifteen years or so when roof covering is replaced. It’s an added cost, but when a storm advances, you will rest easier knowing that you’ve taken steps to increase the likelihood that the home will survive. ~
Richard Reynolds is a retired contractor in Bradenton, Fla. He has been responsible for developing some of the techniques and code language for making roof-to-wall connections.


