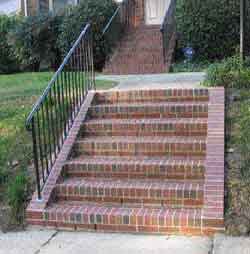
Though I was asked only to repair this set of exterior brick stairs, I knew that simply repointing its crumbling mortar joints would be a case of treating the symptom and not the disease. Due to uneven settling, some sections of the brickwork were offset from adjoining areas by as much as an inch. The 65-year-old bricks themselves were in good shape, but the structure was failing; the only permanent solution would be to remove the old stairs and build new ones on a reinforced concrete footing.
When I tore out the old bricks, I wasn’t surprised to see that they rested directly on the soil. This was a fairly common practice before World War II; even as recently as the mid-90s I’ve seen masons laying bricks for steps directly on the ground. A poor practice to begin with, in this case it was made worse by the soil’s uneven quality, with large, deeply embedded rocks interspersed with soft, loamy clay. Such a mixture of solid rock and plastic soil is a near-perfect recipe for uneven settlement and frost heaves. To pour the reinforced concrete footing — in my opinion, the single most important measure for producing enduring masonry steps — I would need to excavate to sound soil. (I’m in North Carolina, but in a northern climate you would need to excavate below the frostline).
In addition to providing a solid, monolithic base for the stairs, I wanted to control the water that would inevitably come into contact with the brickwork. Laying the bricks with full, well-packed joints would help keep out both groundwater and rainwater, while installing a drainage system around the perimeter of the stairs would direct groundwater away from the structure.
I also planned to pitch the treads to shed water down and off the steps; an internal drain system would allow any water that did get into the stairs to get back out again.
Laying Out the Brickwork
To lay out this stairway, I had to throw out my usual concerns about getting things level and square. For starters, the stairs had to begin and end at the existing sidewalks, which were neither level nor precisely parallel to each other. Instead of building the steps level from side to side, I would start at the public sidewalk and make gradual adjustments until I made a smooth landing at the top sidewalk. And because I wanted the stairs to shed water, both the supporting slab and the stair treads would need to be pitched, not level.
Another constraint was the size of the bricks. For aesthetic reasons and to enhance productivity, it’s important to plan masonry jobs so that you’re working with full, uncut brick courses. If I had been building this set of stairs out of wood or concrete, I could have simply divided the stair’s total rise of 49 3/8 inches by 7 to arrive at a 7 1/16-inch riser height. But in brick, riser size is severely limited: I normally build each step out of one course of stretchers (bricks laid in their normal position) and one course of rowlocks (bricks laid on edge), which works out to a riser height of 6 11/16 inches. Seven 6 11/16-inch steps would have a total rise of 46 13/16 inches, or 2 9/16 inch less than the difference in height between the lower and upper sidewalks. Rather than being a problem, this was ideal, because it allowed me to pitch the stairs by 2 9/16 inches over the stair’s 87 3/8-inch run (or a little more than 1/4 inch per foot) to shed water, while still using full-size courses.
Pouring the Footing
The footing for these stairs could have been stepped up inside the bank, so long as I made it continuous and it rested on firm soil. Unfortunately, though, the soil at the front of the excavation was rocky and the soil in the rear was soft, loamy clay, so I had to remove or break off the rocks and excavate the soft material down to good, solid soil to provide a firm base for the concrete.
I installed simple forms at the front and rear of the excavation to hold the concrete and guide my screed. The wood form at the front of the footing was supported by a galvanized landscaping spike on one side and a galvanized steel bracket driven into a convenient rock seam on the other. At the back of the excavation, I used a polyethylene border restraint (often used in the paving industry) as a form. Supported by spikes driven laterally into the ground, this form could be left in place after the pour without any structural consequences.
To reinforce the footing, I added a grid of rebar. Because I got down to such a good base of soil (almost all embedded rock), the steel might be considered structurally redundant. But it cost only $45, which I consider cheap insurance against uneven settling — and cracking — of the footing. Since I was pouring a pitched footing, I used 3-inch-slump concrete, a pretty stiff mix that is hard to move around but stays put when screeded off to a stepped and nonlevel surface (wetter concrete would tend to slump toward level).
Whereas laying out and forming the nonlevel footing was a little tricky, the actual pour went smoothly, and my helper and I placed the concrete in about 30 minutes. The result is a sturdy, two-tiered footing that rests on a jagged surface of mostly rock. Both sections are pitched toward the street, parallel to my reference line, with the lower section flush to the sidewalk and the upper section higher than the lower by 6 11/16 inches — the height of one brick step.
Building the Wing Walls
After pouring the concrete footing, I built the wing walls. Since each wing wall would be capped by a 4-inch-thick rowlock course, I had to lay out the top of the wing wall first, then measure 4 inches down from that line to establish a guideline for the field bricks. To hold the line, I used improvised brackets and block deadweights at the top and bottom. Once I had laid up the field of the wing wall, I set two string lines to guide the installation of the rowlock border.
I needed to cut the bricks to conform to the slope of the wing wall, so I calculated the pitch of the slope, then made a couple of jigs from scrap plywood and 2-by stock to hold the bricks at the proper angle on the sliding table of my brick saw.
To calculate the pitch, I subtracted the odd-sized top tread from the overall run of the stairs (87 3/8 – 16 3/8 = 71). There were now six treads, with a total length of 71 inches. Each tread, therefore, would be about 11.83 inches (71 ÷ 6 = 11.83), or 11 13/16 inches. The risers, as we’ve seen, were 6 11/16 inches. So the pitch was 6 11/16 in 11 13/16 or, rounded to roof framing terms, 6 3/4 in 12. This is the pitch I used when I made the jigs for my saw.


