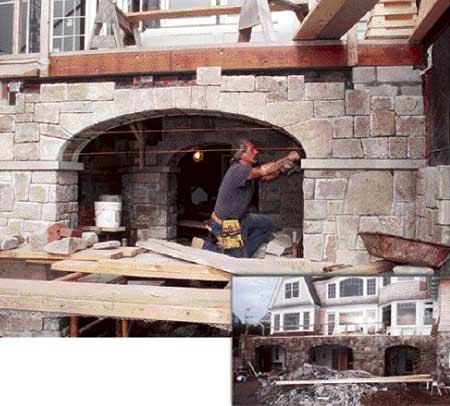
I’m a masonry contractor in Truro, Mass. Recently, my crew and I laid a series of stone arches below the wood-framed terrace of a new residence. The deck above was independently supported on structural steel columns that would be concealed within the stonework, so in this case the arches were decorative. Nonetheless, they were traditionally built and totally capable of supporting a structural load. Before trusses, steel beams, and reinforced concrete became commonplace, nothing beat the durability and bearing capacity of a stone masonry arch.
A masonry arch gets its structural quality from wedge-shaped “ring stones” placed in compression around the perimeter. The overhead pressure is redistributed to the ring stones and down to the springer stone at the base of the arch.
How Arches WorkA masonry arch exploits the simple principle that equal and opposing forces cancel one another out. The form of a circle is extremely strong under compression, and, provided its end points can’t be displaced, so is any section of a circle. The arch ring is segmented only for practical purposes; in theory, it could be carved from a single piece of stone. And masonry segments need not be wedge shaped, provided that mortar is used to fill the gaps and distribute the compressive forces. Under a load stress, any segment of the arch is in equal compression to all other segments; thus, none is moved out of place. Instead, the stress is transferred to the base of the arch. In a semicircular, or true, arch, this force is directly vertical. Little if any horizontal force is exerted at the base line. The curvature of an ellipse is flatter than that of a true arch. As an arch is flattened, the line of stress shifts to a horizontal thrust at the spring line. That puts lateral pressure on the base column and places the ground between columns under tension. Without an “abutment” of sufficient mass to resist horizontal movement, the arch will collapse. When arches abut one another in a series, the horizontal forces cancel each other out and transfer vertically to the bearing base or column. –Dave Holbrook |
I always work from plans prepared by a qualified engineer, so I’m spared the headache and risk of making structural calculations.
On this job, we set a series of elliptical arches between core walls of concrete block built on 12-inch-thick reinforced concrete footings.
We used stainless-steel wall ties, about one per square foot, to provide a strong connection between the concrete and stone. After bringing the veneer up to the specified spring line, we capped it with level granite slabs. The arch construction began at this point.
Enhancing the Stone
We worked this job with quarried granite veneer stone; flat, randomly broken pieces of widely varying size and irregular shape and about 3 to 4 inches thick. The architect specified an ashlar pattern, in which the stone is dressed to have straight geometric lines and is laid in angled patterns. My favorite look in stone masonry is called dry stack, after the original, mortar-free method of laying closely fitted stone. I always work with mortar but back-cut the stone to minimize the face joints. Although the sizes and shapes of the stones appear random, I consider each one for its size and place in the overall pattern and cut it to fit. You have to continually visualize the total installation as you work, which is part of the reason each stone mason’s work is distinctive.
I precut a big stack of 15-pound felt paper into sheets of various sizes and use those to pattern the individual stones. I trace the pattern onto the face of a suitable stone with a lumber crayon or permanent marker. After a few years, you develop an eye for selecting a rough stone that’ll require the least amount of cutting, but it’s still slow going. Each stone takes an average 10 to 15 minutes of prep before setting it in place. We processed 196 tons of granite and worked a little over a year on this one job. And from all that cutting and dressing, we hauled away around 78 tons of rubble at the end of the job, a waste factor of about 40%.
It’s worth remembering that stone masonry requires a large staging area for material storage and processing, for a long time. You may think you’ve got adequate parking for all the other trades, but with stone work going on, you may be surprised. Sometimes I have to park off site, too.


