Despite the simple, rugged nature of the material, concrete counters have become very popular in high-end kitchens and baths. Some homeowners choose this material because it can be produced in any color or texture they want. Others just like the way the product looks: Because they’re crafted by hand, no two concrete counters are ever exactly the same.
Cast-in-Place vs. Shop-Fabricated
Concrete counters can be cast in place or fabricated in a shop. Shop methods place a premium on carpentry skill, while casting counters in place requires better concrete-finishing skills. I own a concrete company that specializes in decorative finishes. Since we have many good finishers, we usually pour counters in place.
Shop-fabricated counters are produced off site, then transported to the job and installed in the same manner as granite slabs. They’re poured upside down and cured in the form; the shape and texture of the finished surface are largely determined by the form.
Cast-in-place counters are poured right side up, so the shape and texture are heavily influenced by the finisher. First, a continuous plywood top is installed on the cabinets; edges, penetrations, and overhangs are temporarily formed. Reinforcing is then installed, and the concrete is placed. As soon as the concrete starts to set, the edges are stripped and the visible parts of the counter are hand-finished with the same tools and techniques used for other kinds of concrete flatwork. You can float, trowel, grind, or use textured mats to finish the surface.
A matter of taste. Site-cast and shop-fabricated counters are similar but not the same. A shop-fabricated counter may be perfectly straight, flat, and smooth. Site-cast counters may be extremely smooth, but they’re unlikely to be as flat or uniform as a shop-cast slab. It’s really two different looks. The subtle irregularities produced by hand-finishing give cast-in-place counters a more hand-crafted look.
Finishes aren’t the only difference. The forms for a shop-poured counter are built from templates. If the template is off, the counter won’t fit. Also, slabs are hard to transport, so large shop-fabricated counters are cast in sections and assembled on site. By contrast, site-cast counters can be monolithic pours, with no seams. Even the backsplash can be formed and poured as an integral part of the top.
Setting Expectations
Most customers have no experience with concrete counters, so it’s important to tell them what to expect. We explain that the color may vary slightly across the counter. It’s possible the counter will crack — we haven’t seen a lot of it, but it does happen. Thick counters are less likely to crack than thin ones. Ideally, a counter should be at least 1 1/2 inches thick at the thinnest spot. On occasion we’ve gone as thin as 1 1/4 inches, but we prefer to pour 2-inch counters.
Customers need to understand that concrete may stain over time. They have an easier time accepting this if they know it’s coming and have been taught to think of it as the development of patina. Counters can be sealed to prevent staining, but the most effective sealers give the surface a shiny, resin-coated look that some people find objectionable. A less obtrusive sealer may provide less protection. People who want things to look exactly the same five years down the road are poor candidates for concrete counters.
We also warn homeowners not to put red-hot pans directly on concrete: Extreme heat can cause it to spall.
Samples. By the time we get the job, the customers have already seen samples from other projects. They may want a slightly different color or texture, however, so we’ll pour three 2-foot-square samples. If they want integral color, we tell them the samples will be close, but not a perfect match to the color of the actual counter. This is because samples are mixed in tiny batches; minor variations in the proportions can affect the results. On the other hand, surface treatments like dust-on color are easier to duplicate.
On the day of the pour, we make additional samples from the same batch of concrete that’s going in the counter. We can then experiment with the samples to show the customers what the counter will look like when it’s treated with various stains and sealants.
Forming the Counter
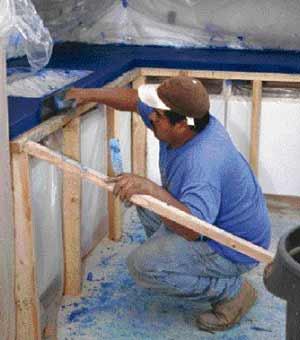
Concrete is poured on the plywood top. The plywood edge is hidden behind a face frame or by thickening the nosing. If the counter has any kind of overhang, we build a temporary shelf to support the nosing when it’s poured and while it cures. The shelf can be anything; we normally put a 2×4 on the flat and prop it up with legs. To avoid damaging the cabinets, we wedge or clamp it in place.
We typically need to remove doors or drawer fronts to install the shelf. Before starting, we use blue tape and plastic to mask the cabinets and nearby walls. If there’s a finished floor, we’ll protect it, too. We cover the plywood top and adjoining walls and cabinets with Kraft building paper. This prevents them from absorbing excess moisture or wicking color from the wet concrete.
Edges that don’t butt to existing surfaces are formed by fastening strips of wood to the temporary shelf. Curved edges can be formed with 1/4-inch hardboard. Integral splashes are formed by suspending a board just off the back wall and parallel to it. The board is supported by temporary legs, which can be removed once there’s some concrete under the bottom edge.


