I remember tearing out an old tile shower early in my remodeling career and being surprised to find not greenboard but a layer of cement under the wall tile. Even more surprising was the lead pan liner beneath the mortar bed on the floor. Like most people, I had mistakenly assumed that a grouted tile surface was waterproof; it had never occurred to me you might need backup moisture protection.
In the 20 years since, I’ve installed hundreds of showers, all of them with pan liners — although I’ve adopted more modern liner materials. When it comes to the walls, however, I often still do it the old way, with floated mortar walls. I work a lot in vintage homes, and there’s no better way to create a flat, plumb tile substrate over the irregular framing I so often encounter.
In this article, I’ll explain how I prepare the pan liner and mortar setting bed for a custom tile shower with floated walls.
Preparing the Space
According to industry standards, a wood-framed floor under a ceramic tile shower should deflect no more than L/360. Having no practical way to assess this in old framing, I use my best judgment, standing and bouncing on the area to test its stiffness and reinforcing the floor where needed.
Drain layout. The shower floor looks better and is more comfortable to stand on if the drain is centered. If it isn’t centered, the floor will slope more from the walls closest to the drain. In an extreme case — if, say, the shower is 5 feet across and the drain is a few inches off one wall — the variation in slope will make it impossible to tile the floor with anything larger than the smallest mosaics.
Rough curb. Unless it’s a wheelchair-accessible shower, I always install a curb. According to most plumbing codes, the top of the curb should be at least 2 but no more than 9 inches above the top of the drain. On a wood-framed floor, we nail down three or four 2x4s on the flat. If the shower is on a slab, we make the curb from bricks or cast it from concrete.
Blocking. Pan liners need continuous support, so I install blocking between the studs to a point 10 or 12 inches up the wall.
When the walls will be covered with cement backerboard, I notch the base of the studs 1/4 to 3/8 inch or pad out the upper part of the studs by the same amount, so that the liner fits into the recess. Otherwise it will bunch up and push the backerboard out at the bottom of the wall.
When the walls are to be floated, as I’ll describe in this article, there’s no need to recess the liner. Instead, if the walls are flat enough to allow for a one-coat job, I’ll simply nail up ordinary drywall as a backer for the mud work. When the framing is badly out of whack, I’ll have to apply two coats of mud anyway (a base coat and a leveling coat), so I leave the framing open for now.
Shower Floor
The shower base consists of a sloped substrate; the waterproof liner, which connects to a three-piece clamping drain; and a mortar setting bed for the tile. When the shower is in use, most of the water runs over the tile and down the drain. But inevitably, some gets through the tile and grout and into the setting bed; that water is stopped by the liner and channeled to weep holes in the drain assembly
Liner material. In a few parts of the country, lead or copper pans are still required by code, and in California some contractors use hot-mopped asphalt liners. But it’s more common to use plastic liners, either CPE (chlorinated polyethylene) or PVC (polyvinyl chloride). I prefer CPE because it folds and handles more easily than PVC. For regularly shaped showers like the ones in this article, I use Chloraloy, a CPE product from Noble (noblecompany.com), and its companion adhesive, Noblesealant 150. For curved or irregularly shaped showers, I’ll use a liquid-applied membrane such as Laticrete 9235 (laticrete.com) or RedGard (custombuildingproducts.com).
Sloping the liner. By code, the surface under the liner must slope at least 1/4 inch per foot so that water hitting the liner will run toward the weep holes in the drain. This is important: If a pan liner doesn’t have enough slope, or if the weep holes are blocked, the mortar bed may never dry out, which leads to surface mold, discolored grout, and bad odors.
The two most common ways to create slope under the liner are to frame the floor so it slopes toward the drain and to build up a slope with drypack mortar. We typically use drypack. Also known as deck mud, it’s usually mixed with four parts coarse sand, one part portland cement, and just enough water so it sticks together when compressed. If the subfloor is wood, we float it onto galvanized expanded metal lath that has been stapled over building paper. The lath reinforces the mortar bed, and the paper prevents the wood from sucking moisture out of the mud. On concrete subfloors we omit the lath and bond the mud to the slab by applying it over a fresh coat of thinset mortar.
To prevent mud from clogging the drain and bolt holes, we cover them with duct tape. We then mix a batch of mortar, spread some of it around the perimeter of the shower, and use a trowel or board to compact it into straight level screeds. We make the screeds high enough to maintain the minimum drop of 1/4 inch per foot between the most distant part of the shower floor and the top of the drain flange.
We complete the slope by adding mortar, packing and smoothing it between the screeds and the drain. When we’re finished, we cover the mud with a piece of roofing paper so it retains moisture while it cures overnight.
Sizing the Liner
The key to a good installation is to carefully measure, mark, and label the liner before doing any cutting. We start by measuring the floor and curb to within 1/8 inch, then make a drawing of what the sheet will look like once it is cut. It has to be large enough to turn up the walls and run over the curb, so we add 9 inches to the sides that butt walls and 12 to 15 inches at the curb. We place the membrane material on a clean, flat surface, draw the shape of the floor and upturned sides on it with a Sharpie, then cut the piece to size. To prepare the liner for placement, we fold it inward along the lines where the floor meets the walls and curb.
Chloraloy comes in 4-, 5-, and 6-foot rolls. It’s expensive, so to minimize waste we stock all three sizes. When the floor is larger than the widest material, we glue pieces together with Noblesealant 150. The typical sequence is to clean the material, apply sealant, lap the pieces, apply pressure with a roller, and then allow the joint to cure. When the liner is really large, it’s often easier to seam the pieces in place.
Installing the Liner
To prepare for installation, we remove the duct tape from the drain, loosely install the bolts, and spread a bead of Noblesealant around the perimeter of the flange. The sealant prevents water from seeping out between the drain and the liner should the drain ever clog.
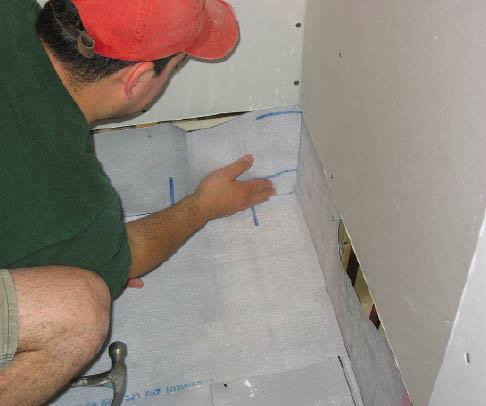
We install the liner by positioning it so the creased edges butt to the walls and curb. This is one time when it helps to have a second set of hands. When working alone, I spot the studs and blocking with Noblesealant so the liner hangs in place when I press it up onto the wall.
Vertical leg. To turn the liner up, I put one hand under the folded material at the center of the wall and press it tightly into the corner between the wall and the floor. I use my other hand to lift the material against the framing, then secure it with a nail or screw, keeping the fastener within an inch of the top edge. I repeat this process all the way around the shower, working from center to corner and fastening every 12 inches or so. There will be excess material at the corners, which I take up by making a triangular fold. When the liner is properly installed, it should lie flat against the framing and fit tightly into every corner. If the material cuts across a corner, it will form an unsupported cove — a natural stress point that might someday spring a leak.
Drain attachment. At this point of the installation process, the liner runs over the drain but doesn’t lie flat because the bolt heads are holding it up from below. So that the bolts can pass through the liner, we use a utility knife to cut small X-shaped slots over the heads of each one, then squeeze them through the openings. Next, we mark the drain opening by turning the upper half of the drain upside-down, placing it over the bolt heads, and tracing its opening onto the membrane with a Sharpie. We then remove the upper half of the drain, cut out the drain opening, and reinstall it right side up.
To prevent water from escaping through the bolt holes, we remove the bolts one at a time, squirt Noblesealant into the holes, then reinstall them. We tighten the bolts just enough to slightly compress the pan liner. This is not like tightening lug nuts — snug is good enough.
Over the curb. The final step is to run the membrane across the curb, which we do by slitting the liner vertically at the ends of the curb and folding the flap out. This leaves studs exposed at either end of the curb. We cover the exposed framing with Chloraloy patches, gluing them on with Noblesealant. There’s still a small hole at the three-way corner where the liner was slit. We patch this area by gluing on a preformed corner dam from Noble.
It’s critical that every part of the liner lie flat and tight against the substrate. Bulky folds and loose areas will prevent cement board from lying flat or create hollow spots under a mortar-bed substrate.
When the glue on the liner has cured, we plug the drain and test the pan for leaks by filling it with water and then leaving it overnight or until the inspector has signed off on it.
Floated Walls
Once the liner has been leak-tested, we protect it with a piece of drywall or plywood and get to work on floating the walls. The mortar is applied over wire lath and a water-resistant underlayment such as 15-pound felt or Grade D building paper. Lately, I’ve been using a tile underlayment called Aquabar B (fortifiber.com). The underlayment serves two purposes: It prevents moisture from being pulled out of the mud while it is curing and provides backup moisture protection when the shower is in use.
As I mentioned above, when the framing is badly bowed, I’ll often have to apply two coats of mortar. In that case, I nail the membrane and lath directly to the studs. If the framing is flat and true enough, I can float the wall with a single coat of mud — around 1/2 inch thick at the thinnest point, but thicker where the studs bow back or are out of plumb. For a single-coat job, I’ll install the underlayment over a solid backing material like drywall. I bring the drywall down to the top edge of the liner but stop short of lapping onto it. I then install the water-resistant underlayment over the drywall, lapping shingle-style at the seams and extending it all the way down to the liner on the floor.
Next, I cover the walls with galvanized expanded metal lath, nailing through to the framing. The walls are now ready to be floated with mortar.
Wall mud. To adhere to vertical surfaces, wall mud must be wetter and stickier than deck mud. I make the wall mud by mixing four parts sand, one part portland cement, and one part masonry lime with enough water or liquid latex to give it the consistency of stiff brick mortar.
Float strips. Creating a flat wall requires the use of a screed guided by float strips — thin strips of material that are temporarily embedded in the mortar at both ends of the wall. Some tile setters use rips of wood for float strips; I use 1/4-by-1-inch flat aluminum stock.
To install a float strip, I spread some mortar up the edge of the wall and press the float strip into it, tamping it in with a level to make sure it’s straight and plumb. After installing strips at both edges of the wall, I fill the area in between with mortar, then scrape off the excess by screeding and sawing across the face of the float strips with an aluminum angle. Next, I remove the float strips and use mud to fill in the recesses they leave. The final step is to smooth the surface of the wall with a float or trowel. If the float strips were installed correctly, the floated surface will be nearly perfectly flat and plumb.
Wall tile. The wall tile can be set as soon as the mortar is hard. I set it so that the bottom course is just high enough for the shower floor to tuck underneath.
Shower-Floor Setting Bed
Once the walls are tiled, it’s time to install the setting bed for the floor tile. The liner is already sloped, so the setting bed can be the same thickness throughout. According to the Tile Council of North America, it should be between 1 and 1 3/4 inches thick. I prefer not to go any thinner than 1 1/4 inches.
Drain stem. We thread the drain stem into the clamping drain, stopping when the drop from the wall to the drain strainer gives us the desired slope of 1/4 to 1/2 inch per foot. To keep mortar from clogging the weep holes, I cover them with tile spacers, pea gravel, pieces of broken tile, or a Positive Weep Protector from Noble.
Starting at the rear wall, we build and compact a mortar screed to about the width of the trowel. The screed should be level, straight, and just far enough below the wall tile to accommodate thinset, floor tile, and a caulk joint. We repeat this process at the side walls and curb, checking with a level to make sure the slope to the drain is correct.
When the mortar screeds are flat, compacted, and level, we begin filling in with deck mud, starting at the back of the shower and working toward the entry. We use a steel trowel and wood float to move and compact mud all around the drain. As with any other mud work, we use just enough mortar to slightly overfill the area; it’s a waste of labor to move a lot of extra mud around.
Once the back half of the shower is filled, we use straightedges of varying lengths to shave down the high spots, removing material a bit at a time until a straightedge can be laid on the slope in full contact with the mud and just touching the screed. It’s important to avoid digging into the screed and to keep the mud just far enough below the top of the drain so the tile will flush out with the strainer. We’re especially careful if the floor is large, because once we’ve mudded the front we won’t be able to reach the back to make repairs. When the back half is done we repeat this process at the front.
Wire reinforcing. Tile industry guidelines call for a layer of 2-by-2-inch galvanized wire mesh reinforcing to be placed in the approximate center of the setting bed. Mesh is a hassle to install because it won’t lay flat and must be held down while mortar is packed over it. We always use wire mesh in large showers over wood framing, but we omit it if the shower is over a slab or is small and over sufficiently stiff framing.
After finishing the mud bed, we mist it with water, cover it with building paper, and allow it to cure for a day or two before setting tile on the shower floor.


