Study the installation details — and get a tight connection to tech support — before you begin
It looked easy enough: Stack a bunch of hollowed-out lightweight polystyrene blocks, fill the cavities with concrete, and presto! — an insulated foundation, ready for interior finishes. I was taken by the technology: With insulated concrete forms (ICFs), I would have a high-tech foundation. I quickly realized, however, that I had a lot to learn about working with ICFs.
I had already built an ICF frost wall for a new entry porch on an old farmhouse. Although the concrete foundation didn’t need to be insulated, the ICF blocks were easy to stack, and it was a simple matter to cut the blocks to fit around the existing rubble stone foundation. Once they were laid up, I backfilled on both sides and poured concrete into the voids. Slick.
Since this ICF job went smoothly, I was encouraged to attempt a full foundation. As it turned out, though, a full ICF foundation required greater attention to details than a simple porch job.
Fancy Footing Forms
The foundation configuration was straightforward: a 26×48 footprint with an offset to accommodate a small first-floor porch. I formed the footings with Form-A-Drain (see Sources of Supply on page 4 of article), a stay-in-place system that forms the footing, drains the foundation, and can be modified to evacuate radon gas (see Figure 1).
Figure 1. Vinyl Form-A-Drain footing forms stay in place as permanent drain pipes after the concrete sets. |
Form-A-Drain consists of hollow PVC sections, with one side slotted to capture groundwater, while the side facing the concrete is smooth. Accessories include couplings, right angles, outlet pieces, and connector pipes that join interior and exterior perimeters, facilitating underslab drainage.
The 12-foot-long vinyl sections cut easily with a handsaw. I set up batter boards, ran string lines 1 foot wider than the house footprint, and squared the lines. I then laid out the outside perimeter in line with the string, driving 5/8-inch rebar stakes through slots in the PVC to keep the forms from moving. The interior perimeter drain was placed 24 inches inside.
I leveled the outside forms with a transit, maintaining the elevation by screwing 1×3 stakes spaced 3 to 4 feet apart to the Form-A-Drain. I leveled across to the interior form and staked it in place. Then I poured the footing.
After the footing set up, I snapped lines defining the outside perimeter of the foundation. Using this line, I shot 1×4 rough-sawn lumber to the footing. (These cleats would be removed after the slab had been poured; I didn’t want little critters making their home in decaying wood, and eventually nesting in the ICF blocks.) The first course of ICFs would be placed against this ledger. I had decided to pour the slab early; this would give me a flat, solid surface to work from, and something to secure the wall bracing to without fear of the foundation walls moving out of alignment. The 1×4 ledger on the footing would prevent the first course of ICFs from being pushed outward when the slab was poured.
I filled the area under the slab with about 8 inches of 3/4-inch crushed stone, level to the top of the footing, and shoveled a 24-inch band of stone around the outside perimeter.
Getting Set
Several manufacturers make insulated concrete forms, each company offering a variation on a couple of themes. The material of choice is expanded polystyrene, the same material used to make take-out coffee cups. Forms can be shaped like the three-hole blocks of their masonry cousins, or come in pre-cut sheets held apart with plastic tees. I chose Therm-O-Wall blocks, which are 48 inches long, 16 inches high, and either 8 or 10 inches wide. At each end, and spaced 16 inches on-center, embedded plastic tees provide furring for securing interior finishes. Another feature of Therm-O-Wall blocks are their ready-made left and right corners; some systems require you to fashion corners from straight forms.
There are a few simple rules to keep in mind when laying and stacking the forms: Build the corners first, stagger the joints, and don’t try to level each course, since it’s impossible to stack the blocks perfectly. You’ll need several canisters of low-expanding aerosol urethane foam, which is the glue used to bond the form blocks together. I used Pur-Fil foam and a Pur-Fil foam gun. You’ll also need a supply of 1×4 strapping. The strapping acts like a band-aid to strengthen weak joints and bridge cracks in damaged blocks (Figure 2).
Figure 2. Lengths of 1×3 or 1×4 strapping are used to strengthen weak spots in the ICF forms. The strapping is screwed to the plastic tees embedded in the forms. |
Simple tools. Tool requirements are minimal. ICFs cut easily with a handsaw, although a table saw helps if you need to rip a bunch of blocks to height. A cordless drill is invaluable; a cordless circular saw is handy, too. A heavy-duty rotary hammer drill makes light work of the dozens of holes that need to be drilled in the footing to accept the vertical rebar that gives the wall its strength. Snips to cut the tees and a rented rebar cutter/bender round out the tool list.
I decided to place the floor trusses in pockets in the foundation wall, eliminating air infiltration at the usual sill and rim joist connection. This boosted the overall foundation wall height to 9 ft. 6 in., allowing for 7 ft. 6 in. of headroom in the basement, and a 4-inch-thick slab. In order to end up with this final wall height, I ripped the first course of blocks 8 inches high.
Start at the Corners
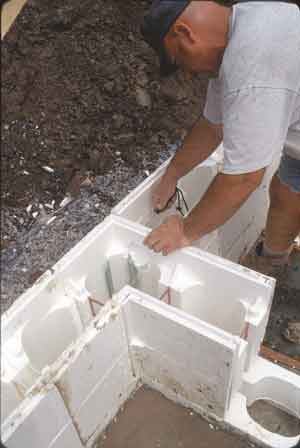
With the help of an experienced ICF block layer, I set the corner blocks, cementing them in place with aerosol urethane foam. I then stretched strings corner to corner and laid the first course, keeping the tops in line with the string and butting them against the 1×4 ledger. Where there were dips in the footing, I filled the gaps with aerosol foam; wood shims work well for large gaps. I then nailed together 2×6 L-shaped corner bucks and plumbed and braced them at each outside corner (Figure 3).
Figure 3. Plumbed and braced 2×6 corner bucks will hold the foundation dimensions as the walls are stacked. The 1×4 cleat attached to the footing keeps the first course from kicking out during the slab pour. |


