When I’m siding with cedar shingles, I like to give my projects a distinctive look by taking advantage of this material’s unique artistic possibilities. I use just a few basic techniques to craft a range of designs, from simple accents and dramatic repeating patterns to amazing free-form compositions.
These techniques are easy to learn; I taught myself how to create different shingle designs by looking at the work of other sidewallers and then experimenting. In this article, I will demonstrate how to build a simple geometric diamond.
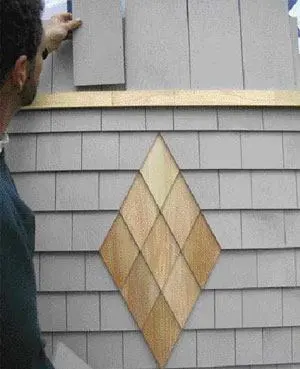
A Simple Geometric Design
A diamond is a common shingle pattern; it can be as small as a single shingle or it can fill an entire wall. In this example, I’ll create a diamond accent measuring about 15 inches wide by 30 inches high using point (also called diamond) shingles.
Like other common shapes that can be used to make repeating geometric patterns — such as round, hexagon, half-cove, fish-scale, and arrow — precut point shingles are available from a number of different shingle manufacturers. Precuts are convenient, particularly if you need a lot of them, but you’re limited to the quantities, sizes, and exposures offered by the manufacturer.
If you need only a few shingles — as in this project — and don’t have use for an entire box, it’s easy enough to cut your own point shingles. The key is the vertical tip-to-shoulder measurement, which must match (within 1/4 inch) your shingle exposure.
For example, for a typical 5-inch white-cedar shingle exposure, the point shingles will have a 5-inch ‘rise.’ Keep in mind that this is the vertical measurement, not the diagonal measurement along the cut.
Whether you use precuts or make your own point shingles, you’ll also need reverse-point shingles, which are the same width as regular point shingles but are cut along only one side. These are used to close the top of the diamond.
A Weathertight Design
To create a diamond pattern, point shingles are dropped down from the course being applied. This leaves a shorter head lap, making the design area prone to water intrusion. So I like to take the precautionary step of adding an extra layer of housewrap behind the design. That way, if any water does find its way through the diamond, it will be redirected onto the surface of the shingles below.
Before getting started installing the shingles, it’s a good idea to lay out your first diamond designs on a flat piece of plywood to see how the system works. This will give you a feel for aligning courses and for making the transition from growing the base to closing the top of the design.
After you get the knack, you’ll be able to build diamonds right on the wall when laying up field shingles, without missing a beat.
Also, it’s easy to misplace fasteners when applying point shingles. To make sure that fasteners are located where they’ll be covered by the diamond shingles above them, I make a cardboard jig with a ‘V’ cut out and mark every diamond shingle with white chalk. This may seem like overkill, but it takes only a few seconds to mark a series of shingles, and it saves ripping a couple off later because of mislocated nails.
Building the Diamond
I start the pattern by dropping a pair of point shingles out of a shingle course so that their points align with the bottom edge of the course below. Doubling up the shingles in the bottom of the diamond gives proper ‘weight’ to the base of the design. Then I install the remaining field shingles in that course.
On the next course, I drop two point shingles down, aligning the tip of each point with the shoulder of the point shingle in the course beneath and the shoulder of the point shingles with the field course shingles. A framing square helps to orient the shingles so that they’re plumb.
On succeeding courses, I drop more point shingles down, installing them in the same manner until the diamond has grown to the desired width. In this project, I stop after the third course.
Before starting to close the top of the diamond, I install sideways ramp shingles on either side of the last pair of point shingles. These allow the next shingle course to smoothly transition up and over the design.
Over the ramp shingles, I install reverse-point shingles — which are used to close the diamond pattern back up — infilling between them with point shingles. To finish up the diamond, I use a pair of reverse-cut shingles at the top of the design.
After the pattern is completed, the remaining courses of field shingles are installed. To emphasize the shingle pattern, I’ve left the point shingles in this example unfinished. But usually I prefinish pattern shingles on both the fronts and backs, as well as along cut lines, before installation.
Mike Guertin is a builder and remodeler in East Greenwich, R.I., and a member of the JLC Live construction demonstration team.


