In the photos below, I’m conducting a sophisticated engineering test on the rain holdout characteristics of a cladding material. I’m spraying the brick veneer wall of a garage with a garden hose. I have a wager going with people inside the garage — I’m asking them to guess how long it will take, under the conditions of this test, for water to pass through the brick veneer. It’s a multiple choice test: A) seconds, B) minutes, or C) hours.

In this hose test, water penetrated brick veneer in less than a minute (right). The wall behind brick veneer must be designed to drain.
The correct answer is A, between 15 and 30 seconds. Brick veneers are essentially transparent to water. We like to think, “Hey, brick is strong. It can handle water.” And it can — in the sense that the water doesn’t damage the brick. But brick is just like a sponge: It sucks water in by capillary action, holds some of it, and lets the rest drool out everywhere. Brick can protect our walls from many things, but water is not one of them.
Wood clapboards, fiber cement siding, and vinyl siding also leak, each in its own special way. People continue to put their faith in every kind of cladding material, but in the real world all claddings leak sooner or later. They always have, and they always will.
The common fallback strategy is to use caulks and sealants. But that’s not the answer, either. Sealants do not span cracks, they cannot withstand movement, and they will degrade from sunlight, temperature, and oxidation. Caulks dry up, they shrink, they freeze and crack, they decompose — they fail. When your cladding leaks, neither caulking nor sealants will keep water out of your building.

So if all claddings leak, and all sealants and caulks fail, how can we keep buildings dry? By creating a water management system beneath the cladding: a continuous drainage plane with integrated flashings and weep holes, with an air space between the cladding and the drainage plane where water can flow. We overlap everything to direct water down and out, and we let gravity do the work.
Unlike caulks and sealants, gravity is free. Gravity does not wear out, and it does not require maintenance. Gravity is predictable: It always acts downward. In water-managed wall systems, gravity is one thing we can trust.
You can build a water-managed wall system with any cladding and with many different kinds of drainage plane and flashing materials. It will work as long as you follow certain basic principles. Human beings discovered those principles thousands of years ago, but some people still don’t follow them; that’s why people like myself, who investigate building failures, have such wonderful job security.
Elements of a Rain-Managed Wall
There are four fundamental requirements for water-managed assemblies:
- Drainage plane: some water-repellent material, overlapped to drain downward, and continuous over the whole building exterior. “Continuous” is the key word here. All it means is that you should connect your windows and doors to the drainage plane, as well as your deck, your roof-wall intersections, any service penetrations — everything. Every single flashing must tie into the drainage plane and dump on top of it, not behind it. There are no exceptions: One reverse lap or unflashed penetration can ruin your whole wall.
- Drainage space between the cladding and the drainage plane (the space can be very narrow, but it must be there). The water needs space to move.
- Flashings at every opening, penetration, or intersection, designed to kick water out and down.
- Weep holes: openings to allow water to escape to the outside.
If you have those four elements, you have a water-managed system. If you’re missing any one, or you do any of them wrong, you can expect trouble.
Portland cement stucco bonds tightly to modern asphalt felts, denying water the drainage space it needs to flow down and escape the wall. Moisture that penetrates stucco will saturate the paper and destroy its water repellency, wetting the wall structure beneath unless an air space is somehow created.
Drainage Planes and Air Spaces
There are many choices of drainage plane material, and there’s a lot of discussion over which is best. The most common drainage planes on houses are still the various building papers — asphalt-saturated felt, plastic housewraps, and coated papers. Housewrap makers like to stress the advantages of their brands, but the difference between one paper and another is really a minor issue. It’s how you use them that counts, and the key factors are the air space and the flashings.
Let’s take an example. The photo (left) shows a classic drainage plane: tar paper installed shingle fashion behind the cladding. In this case, the cladding is stucco. Do you see the air space? No, because there isn’t one. But there’s supposed to be one, and in the old days there usually was. The reason we often don’t get a drainage space behind stucco today is that tar paper has changed.
Decades ago, there was a product called 15-pound felt — asphalt-impregnated rag felt paper that weighed 15 pounds per 100 square feet. Today, in its place we have “#15 felt,” which weighs less than 7 pounds per 100 square feet. In place of the old 30-pound felt, we now have #30 felt, which weighs 16.5 or 17 pounds. The papers are lighter and contain less asphalt.
The old heavy felts absorbed water and swelled up when we applied a scratch coat of stucco over them. They were intended to swell. Then as the felt paper dried, it wrinkled, shrank, and debonded from the back of the stucco, creating a thin, convoluted drainage space. If you tear into an old stucco wall, you’ll see the space. But that process doesn’t happen with modern asphalt felt papers — instead, the paper bonds to the stucco and sticks. It gets wet and stays wet, there’s no drainage, and the paper starts to rot. Then your wall is unprotected.
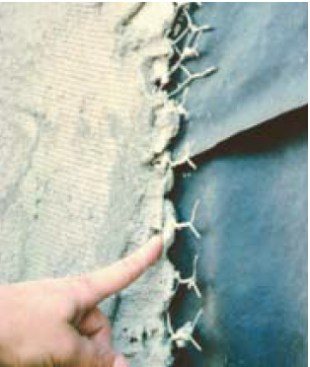
West of the Mississippi, they figured it out. Western stucco applicators use two layers of Type D coated paper under their stucco instead of one layer of asphalt felt, and drainage occurs between the two layers of paper. The stucco might bond to the top layer, but the layer underneath stays free. Some brands of Type D paper even come with pieces of grit stuck on them, which helps to hold the two layers of paper apart.
My point is, any building paper will fail if it bonds to the cladding, and the system can’t drain without an air space. With stucco, we create the air space by using two layers of paper.
Building Papers and Drainage Planes
The images below show a collection of engineers and Ph.D. scientists setting up an eight-sided test building in my backyard at the Building Science Corporation. The reason we’re working in the dark is that we spent the whole day arguing about how to do this experiment. It wasn’t until much later that we realized it would have been a lot quicker to build two four-sided structures, but that’s another story.
The author and his colleagues tested 21 different combinations of building papers and claddings on this eight-sided structure.
Measuring the added water provided a basis for comparing results across wall systems.
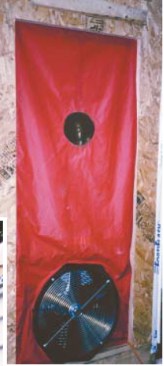
The blower door apparatus turned out not to matter, because leaks were apparent without any air pressure difference.
We tested 21 different configurations of cladding-and-building-paper combinations for water leakage: 14 different combinations of vinyl siding over various sheathings and papers, and 7 combinations of hard-coat stuccos over various sheathings and papers. The holes in the wall are viewports that let us see what happens when we add water.
We depressurized the enclosure to simulate a 100-mph wind pressure, but we needn’t have bothered: Any system that leaked leaked with no pressure difference. A garden hose, it turns out, is plenty high tech.
We added a measured amount of water each time. That way, you can measure how much goes in and how much comes out; you can find the difference; and if you want, you can even weigh the different materials before and after to find out how much water was absorbed. Remarkably, no one has done this kind of test for most of the wall systems on the market. With all the changes we’ve made in materials, no one has ever checked some of these systems to see if they work. So we tried this experiment with a few systems, and we learned some interesting things.
Stucco and housewrap. In the images below, we see what happened when we applied a hard-coat stucco over a housewrap. The stucco bonded so tightly to the housewrap that when we peeled the paper back, the advertising transferred to the back of the stucco.
That tight contact destroys the water repellency of housewrap, which works like a tent in a rainstorm: If you touch the wall of the tent, you cause a leak. Here, the stucco has established what we call “capillary continuity” by bonding to the housewrap, and water repellency is lost. That’s why you should never put hard-coat stucco on any plastic housewrap — the stucco defeats the housewrap.
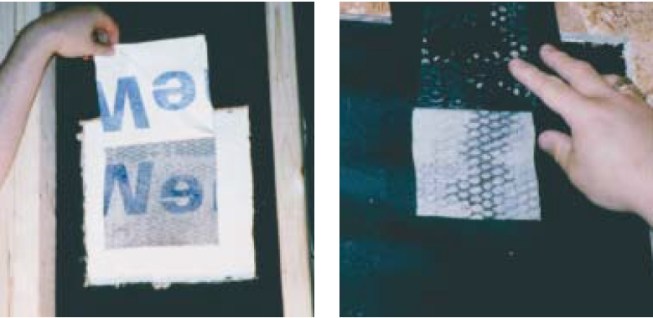
Portland cement stucco stuck tightly to housewrap (left) and felt paper (right) in the author’s tests, destroying the effective water repellency of the building papers.
DuPont’s new StuccoWrap is a wrinkled Tyvek. In spite of the name, the only product StuccoWrap doesn’t seem to work with is stucco. When the stucco bonds to the StuccoWrap, drainage is lost along with water repellency. Stucco applied to StuccoWrap produced the second worst performance of the systems in our test (the worst was stucco applied directly to a nonwrinkled plastic housewrap).
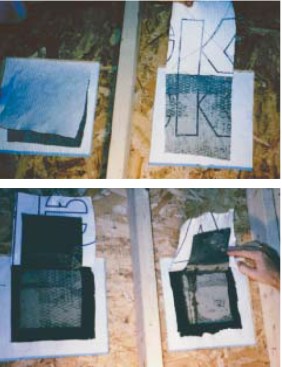
Wrinkled Stucco – Wrap adhered as tightly to stucco as did the other papers in the test, losing its ability to hold out water (left). However, the wrinkles worked effectively when a layer of inexpensive felt was installed over the StuccoWrap before the stucco was applied (bottom). The two papers in combination provided outstanding drainage and water protection. For stucco walls, the author recommends paperbacked stucco lath over wrinkle wrap as a drainage assembly.
But StuccoWrap was also part of the best-performing system we tested. When we added a cheap felt paper over the StuccoWrap and then applied the stucco, the system worked perfectly. The cheap paper was a bond break, the StuccoWrap remained free, and then we saw tremendous drainage in the grooves.
So whenever somebody asks me, “How do you apply stucco to a building on the East Coast?” I tell them this: Put up OSB, staple up DuPont Tyvek StuccoWrap, and then put a paper-backed stucco lath over it — a product such as Tilath from the Alabama Metal Industries Company (www.amico-lath.com), metal lath that comes with the paper stuck to it. The paper backing creates a bond break to provide the drainage. The difference between total success and major failure is that top layer of low-grade, 2¢/sq.ft. paper.
Comparing housewraps. In general, it’s no use comparing one housewrap to another, at least in terms of water holdout characteristics. It’s how you use them that counts.
The housewrap marketing people love to compare performance. But they do it based on a totally meaningless test. The standard test method is to fasten the housewrap over the bottom of a glass cylinder and see how high a column of water you can pour into the cylinder before the water comes through the wrap (every inch of water is equivalent to 250 pascals of wind pressure). The lab comes up with some figure, and then the marketing people go out and brag about it.
That’s great, but in the real world we don’t build houses with little glass cylinders. We staple the housewrap to the wall and nail siding over it. We put thousands of holes in it. That means the real performance of the system is about the holes — and whatever the ads say about housewrap performance, when you put nail holes in them, they’re all the same.
And for the system as a whole, the key thing to understand is that the air space makes all the difference. Water is like a politician: It always does the easiest thing possible. Whatever housewrap you have, and however many nail holes there are in it, if water can go down, it will go down, instead of sideways through the nail holes. As long as there is an air space, every housewrap works and every felt paper works. So forget about comparing housewraps: Make sure there’s an air space, and then concentrate on the flashings.
Insulated Sheathing as a Drainage Plane
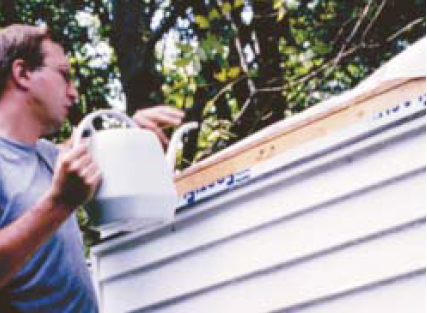
Housewrap and felt are not the only drainage plane materials. Foam sheathing also works well, if you detail it carefully. In the Building America program, we’ve had good success using foil-faced rigid polyisocyanurate as the drainage plane, taping the joints with red Tyvek tape. We’ve also used extruded polystyrene boards such as Dow Styrofoam the same way. It’s an economical way to build a well-insulated wall that performs well.
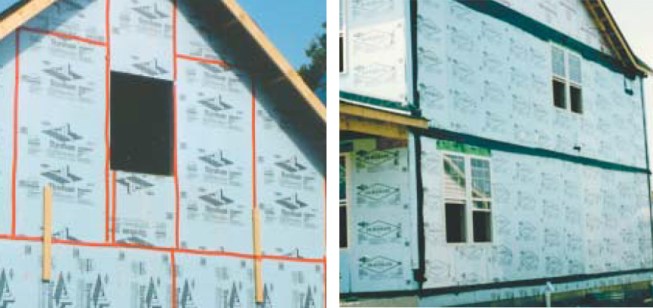
Extruded polystyrene or foil-faced polyethylene can be an effective drainage plane material. Joints in the foam can be taped with red Tyvek tape (left). To reduce reliance on tape or sealant, the author likes to apply the foam with shiplap joints at the vertical seams and a black poly strip as a Z-flashing at horizontal joints (right).
As in any water-managed system, with foam sheathing the drainage space is critical. Foam-sheathing drainage planes work well with vinyl, because you create the air space just by putting the vinyl up. Vinyl is also self-ventilating — I don’t happen to like its looks, but it performs beautifully. Brick also works well over foam sheathing.
Wood siding will not work well over a foam drainage plane unless you space the wood away from the wall with furring strips. In fact, you should fur out wood clapboards over housewrap and asphalt paper as well. It’s the only way to allow the wood to dry evenly, and to prevent substances in the wood from degrading the building paper. Wood siding should also be primed on the back and ends, not just painted on the weather surface.
I have a bias against tapes and sealants. I don’t like to rely on adhesives. So we have developed a way of building a foam-sheathing drainage plane where you don’t have to tape the joints. We use a shiplap vertical joint where the boards butt together, and at the horizontal joints we attach a strip of poly that acts as a Z-flashing. That poly, with the help of gravity, keeps the water on top of the drainage plane.
Flashings
These images show a system using housewrap as the drainage plane. The builder has attached the window to the drainage plane with a membrane strip over the nailing flange. Rainproof, right? Wrong.
In America, we build as if windows don’t leak. We assume that if we seal the window flange to the building paper, we’re done. But in fact, most of the window leakage happens behind that seal, because the windows themselves come from the factory leaking. All windows leak at the joints. The only things that leak worse than windows are doors — especially sliding doors.
My colleagues and I conducted a survey of over 3,500 vinyl windows that were less than two years old — factory manufactured, precision engineered. We found that 20% of them had already begun to leak. So if you build a house with 20 vinyl windows, the odds are that 4 will leak right away (others will leak later). Which 4 windows do you want leaking into the wall? None of them, of course. So we have to assume that every window leaks and build accordingly.
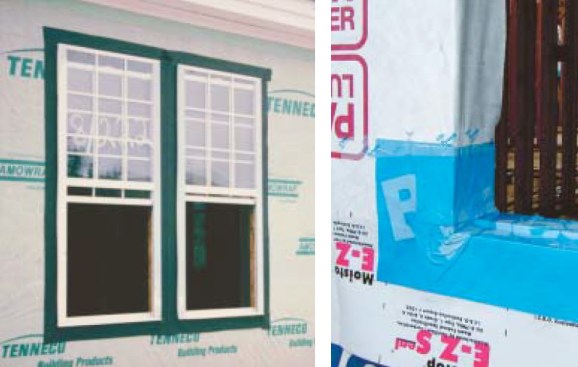
Sealing window flanges to the housewrap (left) is a common practice, but it does not protect against the predictable leakage within the window assembly itself. Only a pan flashing that dumps on top of the drainage plane will effectively keep water out of the wall. Peel-and-stick membrane applied over the top of the building paper and wrapping the sides and bottom of the rough opening (right) accomplishes the task.
But what is the common practice? Cut a big X in the housewrap and wrap it into the window. And where does that leave a hole? Right at the corner, just where the window leaks. We line our holes up on top of each other.
That’s obviously not going to work. What we need is some kind of gutter under the window that collects the water dripping onto the sill and kicks it to the outside. There are a couple of good ways to do this.
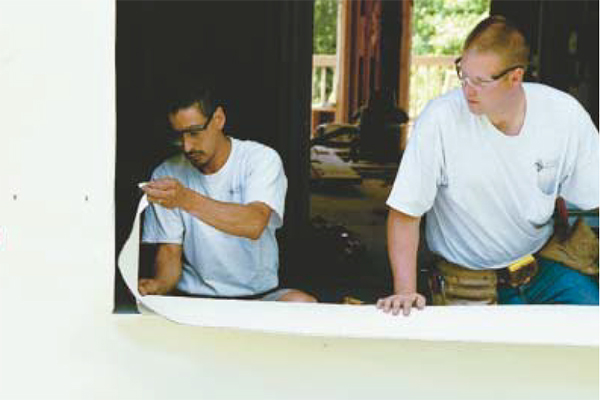
Flexible peel-and-stick. In these photos below, we’re demonstrating a really neat product. I like to give the DuPont people a hard time occasionally, but I love their new product Tyvek FlexWrap. It’s a formable flashing — sort of an elastic ice and water shield that you can stretch under a window and mold into a flashing. It sticks beautifully. You put it in the opening and then install a window. Now your wall’s protected when the window inevitably leaks. Ordinary, nonflexible peel-and-stick membranes can be used for the same purpose, but it takes some cutting and patching. In the upper right photo above, the builder has used a membrane called Blueskin, from Bakor, Inc. [Editor note: Bakor was acquired by Henry Co. since initial publication of this article].
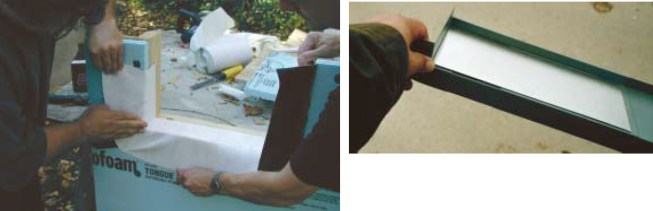
Another option is Jamsill Guard, an injection-molded plastic sill pan with seamless corners, shown above. The author highly recommends Tyvek FlexWrap for pan flashings, whether the drainage plane is housewrap or rigid foam.
With foam sheathing, it’s particularly important to drain all water on top of the foam, not behind it, because the foam can trap the moisture inside the wall. We’re showing how to install FlexWrap over foam. Tyvek doesn’t recommend that, maybe because if you stick the flashings right to the foam, you might not buy any Tyvek. But I recommend FlexWrap as a window pan flashing with foam-sheathing drainage planes (it also works with other brands of housewrap).
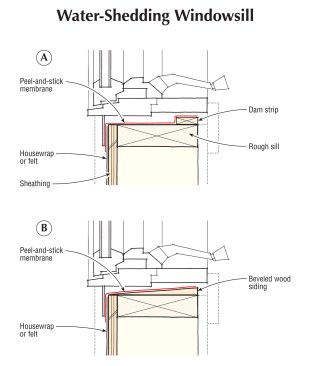
Even water puddled on the sill will dry out better than water absorbed by the wall. Some builders tack a small strip at the back of the opening to block water from moving into the interior, which is a good idea.
But it would be best to slope the sill, so the water will flow out over the drainage plane. A quick trick is to tack a piece of beveled siding over the sill to create a slope to the outside, then apply the flexible membrane. If you need a flat spot for your window to rest on, you can take small pieces of the same beveled material and reverse them to create small level pads on top of the membrane. The membrane seals around nail holes.
Another option is what I call a “window booty.” It’s a premade metal pan flashing that might cost $10 from a metal fabricator’s shop. In my opinion, windows should come with a preformed plastic flashing in this shape. But that would be admitting that the window might leak, and the lawyers don’t want that. So for now we have to make our own.
When you attach the pan, don’t nail down through it into the sill; fasten it through the vertical ears. Then wrap peel-and-stick over it around the window jacks. (With the FlexWrap pan flashings, I don’t wrap the window sides. That’s not the big leak point anyway, so I trust the seal to stick to the housewrap.)
Integrating the window. When we install the window, we integrate it into the drainage plane. The housewrap or felt above the window must lap over the top flange or the top window flashing; we tape the side flanges of the window to the housewrap on the side. But we don’t seal the bottom flange to the wall. That’s the weep hole: We want water to come out there if it has to. We will also provide weeps at the bottom of the wall, though.
A window placed in a wall should have redundant drainage systems. The window itself should drain; the opening the window is in should drain; and the wall the opening is in should drain. At every joint, flashings should kick water to the exterior. If you don’t provide drainage but trust to caulks and sealants instead, you’re asking for trouble.
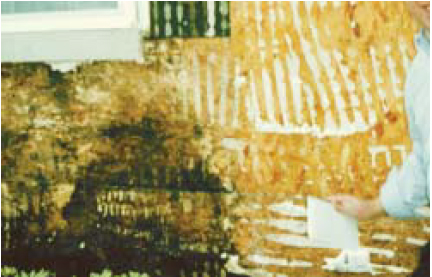
This wall shows characteristic damage from leaks at the window frame joints. Good flashings and a drainage plane would have saved the structure.
Here’s what I’m talking about. We’ve torn the cladding off beneath a window, exposing terminal rot in the wood structure. It’s evident from the dark decay pattern that the water intrusion originated at the window’s corner and center mullion joints, then spread laterally and downward to soak the whole wall area beneath the window. Areas away from the window were not affected.
This is an adhesively attached EIFS wall, where the foam board is a cladding and not a drainage plane. EIFS is a classic nightmare, of course; but the drainage details and not the cladding are to blame. EIFS systems that use a drainage plane and good flashings beneath the foam board are quite effective and reliable, and wood or vinyl siding installed without good drainage systems can be a disaster just like EIFS.
Pan flashings for doors. I have large builder clients who have experienced thousands of callbacks and claims because wood floors were damaged by leaking doors. When they started using pan flashings like the metal one above, the problem went away. Any door with sidelights, and any sliding door, should have a good pan flashing — don’t rely on the guarantee.
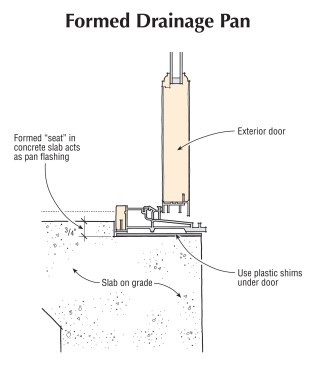
Here’s a trick from the commercial building industry. For the exterior doors of a slab-on-grade house, form a 3/4-inch depression in the slab to create a seat. You’re building a preformed pan flashing right into the edge of your slab. When that mulled front door or that slider leaks, this little step-down will kick the water outside and save your floors. The key is to shim the door up — don’t set it down where it will be sitting in the puddle. (Use plastic shims, not wood.)
Rain and Vapor
Rain is the most important wetter of walls, but it’s not the only one. Occasionally, walls get wet from condensation, and sometimes they start out wet because they’re built with wet materials. And sometimes our rain management systems aren’t perfect. So walls have to be designed to dry out — to the interior, to the exterior, or to both. To understand that, we’d have to take a close look at the vapor permeability of building materials and at the way vapor interacts with buildings. But that’s a subject for another article.
In any case, no matter how well a wall is detailed for drying, there will be trouble if the wall is repeatedly subjected to wetting by rain. On the other hand, if we eliminate rain as a source of wetting, most walls will be fine. That’s why it’s so important to drain everything and to focus on every element of rainwater management: the drainage plane, the drainage space, the flashings, and the weeps. If we pay proper attention to those key details, we will have done most of what is necessary to provide our buildings with dry walls.


