I had an argument once with a guy who tried to tell me, “All floors are the same. You get in, you sand ’em, you coat ’em, and you get out.” But that’s wrong. In fact, the truth is the exact opposite: Every floor is different. You could take a batch of oak flooring and put it in ten different houses and have ten different sets of problems.
I’ve been refinishing wood floors for more than 25 years — up until a couple years ago, when I decided to give my knees a break and retire. I figure I’ve sanded and coated more than 3,000 floors — everything from chicken coops and old storefronts to castles and multi-million-dollar mansions — and each floor has been unique. I came away from every single job learning something new. A lot of it I learned the hard way — by making mistakes and surviving by the skin of my teeth.
In this article, I want to go over some of the basics of sanding wood floors. In a future issue, I’ll discuss staining and finishing.
The Rookie
I did my first floor job with rented equipment. I had been refinishing woodwork in old Victorian homes for a while, and when a customer said, “My floors are wood — can’t you do them too?” I said, “Why not?”
I rented a floor sander, edger, buffer, and vacuum and bought some urethane and some sandpaper. I didn’t know what grit I needed, so the clerk told me, “You have to have a rough cut, a medium cut, and a fine cut.” And he sold me a 16-grit, a 50-grit, and a 100-grit. Needless to say, after that first floor, I nearly got sued.
One thing the clerk at the rental store didn’t tell me was that I had to feather the drum sander to the floor. I just dropped the drum down and started to go, and I dug a trough parallel to the end walls that you could plant geraniums in. Nor did anyone tell me that the 7-inch edger disk would stop an inch and a half away from the corner, and that I had to do the corners with a scraper, by hand.
I didn’t know that the big drum sander, the edger, and the scraper would all leave different scratch patterns on the floor, making it crucial to go over the whole floor with a finer-grit buffer screen before staining or finishing to rub out all those varying textures. In short, I didn’t know about any of the many things that will create different imperfections in the wood surface — flaws that you often can’t see in the bare wood, but that could and did become glaringly obvious after I’d stained and coated the floor.
I learned those details, and a lot more little items, on that job and on future jobs. I learned that different woods sand differently and take stain and finish differently. I learned not to take a job over the phone and not to give a square-foot price. And I learned to use good equipment.
Professional Equipment
A good floor refinisher needs to have his own equipment, and he needs to take good care of it. You can’t do a top job with equipment from a rental center, because it has probably been abused and doesn’t get properly cleaned or maintained.
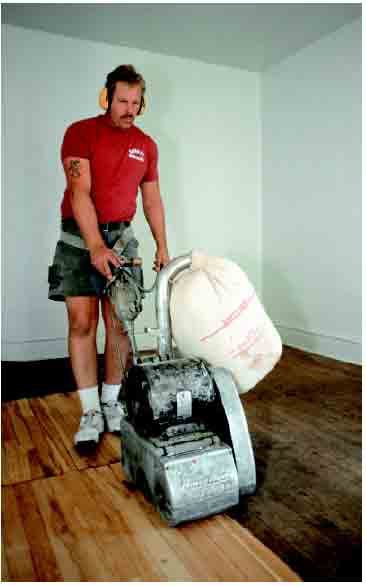
There are four main power tools required, and each one has its special function. There’s a big, heavy floor sander for removing old finish and creating a smooth, flat surface on the main floor. There’s an edger for grinding next to the wall where the big machine won’t reach. There’s a “platypus” with a long bill for sanding under radiators and the like. There’s a buffer for getting an even texture on the raw wood and for scuffing between finish coats. And, as I mentioned, you need a sharp scraper for corners and other areas that have to be hand-scraped.
Drum sanders. The drum sander most rental places carry has a big cylindrical drum with two cracks in it. You take a large sheet of sandpaper, wrap it around the drum, tuck the ends into the crack, and then turn two bolts to tighten it. The only problem is that you’ve got a perfect cylinder with a flat spot on it. Every time that crack hits the floor, it causes what’s called a chatter mark. When you look at the finished floor, you can see this repeating symmetrical pattern perpendicular to the boards.
The better choice is a model like my German-made machine, which has a main drum with a small roller up above it that takes belts. The belts are seamed together on the diagonal, so there’s no chatter mark. To change belts, you lift up a little lever that takes the tension off the roller. You slip the old belt off, slide the new one on, and you’re back in business.
Good models also have a lever for feathering the drum slowly onto the floor as you move forward. That way you don’t burn trenches into the wood every time you start and stop. Unlike the buffer, edger, and platypus, the big machines run on 220-volt power.
Edgers. Edgers haven’t changed much in 50 years. The motor drives a 7-inch disk of thick, heavy D-grade paper, anywhere from 12-grit up to 100-grit. The disk has a hole in the center, and you invert the edger, take out the bolt and its concave washer, take the old disk off, mount a new one onto the stiff rubber pad, bolt it, turn the machine over, and turn it on. The edger has two steel wheels in the back, which I like to wrap masking tape or duct tape around so they won’t put marks in the floor.
The platypus. The platypus is designed for sanding under low objects. It’s a little 3-horse motor with a pulley belt gear on the bottom of it, two big wheels at the rear, and a long extension on the front that looks like a platypus bill. At the end of the extension is another wheel driven by a V belt, which has a 7-inch edger disk mounted to it. The machine has handles like a bicycle. You get down on the floor on your knees, very carefully ease the nose down, and drag it back and forth. It’s a lot of work.
The buffer. A buffer is a pretty simple machine, and it will last forever if you take care of it. It’s basically just a motor with a 14- or 16-inch brush. You set the brush down on a synthetic fiber pad, with a screen under the pad, loaded with anything from a 50-grit up to a 120-grit. The brush wheel rotates slowly — maybe 80 rpm — and under the buffer’s 75-pound weight, the screen smoothes down the scratches made by the drum sander and edger, leaving fine, uniform scratches over the whole floor.
In the old days we used steel wool under the buffer, instead of the synthetic fiber pad and screen. The pad and screen are a big improvement — fine bits of steel wool used to rub off and get rust into the floor. Other than that, though, the buffer also is the same machine it was 50 years ago.
A lot of the buffers in rental stores are 25 to 30 years old; I still have the first buffer I bought. You blow the dust out of it, put new brushes in the motor, clean it once in a while, and it’ll keep running. You can pull the brushes out and replace them for about $5 a set. Of course, if you don’t do that, the core of the copper wears out, and that’s a $900 replacement.
Scrapers. The scraper has a wooden handle with a Carborundum blade on the end of it, which has to be sharpened with a file over and over after not very many strokes. You pull the edge over the wood in the corners, or anywhere that a machine can’t reach. It’s tedious, but there’s really no other way.
Estimating Refinishing Jobs
Hundreds of times, I’ve answered the phone and heard, “Listen, I need a floor stripped. What do you get a foot?”
What do I get a foot? “I’m sorry, I can’t give you a square-foot price. Every job is different.”
Say you have a room to sand and coat that’s 30 feet by 30 feet; that’s 900 square feet. You’ve got 120 lineal feet of walls to edge, and there are four corners to scrape. But now consider a house that’s 30 by 30 — same square footage — but with four rooms, a set of stairs, and a hallway. There could easily be 300 feet of wall to edge. With four rooms, plus the stairs and hallway, there are 24 corners to pull. Say in the hallway the boards run the short distance; then that whole space has to be done with an edger. If there are closets in the bedrooms, they have to be done with an edger, too. If there are radiators in a room, they have to be taken out; if they’re baseboard radiators that can’t come out, you have to use the platypus, which is even harder to run than the edger. Wherever there’s a cast-iron radiator that won’t come out, someone has to hand-scrape under the pipes.
It’s an hour’s work to do one radiator. Somebody could completely sand a 10×10-foot room in the time it takes to do one radiator. I would never hire anyone who gives a square-foot price.
Assessing moisture conditions. Before I start any job, or even price it, I go to the site and do what I call a primary survey. Is the house on a mountain-top, is it next to the beach, is it in a swamp? Is it in a forest and surrounded by trees so that all the moisture is trapped?
Moisture affects the ability of the wood to be sanded, stained, and coated. You always want to check the moisture content of the floor — it could be anywhere from 4% to 34%.
Ideal moisture contents vary in different parts of the country, because the wood has to come to equilibrium with the environment, and average atmospheric humidity differs from place to place (see Figure 1).
Ideal Wood Moisture Content by Region
Figure 1.Wood flooring should reach equilibrium with atmospheric humidity before being installed, sanded, or finished. This map indicates appropriate ranges of wood moisture content.
My primary survey also includes a surface inspection. First I get the room completely cleared out and vacuum the floor. Then I get down on my hands and knees with a pair of kneepads on and examine it. If there’s candle wax dripped here and there, it will get worked into the floor and prevent the finish from adhering. I scrape that up with a metal scraper. Sometimes I find little bits of black tar. That has to be cleaned up, too — if I grind tar into bare wood, it’ll be tough to get out.
I also look for nails, and before I sand, I countersink them all (Figure 2). One nail can ruin a whole job. You get something called a nail run. Sometimes the nail is flush with the surface of the floor, and you don’t see it until you sand it and it shows up as a little silver line. But that nail just put a groove in your sanding paper. Now, with every run down the floor, you’ll duplicate that pattern on the floor. It makes this little raised tube on the surface of the wood; then when you stain the floor and finish it, the first screening will take the color off the top of those little raised strips. You’re at the very end of the job and strips pop up everywhere. Nail runs are scary.
But even scarier is what can happen if you run over a drywall screw, or a dime or penny that has fallen into a crack between wide boards. Part of the reason for vacuuming is to suck up those things. If a floor sander hits a screw at 2,800 rpm and that thing sparks while your bag is full of fine sawdust and you’re sucking in 1,600 cfm of air, you can get a fire in the bag. I’ve had bags blow up on me twice. I’m sanding along, and all of a sudden it smokes and boom! It just bursts into flames. That’s why I have a fire extinguisher with me at all times. I can immediately shut off the machine, leave the bag where it is, and extinguish the fire right there. I don’t carry the bag through the house, because I don’t want to set the rest of the house on fire.
Figure 2. All nails need to be countersunk before any fine sanding takes place. If the drum sander hits a nail, it will groove the sandpaper and cause a disfiguring “nail run.”


