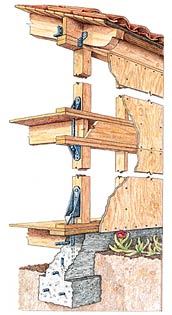
Framing Around Hold-Downs
The hold-down hardware in the walls will have to line up
with the anchor bolts in the concrete when the walls are tilted
up. So before any framing begins, the layout man needs to
accurately note the location of key structural members such as
bearing posts, window and door trimmers, and king stud
assemblies, so that they match the location of the hold-down
hardware. In some cases — at inside corners or near a
window or door, for instance — it may be necessary to
predrill a structural member or leave out the adjacent stud in
order to have access to the nuts and bolts.
At the foundation, a typical hold-down consists of an
embedded anchor bolt connected to a metal bracket with a nut
and washer. The metal bracket is then attached to a structural
member such as a trimmer, with a set of horizontal bolts.
Tolerances of plus or minus 1/8 inch must be met to make
installation go smoothly. Otherwise, it takes a pretty big
hammer to bend the steel into submission.
All hold-downs must be installed with the bottom hole at
least seven bolt diameters from the end of the post. This
prevents the horizontal bolt from passing through the post too
near the post end, where it could tear out under load. It used
to be that some of the smaller hold-downs had to be held up a
certain distance — the "standoff" distance — when
installed. But now Simpson Strong-Tie, the hardware
manufacturer I use, has built this standoff distance into all
of its hold-downs. The HDA series installs flat against the
sill and the bottom hole is automatically seven bolt diameters
up. The heavier-duty HD series has a folded down "ear" that
presets the distance (Figure 4).
| Figure
4. Some hold-downs, depending on the
manufacturer, have to be held up a specified "standoff"
distance from the plate, to ensure that the horizontal
bolts don’t tear out the end grain of the post
under load. |
Hold-downs are installed with commonly used tools, such as a
1/2-inch or 3/4-inch drill and auger bit, open-end wrenches, a
deep-socket set, and, occasionally, a pneumatic impact wrench.
Once the plywood shear paneling has been installed, access to
the hold-down bolts is restricted. So we usually connect and
tighten the hardware after the walls have been plumbed and
lined, but before the plywood shear paneling is installed.
Sometimes the plywood has to be nailed before the hold-downs
are connected. In this case, we use ratchets and pneumatic
impact wrenches to get into tight spots. It’s
occasionally necessary to preinstall hold-downs to king post
assemblies before framing the king post into the wall.
Hold-downs can also be used to connect two floors together
(Figure 5).
Figure
5. To provide a secure load path between stories,
engineers specify bolted hold-downs, with the lower one turned
upside down (left), or straps like the Simpson FTA (middle) or
MST (right).Tying to the Roof
To
ensure that the plywood extends (and ties) all the way up to
the top plate, we install the rafters after nailing the shear
panels flush with the top of the double top plate. Blocking is
nailed into place between rafters and A35F clips are installed
on 16-inch centers to tie the blocking to the top plate (Figure
6).
| Figure
6. Here, Simpson A35F clips tie eaves blocking
to the ceiling diaphragm below. |
In cases where roof overhangs are large and wind uplift is
an issue, we use H-series or hurricane offset straps to tie the
rafter to the top plate.
Roof sheathing.
The
building code requires us to stagger the joints of the roof
plywood. For added strength, we are often required to block
between rafters along plywood edges or to use tongue-and-groove
plywood. We also nail the sheathing to the perimeter blocking
installed between rafters. This allows the transfer of shear
stress from the roof to the walls and down the hold-down path
to the foundation.
Shear Basics
The plywood
sheathing on the walls of a house does double duty. First, it
provides resistance against racking — the tendency for a
row of studs to collapse like dominoes along the length of the
wall. Second, when lapped across the wood members and nailed
properly, plywood ties the pieces of the framing together.
A good example of this is the joint between a first and
second story. If the plywood sheathing spans from the lower to
the upper floor and is properly nailed into the first-floor
studs and top plates, the second-floor rim joist (or blocking),
and the second-story studs and plate, the plywood ties the two
floors together.
Typically in residential construction, 1/2-inch Structural
#1 (called "struc one") plywood is specified for shear
paneling. Plywood ratings call out the veneer grades,
adhesives, and the structural span of the plywood. Do not
substitute a different grade of plywood for the specified grade
without the engineer’s approval.
Plywood shear panels should be placed and nailed so that
they connect the sole plate or bottom plate of the wall to the
vertical framing members. Shear walls should also be blocked
between studs at the top of each sheet of plywood to accept
edge nailing. The plywood sheet must be nailed so that all four
edges have framing members behind them to allow for full
perimeter nailing.
All our plans have a shear nailing schedule that specifies
the spacing and size of nails to be used (See sample schedule,
below).
Shear Wall
Schedule |
Symbol | Wall Sheathing | Sill Connection |
| 3/8" ply. str II,
blocked w/8d
@ 6" o.c. E.N. & 12" o.c. F.N. | A34 @ 24" o.c. 16d @ 6" o.c. |
| 3/8" Ply str II,
blocked w/8d
@ 4" o.c. E. N. & 12" o.c. F.N. | A34 @ 24" o.c. 16d @ 6" o.c. |
| 3/8" Ply str II,
blocked w/8d
@ 3" o.c. E.N. & 12" o.c. F.N. | A34 @ 16" o.c. 16d @ 3" o.c. |
| 1/2" Ply str I,
blocked w/10d
@ 3" o.c. E.N. & 12" o.c. F.N. | A34 @ 8" o.c. 16d @ 3" o.c. |
| 5/8" G.W.B
blocked w/6d cooler nails
@ 4" o.c. E.N. & F.N. | A34 @ 48" o.c. 16d @ 8" o.c. |
| 7/8" stucco over paper backed lath
w/16 GA. staples
@ 6" o.c. top & bottom & E.N. & F.N. | A34 @ 32" o.c. 16d @ 8" o.c. |
This typical shear wall schedule
specifies plywood size and type as well as edge-nailing
(EN) and field nailing (FN) size and spacing |
For instance, a schedule that calls for a 4- and 12-inch
nailing pattern refers to a 4-inch nail spacing along the
plywood perimeter and a 12-inch spacing in the rest of the
sheet.
Shear paneling should be installed so that the joints are
staggered. The shear plywood should continue to the top plate
of the wall and in two-story construction should tie the first
and second floors together. It is critically important that
sheets are gapped 1/8 inch at the joints (we use 16d nails as
spacers.) This allows the sheets to expand and contract with
moisture and temperature changes without buckling.