My company builds high-end custom homes in Southern California. We used to frame everything with wood, but about eight years ago we started using light-gauge steel (LGS) because it gave us a higher-quality building. LGS won’t rot, burn, or get eaten by termites, and every piece is perfectly straight. Now we rarely frame with anything but steel.
I recently started a business selling LGS materials and training builders to frame with steel. The same structural principles apply whether you frame with wood or steel; you still have studs, beams, headers, joists, and rafters. Some things are different, but once you understand what the differences are, you can frame with steel as confidently as you frame with wood.
Engineering the Structure
Each stud manufacturer used to have its own method for assembling buildings. As a result, engineers had to provide stamped drawings for each job. But a few years back, building codes began to adopt the Prescriptive Method for Residential Cold-Formed Steel Framing, a collection of span charts and construction details for building with LGS. The latest version of the prescriptive method, the Prescriptive Method for One and Two Family Dwellings, has been incorporated into the International Residential Code (IRC) and is available as a separate document from the Steel Framing Alliance. In some jurisdictions it’s now possible to use LGS without consulting an engineer, which is how it has always been with wood.
Even so, I highly recommend consulting an engineer who specializes in LGS. I have to use an engineer because stamped drawings are required in the seismic zones where I build. If the building is big enough, you’ll need an engineer anyway because the prescriptive method does not apply to residential buildings with footprints greater than 36×60 feet. Engineers can also allow you to use details that haven’t made their way into the code. The easiest way to find a qualified engineer is to contact the Light Gauge Steel Engineers Association.
Steel Framing TerminologyTo build with LGS, the first thing you need to learn is how to order material. The Steel Stud Manufacturers Association (SSMA) recently standardized the way it describes studs and track. The convention is to specify the web, member type, flange, and thickness. For example, a set of plans might call for a 1200S162-68. The first set of numbers describes the depth of the web. In this case, it’s 1200, which is 12.00 inches. The letter “S” stands for stud (“T” for track, “F” for furring channel). The next set of numbers refers to the width of the flange. In this case, it’s 162, which is 1.62 inches (15/8 inches). The last number refers to the thickness in mils (thousandths of an inch) of the steel used to make the stud. Here, it’s 68 mils (.068 inch) thick, 14-gauge steel. By convention, track is sized by inside dimension (ID), and studs are sized by outside dimension (OD). This means that studs will fit perfectly if you order them the same size as the track. Wood framers build walls with 2×4 and 2×6 studs. The equivalent material for steel framers would be 362S162-33 (3 5/8 x 1 5/8-inch 20-gauge) and 550S162-33 (5 1/2 x 1 5/8-inch 20-gauge). You can tell by looking that they’re wall studs, but different-gauge metals are sometimes specified for different parts of the frame. To avoid confusion, each stud and track gets labeled every foot by the roll-forming machine. Additionally, some manufacturers color-code the ends of material. The most common colors by gauge are: 20-gauge (33 mils), red; 18-gauge (43 mils), yellow; 16-gauge (54 mils), green; 14-gauge (68 mils), orange; 12-gauge (97 mils), blue or black. There are also designations for the strength of the steel, the thickness of the galvanized coating, and whether the studs have holes punched in them. Strength is rated in “ksi.” For 20- and 18-gauge material, the minimum rating is 33ksi. For 16-gauge and thicker, it’s 55ksi. G-60 is the minimum galvanized coating allowed for load- bearing studs. You can order G-90 and thicker coatings for buildings in harsh, exposed environments. |
Material
Most contractors are familiar with the light-gauge steel studs and track you can buy at lumberyards and drywall supply houses. These studs are usually 25-gauge steel with 1 1/4-inch flanges and are intended for non- load-bearing applications such as partition walls. The load-bearing studs used in LGS houses are much stronger, anywhere from 20-gauge to 12-gauge in thickness, with a minimum 1 5/8-inch flange. They also have a thicker galvanized coating and are made from higher-strength steel than non-bearing studs.
Structural studs are not stock items. You can buy them through a drywall supply house, but they will be made to order by a roll-forming company. The roll former slits (cuts to width) the steel and runs it through a computer controlled machine that bends the profile, punches holes, and cuts each stud or track to the length you request. Incidentally, roll formers do not differentiate between joists, rafters, and studs. To them, almost everything is a stud or track. For example, a joist would be considered a 2×12 stud.
Around here, the lead time for a steel framing package is a couple of weeks. It takes the roll former only about a day and a half to produce all the framing for a 3,000-square-foot house. If you change something and need extra material, you can usually get it made in a few days. The roll formers I use don’t charge a premium for small runs of added material, though I might have to pick it up myself or pay a delivery charge if I need it in a hurry.
The good thing about having framing stock made to order is that there’s no upcharge for having it precut to the exact length you need. This saves labor and reduces waste (see Figure 1).
Figure 1.As you can see from the size of the scrap pile, there’s not a lot of waste on a steel framing job. This is what’s left after framing half of a 3,000-square-foot house.
If you need 14-foot 1-inch joists, you order that exact length. If you’re not sure what length is needed, you can order the joists a couple of inches long and trim them on site. With wood, you’d be buying 16-foot pieces and ending up with longer pieces of scrap. You could use some of it for blocking, but there would still be more waste than with steel.
Tools and Fasteners for Light-Gauge Steel
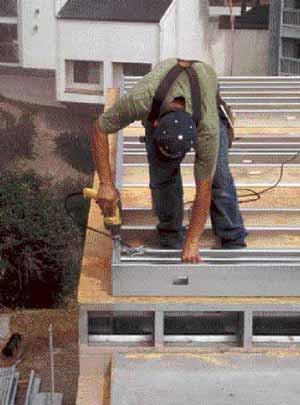
The most popular tool for cutting studs on site is a 14-inch abrasive cut-off saw (Figure 2). The blades are cheap, but they throw a lot of sparks and wear out quickly.
Figure 2.Most framers use chop saws with 14-inch abrasive blades to cut studs (right). It works, but the blades produce a lot of sparks and wear out quickly on heavier-gauge steel. It doesn’t cost more to order precut studs, but if you need to cut on site, a dry-cut blade will do the job. The orange paint indicates that the joist is made from 14-gauge steel (below).
A better way to cut LGS is with a dry-cut carbide-tipped blade in a circular or cutoff saw. Be careful where you point the saw, because waste is ejected as a spray of metal chips. Heavy-duty electric shears and nibblers are good for cutting curves. A guy I know cuts metal framing with a 14-inch gas-powered hand-held saw. It’s the LGS equivalent of cutting wood framing with a chainsaw.
Screwing and Nailing
I use an old 2,500-rpm B&D screw gun with the versa clutch. The clutching action makes this tool somewhat like using an impact wrench. With so many fasteners to drive, it’s worth using a corded tool, but for small pick-up jobs I’ll use a 12-volt Makita cordless impact driver. Drywallers and commercial steel stud guys like using 4,000-rpm guns, but you’ll snap a lot of bits if you release the trigger a split second late.
Areas that will be drywalled or sheathed should be put together with low-profile Phillips head screws. Other connections should be made with hex-head screws, because it’s easier to steer and control them with the gun. A variety of screws are available for different steel framing applications, and new ones are being developed every year.
Specialized nails and guns are available for assembling certain parts of LGS buildings. We use nail guns primarily to fasten wall and roof sheathing. Guns and fasteners are also available for attaching drywall, siding, rigid foam, and for certain steel-to-steel connections (such as stud to track). The nails have limited shear values and vary in design depending on the gauge of the stud and the sheathing material.
Hand Tools
The contents of your toolbelt will change when you start framing with steel. Keep your hammer for prying and bending, but replace your pencil with a Sharpie felt-tip marker. You’ll need heavy-duty aviation snips for notching and Vise Grip clamps to hold parts together for fastening. Metal studs are perfectly straight, so you can plumb and level anything in the building with a magnetic torpedo and a 4-foot level. Finally, you’ll want a 5/16-inch magnetic nut driver, 2-inch and 8-inch magnetic bit extensions, and a handful of #2 short Phillips bit tips.


