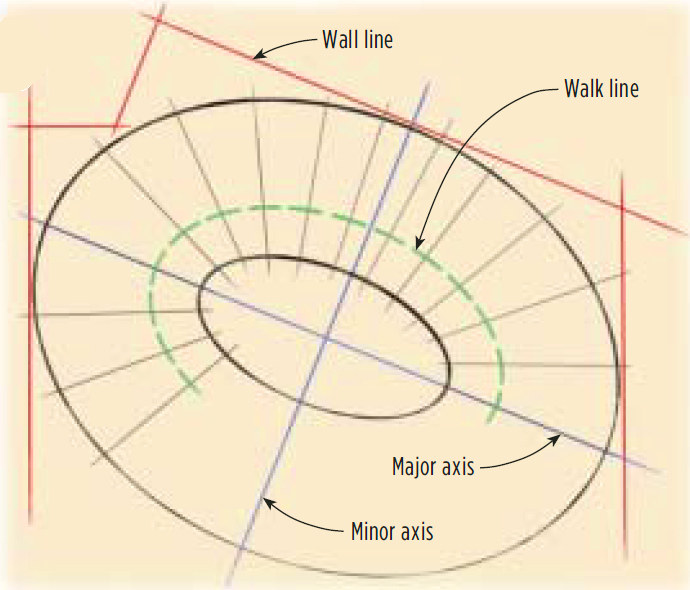
Recently, my friend Nick Ridge and I took on a job in Northern California that had an interesting challenge — an elliptical staircase with a self-supporting inside stringer. To make things trickier, the major axis of the ellipse paralleled a back wall that ran at an angle to the two side walls enclosing the staircase. I had to figure out a way to size the ellipse so that it hit the walls at three unknown tangent points.
The architect’s drawing was of little use and I couldn’t figure out a way to do the layout with math, so I resorted to the tried-and-true caveman method — trial and error — in hopes of eventually finding the correct-size ellipse to fit the space. Working in an open area elsewhere in the house so that the proliferation of trial lines wouldn’t confuse us later, I snapped out the wall layout and started drawing trial ellipses. I got lucky: On the second try, I found the right focus points for drawing the ellipse that fit the space.
After drawing the outside and inside curves of the stair, we did a quick check to make sure the stairs would meet code: First, we drew a third ellipse 12 inches in from the inside edge to define the “line of travel.” Using a 50-foot steel tape, we measured the total length along the line of travel and divided by the specified number of treads (11) to make sure the treads were wide enough at that point. The result — 9 5/8 inches — was better than the 9-inch minimum required by the local code.
We used the same procedure to check the tread width along the inside of the curve and came up with 63/16 inches — slightly better than the 6-inch minimum requirement.
Next, we divided the inside and outside ellipses by the number of treads, then snapped lines between the marks to define the treads.
Time to Cut
We could now use the floor layout as a pattern to cut all the various pieces. We used 1 1/4-inch plywood for the treads, and 11 1/4-inch TimberStrand rim board for the risers. The plan was to attach 2×4 cleats to the front of each riser to support the tread below.
Cutting all the pieces took a while because, unlike standard circular-stair parts, each tread — as well as every angle on the end of the risers — was unique. We took the angle cuts directly off the floor layout with a protractor, then adjusted the circular-saw bevel accordingly for each cut. We cut both the risers and the 2×4 tread cleats this way.
To mark the treads, we positioned sheets of plywood over the floor layout, then redrew the inside and outside elliptical curves using the same focus points as before.
Walls
Next, we made the elliptical wall plates for the perimeter walls out of plywood. With the treads in position on the floor, we laid out the wall studs — which would also support the outer end of the risers — to fall either in front of or behind the line of each riser assembly, depending on the situation.
When I’m framing a standard circular staircase, I can easily position the studs exactly parallel to the riser so they can be sandwich-nailed together. It wasn’t so easy with the elliptical stair: While some of the studs fell parallel to the incoming riser, others had to be rotated slightly to give good support but not affect the drywall nailing. In some cases, the angle of the studs was so severe we had to make vertical cheek cuts on the end of the riser.
At the corners, we were able to run the risers long and connect to the studs of the rear wall as well (refer back to B), which greatly strengthened the staircase.
With the perimeter curved wall in place, we calculated the riser height and laid out a floor-to-floor story pole to mark where the top of each riser assembly would be nailed to its appropriate supporting stud. We then used the riser marks on the perimeter studs as a reference to precut temporary support studs for the inside of the ellipse.
Assembly
At last we moved on to the fun stuff: putting it all together. We started by attaching the 2×4 cleats to the risers, then worked our way upward, nailing off each riser assembly to the correct perimeter stud. We tacked the temporary support at the inboard end and added the tread on top, completing each step before moving on to the next.
To make sure we stayed exactly on our floor layout below, we plumbed down with a level at the end of each tread.
Once all the treads were in place, we began the process of applying overlapping layers of 1/8-inch plywood to build up a 1 3/4-inch-thick structural stringer. Nick first installed pieces of 3/4-inch plywood in the end of each riser-tread assembly, with the stair’s slope along the bottom edge. This would give us a smoothly ascending line to use as a guide when we cut the bottom of the stringers after the glue-up.
We found that 1/8-inch wacky wood worked well in the tightly curved sections at the top and bottom, while standard 1/8-inch door skin was more than flexible enough for the middle part. We used Weldwood plastic resin glue and plenty of screws and clamps, applying layer after layer.
When the glue had set up, Nick went to town with a jigsaw and circular saw to put a finish edge on the bottom of the stringer and cut out the triangular sections on top.
Later, finished oak treads would be cantilevered beyond the stringer by the trim guys for the traditional open-staircase look. But for our part as framers, we only had to remove the temporary riser support studs, take a moment to admire a once-in-a-lifetime project, and move on to our next adventure.


