My crews used to install gable trusses by nailing a piece of two-by lumber to the gable wall of the house in such a way that it stuck up high enough to catch the top chord of the truss when we rolled it. The two-by, which was braced to a stake in the ground, prevented the truss from going beyond 90 degrees and toppling off the end of the building.
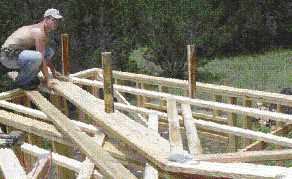
Then I came up with a trick that makes it faster and safer to install these trusses. Instead of standing a single truss against a vertical two-by, we create a wide stable base by nailing spacers between the first two trusses and standing them as a single unit. As long as it’s not too windy, the truss unit will sit upright on the walls.
Next, we tack the unit to the top plates, quickly roll a couple more trusses, and install permanent sway braces. At this point, the first group of trusses is solid enough that we can install the rest without worrying they’ll topple like dominoes. If we are especially concerned about stability, we’ll gang three trusses instead of two.
Richard Birch is a framing contractor in Selma, Texas.
Inexpensive Clamps
by David Frane If you’ve ever installed split columns around a structural post, you know how hard it is to come up with enough fabric band clamps to glue up more than one or two at a time. It always bothered me to leave clamps on overnight, because who knows if they’ll be there the next day.
I ran across these columns on a job site in Saratoga, Calif. The carpenters who installed them used oversize hose clamps to glue them up. Big hose clamps aren’t cheap, but they’re easy to remove and less likely than band clamps to walk off the job.
Easy Bullnose Corner
by Gary Katz When I saw Norco’s “conversion corner” at the JLC Live show, my immediate reaction was, “Why didn’t someone think of this sooner?” I could kick myself for all the three-piece corners I’ve mitered, or the hundreds of dollars I could have saved on premanufactured bullnose corners. Not to mention the time spent lining up and sanding mismatched profiles!
With these plastic corners, all you do is adhere them right above the baseboard height, or just below the crown, and with a little mud work you’ve got a nice-looking chamfered edge that transitions from round to square. Then back to carpentry as usual.
Gary Katz moderates the Fnish Carpentry Forum at jlconline.com


