It does no good to carefully lay out and snap lines for plates if you don’t pay equal attention to plumbing and aligning the walls. Like many carpenters, I learned this the hard way. In the past, we’ve been forced to adjust the lengths of rafters, taper the drywall at ceiling corners, and even struggle to hang doors straight and trim them evenly — all because of poorly plumbed and aligned walls. Now we take the time to plumb and align the walls properly to ensure that the top plates end up directly above the bottom plates. It takes our three-man crew about 30 minutes to plumb, straighten, and brace all the walls on an average 1,200-square-foot floor of a house. On the following pages, I’ll describe our method.
Simple Tools, Basic Materials
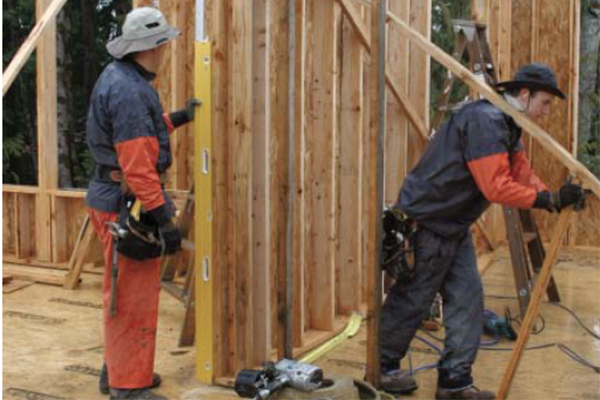
It takes only a few basic tools to plumb and straighten walls — mainly a good level and some nylon dry lines. We like Stabila’s Plate Level (800/869-7460, www.stabila.com) because it can be extended the height of the wall and its offset design doesn’t get thrown off by bumps and bows in the studs. And we recently started using a PLS5 point-to-point laser (800/601-4500, www.plslaser.com), which lets the operator know the wall is plumb when both the down beam and the up beam hit the edges of the plates. I also use a 3-foot stepladder; although two of the guys on my crew are tall enough to reach 8 or 9 feet up with a nail gun, I’m not so fortunate.
Finally, we order 2×4 material for bracing. The braces should run at a 45-degree angle, so for 8- and 9-foot walls we use 12-footers.
Plumbing Perimeter Walls
The process of standing and plumbing the outside walls really begins when we frame the deck, which we’re careful to make level and square. Our walls are already sheathed when we stand them, which means they’ve been squared on the deck.
In most cases, when we stand the walls the outside corners are either dead-on or within 1/8 inch of being plumb. Now, I may take some heat for saying this, but I think it’s acceptable for the corners of an 8-foot-tall exterior wall to be as much as 1/4 inch out of plumb. I allow this tolerance because racking a wall once it’s been sheathed is difficult. If the wall is less than 10 feet long, we might be able to rack it by pushing on the upper corner with a forklift, but that will get us only about 1/8 inch.
If we’re really desperate, we might “remodel” the corner by pulling the sheathing nails from the corner studs, beating them plumb, then renailing the sheathing. But, in fact, because we’re careful at the deck framing stage, this is almost never necessary, and the vast majority of our walls are on the money or less than 1/8 inch out of plumb.
Straightening and Bracing
Next we stretch our dry lines to gauge the straightness of the wall. Many framers I know stretch the string between 2×4 blocks nailed to the inside edge of the plates, which allows them to use a 2-by block to gauge the space between the plate and the line. We prefer to put the string 1/2 inch above the plates and in line with the inside edge. Then we stand under the wall and sight up the inside edge of the plates to see where they are in relation to the line, which is faster than using a gauge block.
Because we always cull the best plate stock, straightening the walls is fairly easy. The plate is either good where it is or has to come in or go out. It’s unusual for our plates to be more than 1/2 inch out of parallel with the dry line.
If we like the plate where it is, we’ll go ahead and nail diagonal braces between the deck and plate to hold it in place. Generally we start bracing at one end of the wall and work our way toward the other end. But if there’s a really big bow somewhere, that’s where we’ll start. It goes without saying that it’s next to impossible to straighten a bowed header, so we’re also careful to reserve the straightest stock for long headers.
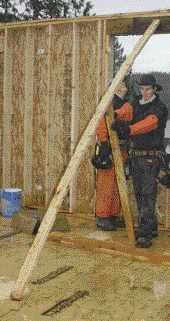
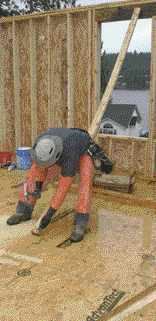
Spring braces. We typically use spring braces to push the plates out or pull them in. If the top has to go out, we nail the 2×4 brace on the flat against the plates, sit against the middle to “shorten” it by springing it down, and then nail the bottom to the floor. We try to hit a joist; if we can’t, we nail the bottom of the brace to a cleat that does.
When we get up off the brace, it springs back and pushes the wall out — usually too far, which is exactly what we want. We then take a 4-foot 2×4 scrap and wedge it between the bottom of the flat brace and the deck. This shortens the brace and pulls in the top of the wall. We wedge the 2×4 scrap in as tightly as needed to bring the top plate in line with the string, then nail it off.
We also use spring braces to pull walls in. The only difference is we don’t sit on the spring brace when we first nail it in. If the wall proves really hard to move in, we’ll pull it slightly farther than necessary, knowing it will probably creep back out a bit.
Using a push stick. Sometimes a wall is so hard to move we can’t budge it with a 12-foot spring brace. In that case, we use a push stick, a 16- or 20-foot brace that can be sprung even more than a 12-foot brace. We wedge the push stick between the top plate and either a solid cleat on the deck or the bottom plate of a nearby wall. We leave the push stick in place long enough to secure the wall with a normal brace. There’s usually so much tension on the brace, we push the wall 1/8 to 1/4 inch beyond plumb before bracing it. When we remove the push stick, the wall usually creeps back to a plumb position.
When he gets off, the brace springs back up and pushes the wall farther out than it needs to go.
A carpenter nails the brace to the wall, then springs it down by sitting on it before nailing it to the deck.
Interior Walls
We frame most of the interior walls before installing the joists above, so we plumb and align those after the exterior walls. Interior walls go quickly because many of them intersect exterior walls, which are already plumb. Because they’re framed with 2x4s and are unsheathed, interior walls are easy to rack square and straighten; we can usually muscle them straight without using spring braces.
We straighten the longest walls first, especially hallways, because it’s particularly noticeable when they aren’t straight. In most cases, hallway walls don’t hit the exterior, so we start at one end, plumbing and bracing in both directions; plumb and brace the other end; then straighten in between.
In halls and stairways with parallel walls, we straighten and brace only one side, then quickly straighten the other side by nailing temporary 2×4 spacers between it and the side that’s already straight. After we’re done with the interior walls, we go back and check all the door openings to make sure they’re plumb enough for the finish carpenters.
How Much Bracing Is Enough?
Some framers I know use so much bracing you can hardly walk through the house. I believe that if you place the bracing carefully, there will still be room to work inside. We usually put braces right at the corners and every 8 to 12 feet in between, taking care to avoid placing them in front of doorways.
It’s not necessary to use a dozen nails at each brace, but you do have to make a solid connection. We put three nails at the top and two or three at the bottom of each brace. We make sure we haven’t nailed into the joints between the plates, and we test every brace before moving on. We learned to do this after the bracing on a gable rake wall came loose. No one noticed the gable had moved out of plumb until it was too late, and the finish carpenter had to shim the tops of some cabinets way off the wall.
Sometimes you need to be creative about how to install braces. We don’t want to nail into a basement or garage slab, so in those areas we angle in the braces from nearby walls or wood-framed floors.
When to Remove the Bracing
The wall bracing doesn’t come out until the floor or roof above is sheathed. On a two-story house, we’ll leave the first-floor braces in place until we need to use them on the walls above. We leave the upper-floor braces in until the roof is stocked. This is especially important with heavy roofing material like tile, because stocking too much in one place can cause the rafters to push walls out of whack.
This happened to us about a year ago in a kitchen with a long-span cathedral ceiling. Even though the walls were braced and the rafters sheathed, there was enough weight in one spot to push the outer wall out of plumb, which we didn’t notice until it was time to install the cabinets.
It’s always a good idea after framing is complete to go back and check the walls for plumb. Even if you did a superior job of bracing, there’s always some “creep” that happens when people start climbing around on the walls to set joists or trusses. This is particularly true if it rains a lot before the roof is tight to the weather — a common occurrence in our area. Drenched framing sometimes bows even more when it dries.


