Before
Occasionally you have the opportunity to drastically improve the appearance of a house as part of a living-space upgrade. That was the case on the project shown here — a master suite and porch addition on a home that had a 3/12 main roof and an attached garage with a flat roof. Buildings with low- and no-slope roofs are just asking for trouble in the wet coastal part of Washington state where I work, so we decided to raise the roof to a 6/12 pitch as part of the job. This would reduce the likelihood of future leaks and enhance the house’s curb appeal.
Plan of Action
Since the budget was limited, I had to come up with a way to do the work without damaging the finished rooms below. Instead of tearing off and replacing the existing roof structure, we would leave it more or less intact and stick-frame a new, steeper roof over it. We would use trusses on the addition and the porch and for converting the flat garage roof to a gable.
New Truss Roof
To reduce the risk of water damage, we scheduled the project for the driest part of the year. We started by framing the addition, then turned to the garage roof, so that we could leave the main house protected for as long as possible.
The garage roof framing consisted of 22-foot-long 6×12 beams that pitched slightly away from the house, covered with 2×6 T&G decking — a good work platform for staging the new garage roof.
After removing the edge metal, we installed 2×6 top plates along the perimeter of the garage roof deck to create a level surface for the new trusses. Using a builder’s level to check elevation, I blocked and shimmed the plates level, then used 8-inch lags to fasten them to the 6×12 beams.
The trusses arrived the following day, and with the help of two framers I quickly installed them on the garage and the rear addition.
New Stick-Framed Roof
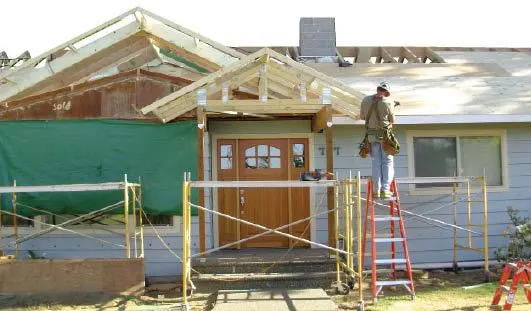
At this point we were ready to begin work on the main gable roof, which would be stick-framed over the existing roof. To avoid the possibility of rain damage, I waited until the forecast called for 10 days of dry weather, then called in the roofing company to strip off the shingles.
We faced a couple of challenges. The existing roof had 24-inch rafter spacing over 16-inch joist spacing, so space would be tight for nailing new rafters alongside the old. I also wanted to maintain the original 2-foot soffit overhang, but without encroaching on the windows below, which steeper rafters would do.
For these reasons, I decided to install the new 2×10 rafters directly on top of the existing 2×6 rafters and connect them together at the plate line. This would make it easier to attach the rafters and allow me to preserve the original wide overhang.
After stripping off the shingles, we removed the lower course of roof sheathing to expose the top plates. We then rolled back the old batt insulation and cut the existing rafter tails and eaves overhangs flush to the wall. Next, we cut a series of large openings through the sheathing for access and venting and installed a new 2×12 ridge supported by posts that ran to a bearing wall below.
Fitting the bottom end. We laid out the plumb cut on the new rafters in the usual manner, but made a 3/12 seat cut, to match the slope of the rafter below. We then installed the new rafters on top of the old, connecting them on both sides with 3/4-inch plywood gusset plates fastened with closely spaced 1 3/4-inch medium crown staples. (Although this project was not engineered, the plan checker at the building department, himself an engineer, had no qualms about signing off on it.)
The original rafters had only been toe-nailed to the top plates, so we reinforced that connection with hurricane ties. We also installed cardboard insulation baffles at the eaves while the area was still accessible from above.
Cross-Gables and Infill
The next step was to tie in the new trusses to the new stick framing. The lower-pitch mono trusses over the back porch stopped at the wall of the house, so we completed the framing by gusseting 2×6 rafters to their top chords and running them back to sheathing on the new stick-framed gable. We also framed a new, steeper gable over the entry and filled in the transition between the addition and the main roof with overlay stick framing.
Finally, we sheathed the rest of the roof, built vented soffits, and called in the roofers. All told, it took three carpenters eight days to reframe the roof.
Elmer Miller owns Miller Estimating & Consulting in Lynden, Wash.


