If it hasn’t happened already, chances are good that one of these days a client will ask you to incorporate some timber framing into a new house or addition. Your reaction probably won’t be neutral. Either you’ll welcome the challenge of working with a timber framer or you’ll feel the beginnings of a headache that you fear will bloom into a full-scale wall banger.
Relax. It’s not that complicated. And you may discover that timber framing adds an attractive element to the usual package you offer clients.
I’ve been involved in timber framing for nearly 20 years. Back in the ’80s, when I was starting out, we mainly built barns and whole houses, like most other timber framers. Gradually that has changed, though, and over the last 10 years we’ve been involved with hybrid frames — structures that are primarily stick framed but have timber-framed spaces included in the plan.
By far, our most popular job is the exposed timber-frame truss ceiling in a great room, in either new construction or an addition. These roofs are typically supported on standard 2×6 exterior walls, which are far simpler and less costly to build than a timber-frame support wall, with its posts and girders.
Why Hybrids Are Popular
Timber framing is labor-intensive and specialized. Without question, it’s more costly than stick construction. By limiting its application to one or two areas, the homeowners get the look and feel they’re after at less cost. Also, reducing the amount of material makes it possible to upgrade the timber quality to kiln-dried or recycled old-growth stock, either of which is as dimensionally stable as wood can get.
Compared with the hybrid approach, a whole-house timber frame can be especially challenging in areas like kitchens and baths where space is at a premium, and where fixtures dictate room layout. Also, having posts in every room tends to dominate the interior design, complicating furniture placement and making it hard to locate plumbing and mechanical ducts and piping. The lead time for a hybrid project is also considerably less than for a whole-house frame.
More drama. Though we still do a dozen or more whole-house timber frames each year, we’re encountering a growing number of architects and clients who prefer area-specific timber framing. There’s a sense that limiting the timber framing in the overall design gives it greater impact — something about less being more.
Truss design can make a space feel contemporary and light, medieval and heavy, or just about anything in between, depending on configuration, timber species, surface, and finish. Finished ceiling material also has an impact. White drywall or pickled tongue-and-groove boards can help a tight area feel larger, while painted drywall or natural-finish tongue-and-groove can visually lower a high ceiling and make a large room feel more inviting.
We also consider roof pitch and span. Steep pitches typically look best, but if a shallow pitch is needed, it’s smart to avoid scissors, hammer-beam, and “tied rafter” systems, which, because of their structural geometry, are not stable at low pitches. Some types of trusses handle long spans more comfortably than others do — any of the trusses that have a low bottom chord, for example. Scissors trusses, hammer-beam trusses, and tied-rafter trusses are more appropriate for shorter spans — say, 24 feet or less.
Working With the Timber Framer
We work with the builder, owner, or architect to explain the possible truss configurations for a given room, and the possible timber species. Once a decision is reached, we design the timber trusses and supply stamped engineered shop drawings. (When working with a timber framer, be sure to request that truss drawings are sealed by an engineer registered in your state.)
We also provide detailed drawings showing how the trusses interface with the stick-built walls. If the builder or architect seems anxious about the job, or the job is especially complex, we’ll visit the site before delivery. On delivery, we handle installation of the trusses and sometimes of the built-up insulated roof, including either the drywall or T&G ceiling boards. Many builders will handle the roof with their own crews.
Framing the Walls
We’ve built trusses for rooms ranging from 16 by 20 feet all the way up to a 102-by-120-foot church sanctuary. Most of our jobs are closer to the small end; a 20-foot-wide by 30-foot-long room is typical.
Depending on budget, we may use fewer trusses spaced farther apart or more trusses closer together. Heavy trusses can generally be spaced up to 16 feet apart as long as they are joined with purlins at 4 feet on-center. In that case, the T&G ceiling boards would run parallel to the trusses, across the purlins. With closely spaced trusses, we run the ceiling boards perpendicular — rather than parallel — to the trusses.
Framing the walls in preparation for the trusses is straightforward. In a typical job, the GC builds standard 2×6 exterior walls to the designated height for supporting the truss bottom chord. Under each truss layout location, a post of ganged 2x6s carries the point load to the foundation below. On a wood-framed floor, the joist cavity below the post must also be blocked solid.
The “mini wall” can be built either before or after the trusses are set. If it’s done before, the builder leaves a 1/16-inch gap on either side so the truss can easily slide into position. If the trusses are made from seasoned or kiln-dried wood, the angled top plate of the mini wall can be flush with the top surface of the upper chord (rafter). If the timbers are green, I advise setting the angled plate about 3/8 inch lower for hardwood trusses and 3/16 inch lower for softwood.
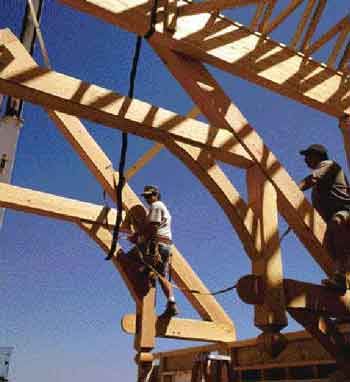
We use Simpson ST6236 straps to tie the trusses to the sidewalls. After the trusses are in place, the purlins are dropped in place. If the purlin ends are dovetailed, they simply slide into their slots; if they have tenons on the ends, the trusses have to be spread slightly so that the purlins can be positioned. We use opposing come-alongs to spread the trusses. The purlins that die into the gable walls are set last.
Once the purlins are positioned and racked square, we nail diagonal 2x4s across the top to hold things true. Then we set the knee braces, which fit between the truss bottom chords and the ganged 2×6 posts. Because we like to join the braces to the posts with a pegged tenon, we give the general contractor a measurement down from the top plate as a “no nail” zone. That way we can drill and chisel the mortise without trashing our tools.
Built-Up Vented Roof
It’s always a good idea to get a roof over a timber frame as soon as possible. There are a number of options. Some projects use structural insulated panels for the roof, while others have a conventionally framed roof built over our truss system. A framed roof is typical when the client wants recessed lighting in the ceiling.
Our own recommendation is a built-up vented roof. We used to use panels, but found that adding strapping and another substrate for venting was both redundant and costly. Our built-up roof system, by contrast, is simple and economical. It doesn’t require a crane to build, and it provides the code-required ventilation.
T&G ceilings. The most popular finished ceiling is tongue-and-groove boards. Most clients choose a lighter-colored wood species that contrasts with the timbers. For example, if the timbers are Doug fir, white pine, or spruce, T&G boards work well. If you use the same species for both, you lose some of the dramatic effect of the trusses.
There’s no need to oil the T&G, although some clients request it. Whitewashing the boards brightens the ceiling and is an increasingly popular treatment.
Building the roof. On a typical roof with purlins, we first install the T&G boards perpendicular to the purlins, good face down. We then apply a double layer of 3-inch-thick 4-by-8-foot sheets of high-density extruded polystyrene, for a total of 6 full inches of insulation. (In extreme climates, we’ll go thicker, depending on local energy codes.) If it’s available, we might use three layers of 2-inch EPS instead.
We stagger the second layer 2 feet in both directions so the seams don’t line up. Then we run 2x4s on the flat from the eaves to the ridge at 2 feet on-center. Since we know the spacing of the purlins, we predrill the 2x4s with holes at each purlin and the ridge, then drive ring-shank pole-barn nails or screws through the 2x4s, foam, and tongue-and-groove into the purlins. We let the 2x4s fly wild off the eaves, snap a line to mark the overhang, and install 5/8-inch plywood sheathing over the 2x4s. Either we or the GC will come back and finish up the soffit details.


