When I was 12 years old, my father gave me a Ford straight six-cylinder engine and told me to fix it. I really had no clue what I was doing, but with his tutoring I stripped it down, replaced its worn and broken parts, and put it back together. After 100,000-plus miles, that engine is still going strong under the hood of a ’65 Falcon.
So the first time I explored the innards of a pneumatic roofing stapler, I felt right at home: There was a piston, cylinder, rings, intake, exhaust — it was basically a simple motor. Since then, I’ve been responsible for maintaining and repairing the 30 or so pneumatic tools in my company’s arsenal, several of which are themselves antiques. From brad nailers to framing guns, most pneumatic tools are very similar, inside and out.
Regular maintenance, which takes only a few minutes, is an important part of our daily routine. The better we take care of our tools, the less frequently we have to open them up. And when the time comes for a more thorough cleaning and parts replacement, we can do the job on site or in our workshop in 30 minutes or less, which saves us travel time to the tool-repair shop and downtime on the job.
Daily Maintenance
It’s important to keep the inside of your pneumatic tools clean and lubricated. Cleanliness starts with your air hoses; if they’re handled carelessly, uncoupled quick disconnects can fall on the ground. And if dirt and sawdust get in a hose fitting, they’ll contaminate your tool the next time you plug it in. Sand and dust quickly wear out the rubber O-rings inside — or, even worse, they can scratch the metal cylinder. Once this happens, power diminishes rapidly.
An easy way to prevent debris from entering hoses is to keep the male and female ends of each hose connected, disengaging them only when you’re ready to make a connection to another hose or a tool. Protect a tool’s male fittings with plastic end caps. The inexpensive ones designed to cover the cut ends of wire shelving fit pretty well.
Internal lubrication keeps air tools running smoothly. I have never had good luck with automatic in-line oilers that are connected to the discharge of the compressor. They may work fine on shop compressors, but they don’t work as well on mobile compressors, because they tend to snap off and leave the inside of hoses oily. A daily lubrication ritual is just as effective.
When I take tools out in the morning, I drip six to 10 drops of lubricant into the air intake (if the manufacturer has a different recommendation, I’ll follow that), using only lubricants formulated for pneumatic tools. Don’t use motor oil as a lubricant, because it can deteriorate O-rings and bumpers. On days when I’m driving lots of fasteners, such as during sheathing operations, I’ll usually relubricate at lunchtime.
Moisture diminishes the effectiveness of lubricants and can accelerate corrosion of the metal parts inside tools. To help keep moisture out of your pneumatics, drain any water from the compressors daily, and cover the tools in the rain.
Each time you take a tool out to use, look it over carefully for loose or missing screws and parts. Check that the contact tip mechanism is free and not gummed up, and oil it lightly after every couple of uses.
After plugging in the tool, listen for air leaks. Leaks around gaskets may indicate loose screws or a damaged gasket, while leaks around the trigger may signal a malfunction that can compromise safety. Leaks from the exhaust port or the nose of the tool may be a symptom of worn O-rings inside.
With the tool connected, look for cracks or small holes in the housing. Cracks usually are caused by dropping the tool, but small holes can develop on old tools worn from rough use. Cracks and holes are serious — a cracked housing can explode and send fragments flying — and can’t be repaired. If you find a crack or a hole, take the tool out of service but save it for parts.
Disassembly and Cleaning
Periodically, pneumatic tools need to be disassembled and cleaned, and their worn parts replaced. According to at least one manufacturer’s guide, this is a chore that should be done on a weekly basis, but I doubt this ever happens in the real world. My framing nailers are used every day, and I disassemble them every one to two months. I open up my finish nailers once a year, but they get used only four days each month. I overlooked a siding stapler for five years until the piston started sticking, but I don’t recommend waiting until that happens.
Check the manual first. Before opening up a tool’s motor, it’s a good idea to make an assessment of what parts will need replacement and round them up ahead of time. I start with the owner’s manual; most have exploded drawings of the tool. That the piston O-ring will need to be replaced is a given. Most other O-rings are stationary and will need replacement only if you damage them while disassembling or reassembling the tool.
Though made of hardened steel, the business end of a driver can still show signs of wear. You can check the condition of the driver before disassembling the tool by dry-firing it. First, empty out the fasteners. Hold back the contact safety nose while aiming the tool away from you (and others), and then squeeze and hold the trigger. The tool will fire and the end of the driver will stick out the nose. Worn drivers will have rounded or chipped edges that can lead to jams or unset fasteners.
The bumper also may need replacement, but most of the new ones are more durable than those used 10 or 15 years ago. I wait until after I’ve opened up the tool to run out — if necessary — and pick up a new bumper from my local tool shop. Its service department stocks such common replacement parts as O-rings, bumpers, gaskets, and drivers for most nailers and staplers. Other parts that don’t break often, like cylinders, nail magazines, and caps, will likely involve special orders. Some manufacturers bundle parts into “rebuild kits” that include several O-rings and perhaps a driver. But if the only part your tool needs is a piston O-ring, these kits aren’t very cost-effective.
Some disassembly required. I work on a large, clean piece of cardboard that gives me space to spread out parts; when I’m done I can throw the mess away. With the diagram nearby for reference, I start taking the tool apart by removing the cap screws. Some tools have spring-valve assemblies under compression beneath the cap, so I back the screws out evenly to avoid jamming.
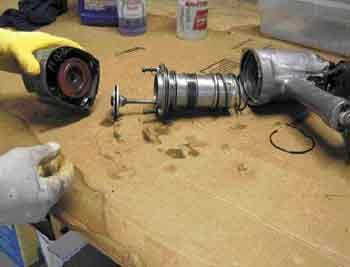
Sometimes the cylinder and piston are beneath metal or plastic disks that snap into place, but usually the cap is all that needs to be removed to see these parts. When there’s a nut on top of the piston, I use a pair of needle-nose pliers to grip it and pull the piston out (Figure 6). If the top of the piston is flat, I insert a thin metal rod up the nose to push the driver and piston out.
Because air flows between the cylinder and the body, a lot of dirt collects there. So, for a complete cleaning, I remove the cylinder in addition to the piston. Cylinders are held in place with two or three O-rings between the base or sides of the cylinder and the body of the tool, and they snap in tightly; getting them in and out takes some effort.