Airtight ductwork is one of the keys to a quality heating and cooling system. It helps to make a home more healthful, more comfortable, and more energy efficient. By reducing the load on the equipment, it also reduces wear and tear.
There is only one way to make sure that the ductwork has been thoroughly sealed: Test it. A simple pressure test can measure the airtightness of the air distribution system and helps you hold your installers to a high standard of quality.
Of course, airtight ductwork is only one of the keys to quality hvac. A Manual J load analysis and Manual D duct design, proper refrigerant charge, and correct airflow over the evaporative coil are all just as vital. But poorly sealed ductwork can negate good work in all those other areas: You can properly size the unit, lay out the distribution system correctly, tune the compressor perfectly, and set the fan just right, but if leaky ductwork blows most of your conditioned air into the attic, or pulls most of the system’s return air from the crawlspace, you’ll have a system that costs too much to run and doesn’t do its job.
Pressure testing is not a new concept in home construction. Plumbers have their work pressure tested on every job, and the test forces them to get it right — meaning no leaks, period. But when plumbing leaks, there is an immediate consequence: Things get wet. Air leakage, on the other hand, is invisible and seldom causes immediate trouble. Instead, homeowners gradually become aware of comfort problems, high utility bills, and decreasing indoor air quality over time. The test is the only way to identify the defects in advance.
In ten years of testing ductwork before drywall is hung, I’ve seen some excellent ductwork installations and some atrocious ones. I’ve learned that if you want consistently good results, you have to test consistently. All tradespeople do better work when they know they face inspections. As one local mechanical contractor’s lead man put it to me, “There are three kinds of air distribution systems: regular, sealed, and sealed and tested.” If you test your installer’s work, it will get better. And realistically, until you start testing, and showing your installers the results, they won’t even know that their system leaks. They certainly won’t know where it leaks. The test makes them face reality, but it also helps them learn.
The duct airtightness testing system I use is called Minneapolis Duct Blaster, from the Energy Conservatory (612/827-1117, www.energyconservatory.com). It consists of a calibrated variable-speed fan, a fan speed control, and a digital pressure-reading gauge called a digital manometer (see Figure 1).
Figure 1.The Minneapolis Duct Blaster is a calibrated variable-speed fan that’s tied into the heating or cooling air distribution system at a supply plenum, return grille, or air handler compartment (top). The digital pressure gauge (bottom) calculates air leakage rates from pressure and fan speed data.
The test itself is pretty simple: We attach the Duct Blaster fan to the air distribution system at a return grille, a supply plenum, or the blower compartment on the air handling unit. We temporarily seal off all the registers and grilles. Then we turn on the Duct Blaster fan and apply pressure. The Duct Blaster system measures the airflow needed to create a test pressure of 25 pascals (a 0.10-inch water column) in the duct system. This airflow rate is our duct leakage measurement. We compare the duct leakage reading with a recognized standard, and we give the system either a pass or a fail. The whole process takes less than two hours (mostly for setup and takedown) and typically costs around $220.
Over the years, my company has headed off a lot of potential problems by testing ductwork before the drywall is hung. When the drywall is up, we can still gain access to the ducts, but the problems are harder to locate and assess.
Why Airtight Ductwork Matters
Good duct sealing makes a major contribution to the healthfulness, safety, comfort, and efficiency of a new home. Sealing the ducts is even more important than sealing the building envelope, because when the air handler is running, the pressures in the air distribution system are much greater than in the building or the outside air. Pressure differences are what drive infiltration; a hole or crack in the building envelope is not an air leakage point unless it sees a pressure. Ducts always operate under pressure, so a hole in the ductwork is always a leak.
To clarify the importance of pressure, let’s look at some numbers. Wind, stack effect, exhaust fans, and the like generate air pressures across the building shell that range from 0.5 to 10 pascals. On average, a house is usually in the low end of this range. (A pascal is a very small metric unit of pressure. There are 25 pascals in 1/10 inch of water column. If you were to put a straw into a glass of water and suck the water up the straw 1 inch, you’d create an inch of water column pressure, or 250 pascals.)
Pressures created in air distribution systems when the air handler is running range from 10 to 125 pascals, tens of times greater than the ordinary pressures acting on the house envelope. And these pressures, unlike the wind, are continuous when the air handler is running. That is why house infiltration rates can double or triple when the equipment is active.
Temperatures. Remember, too, that leaks in supply ductwork involve conditioned air, not room air. The air that escapes from supply ductwork has been heated to 140°F or cooled to 58°F, and it is not getting to the room it was meant for. If most of the ductwork is in the attic or crawlspace (which is often the case), all this heated or chilled air is now leaking straight to the outdoors. The resulting energy loss is much greater than the loss that occurs when 70°F room air leaks out around a window, for example. That’s why simple duct tightening may cut heating and cooling costs by 15% to 30% in many homes.
Duct leaks also typically affect comfort, because the system doesn’t deliver the intended amount of conditioned air to satisfy the design load for a room. Rooms at the end of long duct runs suffer the most: The farther away from the fan a room is, the greater the likelihood that air will find its way out of a leak instead of going where it’s meant to.
On the return side of the air distribution system, leaks pull ambient air or even hot attic air into the system, further compromising efficiency. Leaks also threaten indoor air quality: Air from a crawlspace may carry pesticides, moisture, radon, and mold spores, all of which can get sucked into the return leak, then sent through the supply side to every room in the house.
Energy penalty. How much do these leaks affect energy consumption? A 1999 summary report of 19 separate studies from around the country (www.aceee.org/pubs/a992.htm) suggests that the average annual energy savings potential in a typical house from sealing the ductwork is around 17%. These studies include both heating and cooling climates. Anywhere ductwork can leak outside of the house, there is the potential for a large energy penalty. In one study, researchers at the Florida Solar Energy Center found that sealing ductwork in existing homes cut cooling bills by about a third.
Locating the Leaks
Where are these leaks happening? Basically, leaks are possible at any joint or seam in the system, from the air handlers supplied by manufacturers, right on through to the sheet-metal supply boots your installer brings to the job. If you look at all the joints, you’ll find the leaks.
There are leaks on sheet-metal trunk ducts every 48 inches, where the trunk sections connect. Every collar attached to the trunk, where flex duct branches take off, represents a possible leak. So does every adjustable elbow. We also find leaks where flex duct connects to supply boots, in the boots themselves, and around the plaster grounds. I’m often surprised by how leaky some of the manufacturers’ mechanical units are. I’ve tested units that leaked 40 to 45 cfm right out of the box.
I used to commonly find flex ducts that either had never been connected or had been accidentally disconnected by another trade. During the early to mid 1990s, most framed return cavities were major leakage sites. Disconnected ducts and framed cavities still tend to be the biggest culprits, but practices have improved significantly.
Stud and joist bays used as returns are still common in my part of the country and often present a lot of problems. All framed cavities should be lined with OSB, plywood, duct board, drywall, or sheet metal and then sealed with mastic at every joint. Hvac contractors sometimes blame the framers for not lining the cavities, but we don’t accept that excuse — if it leaks, you fail.
The most frustrating leaks are where the hvac installer tried to seal the system and failed — where someone did the sealing but didn’t get it right. For example, it hasn’t yet dawned on everyone that each joint and seam have to be sealed on four sides, not just three. If a crew hasn’t had the benefit of some training, and has never seen a system tested and fogged, it’s a good bet the system won’t pass. Installers just can’t picture the consequences of an average duct sealing job.
Running the Test
A Duct Blaster test on a single air distribution system takes about 45 minutes to 1 1/2 hours to perform. Most of that time is spent sealing off registers and grilles and setting up the equipment. Once a system is prepared, it takes only about 2 minutes to perform the test.
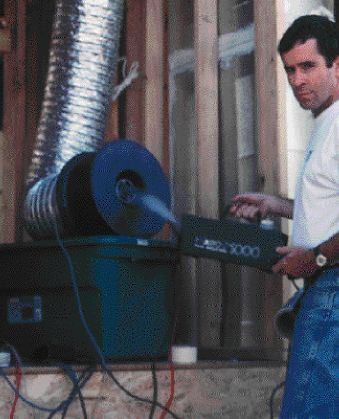
The first step is to attach the Duct Blaster fan to the air distribution system (Figure 2). We can attach it to the blower compartment on the air handler or to a return grille. If the air handler is not set when I arrive to test, I connect the Duct Blaster directly to the trunk lines in the mechanical room where the air handler will eventually be set. But we prefer to test with the air handler installed, because of the leakage we’ve seen in even brand-new units.
Figure 2.The author tapes a plastic transition fitting to a piece of cardboard cut to fit the opening in the air distribution system (top), then places the assembly in the opening (left center) and connects the fan to the opening with a length of flex duct (right center). It’s best to test the system with the air handler installed, because the air handlers are often a leakage point. If the air handler has not been set, the author hooks up the Duct Blaster to the trunk line where the air handler will go. The equipment can also be attached to a return grille (bottom).


