Most home builders are familiar with spray-in-place insulation products, which have become increasingly popular in recent years. But not many are aware that spray polyurethane foam (SPF) is also used as a roofing material. Spray foam roofing has been around for more than 30 years; it’s used mainly to reroof existing flat roofs on commercial and residential buildings.
Our company does SPF roofing and insulation in Northern California, on both residential and commercial projects. And since homes with flat or low-slope roofs are common in our area, and many of them have old, leaky built-up roofing (BUR), residential reroofing is a considerable chunk of our business.
In this article, I’ll talk about reroofing a low-slope roof with SPF. The project I’ll focus on began when the homeowners decided to install a photovoltaic power system. The PV contractor told them there was no way to attach mounting brackets to an old built-up roof like theirs without creating leaks. He recommended reroofing and suggested using SPF; the owners called us.
For a project involving a new roof, the process would be nearly the same as the one I’ll describe here except with less prep work.
Polyurethane Material
Polyurethane, a plastic, was invented prior to World War II. It was first used for roofing in the 1970s, when U.S. military officials recognized its value as a lightweight, waterproof, all-in-one covering and insulation. Since then, its use has spread to the private sector.
Polyurethane foam is formed when two liquid components are mixed at a 1-to-1 ratio inside the tip of a specialized spray gun. It contains isocyanates, polyols, catalysts, and a non-ozone-depleting blowing agent that causes tiny bubbles to form in the mixture as it exits the gun. Bubbles continue to form until the material has expanded to 30 to 50 times its original volume.
Dense closed-cell foam. Roofing foam is similar to the foam used to insulate walls, but it differs in density and permeability.
Open-cell wall foam is soft and permeable to moisture. Closed-cell wall foam is denser and impermeable to moisture. Roofing foam is denser still, and hard enough to walk on. Because of its closed-cell structure, it is impermeable to water and air, and is also a vapor retarder.
Foam as Roofing
As with any roofing system, foam has its pros and cons. Chief among the former is its ability to conform to shapes that are difficult to flash and waterproof with conventional materials. Here’s a brief overview of the product’s other advantages, as well as its limitations.
Excellent R-value. Many roofs, even with rigid insulation above the sheathing, or batt or blown insulation in the cavity below, permit significant heat gain. This is especially true of BUR; most built-up roofs act like giant solar heat collectors.
SPF roofing, however, resists solar heat gain; with the right coating, it can be both Cool Roof-rated and Energy Star-rated. Roofing foam has an R-value of about R-6.5 per inch of thickness; a typical application is around 1 1/2 inches thick (though some parts of the roof get more foam than others).
Long service life. Cured foam retains its flexibility over time and is chemically very stable. The only thing that can damage it — aside from being punctured by a sharp object — is ultraviolet (UV) light. A properly applied and maintained SPF roof should last the life of the building.
Maintenance involves renewing its UV-resistant top coating every 10 to 15 years. With upgraded systems, the recoating cycle can be extended to 20 years.
Unlikely to leak. Most roof leaks happen when water gets in through an open joint or seam in the roofing material. If the roof contains several plies — as BUR does — water can get in at one place, migrate horizontally between layers, and come through the ceiling somewhere else. Such leaks can be difficult to locate and repair.
An SPF roof is a thick monolithic membrane; it has no seams, joints, or plies. The only way it will leak is if a hole goes all the way through it.
Limitations. SPF works well on sloped roofs, but since it’s not as attractive as shingles, people tend to install it on low-slope roofs where it can’t be seen and where shingles would be a poor choice.
Also, foam roofing can’t be installed year-round in all climates. This is because at the time of application there must be very little or no wind and the roof surface needs to be absolutely dry and above 50°F.
Cost
Installing a spray-foam roof is not the cheapest option, but future energy savings and a longer, more trouble-free service life should offset its higher initial cost.
In our area, the cost to roof or reroof an average residence with SPF runs between $5.50 and $10 per square foot.
Inspecting the Existing Roof
The first thing I determine when I’m inspecting an existing roof is whether it should be stripped or swept. It’s surprising how many multiple-overlay built-up roofs we find — even though they impose an excessive load on the structure and in some areas aren’t allowed by code.
In cases where there are multiple roof layers, it’s best to strip back to the sheathing. This lightens the load and provides a smoother substrate for the foam.
If there is only a single layer of roofing, it’s often possible to sweep off the gravel, prep the surface, and apply a layer of foam. This allows the building owner to avoid the mess and expense of a tear-off, yet still end up with a lighter roof.
When we inspected the roof of the home shown on these pages, we found leaks, ponding, and an area with rotted sheathing. But since the roof was just one layer, we decided to repair the rot and install SPF over the existing membrane.
Ponding. In older buildings, sagging and settling can lead to significant ponding. With many roofing systems, this problem is difficult to repair — but with SPF, low areas can be built up by applying more foam.
To find the low spots, I survey the “topography” of the existing roof with a laser level. I measure the elevation at various locations and draw a map to show our applicator where the high and low spots are so that he will know where to add more foam to get the roof to drain.
If we simply applied the same thickness everywhere, the low spots would remain and water would continue to pond.
Prep Work
Prep work is extremely important, especially when foam is applied over an existing roof. Some roofing contractors have been known to show up, spray foam all over everything, coat it once, and call it good. Although that kind of installation may provide temporary relief from leaks, the homeowner will experience problems over time.
For a proper job, the roofer must prep the surface, repair damaged sheathing, replace sheet metal and flashings as necessary, deal with drainage issues, and apply foam and coatings correctly.
Surface prep. To achieve a good bond, all loose material must be removed from the existing roof. That means sweeping up and hauling away any loose gravel. Sometimes areas have been built up with asphalt and gravel; if that material is coming loose, we scrape it up with a spudding tool.
Once the major debris is gone, we clean the membrane by sweeping up any accumulated silt and then dislodging the remaining dust with a gas-powered blower. If the roof doesn’t leak, we power-wash it.
Sprayed foam will adhere to just about anything, but it’s still a good idea to prime the surface of the existing asphalt. We use an airless sprayer to apply a special adhesion building primer to the surface of the roof.
Sheathing repairs. When we find rot, we strip that portion of the roof and replace framing and sheathing as necessary.
If a Class A fire rating is not required for the roof, we prime the sheathing and apply foam over it. When a Class A rating is required, we nail DensDeck (Georgia Pacific, www.gp.com), a 1/4-inch fiber-impregnated gypsum board, over the patched area before priming and applying foam. There’s no need to put DensDeck on BUR because foam over BUR is a Class A assembly.
Metal Work
Sometimes we can reuse the existing sheet-metal vents, but we always install new foam stop along the edge of the roof.
Edge metal. Edges are one of the weakest links in any roof. To beef them up, we use a commercial-gauge metal foam stop that’s hemmed and kicked out to drip at the lower edge.
We apply urethane sealant where the pieces lap, interlock the overlaps, and use at least two fasteners at each joint. This prevents the edge metal from lifting and causing the membrane to crack in a critical area.
Vents and fans. If we strip the roof, the existing roof jacks may need to be replaced; but if it’s a sweep job and the jacks are in good condition, we leave them in place and entomb them in foam. Any unsatisfactory vents are cut out and replaced.
Existing roof-mounted vent fans can present a problem because the foam could raise the surface of the roof high enough for water to run into them. We usually build a curb around each fan and install a custom-made vented cap over the top; that way, the old fan can remain in place and be serviced or replaced in the future.
Never let a roofer foam in the fan without considering the potential for leaks or the possibility that the fan will someday need to be replaced.
Drains and scuppers. Most of the homes we work on have scuppers or built-in metal dropout drains that pass through the overhang and connect to downspouts below. We replace the scupper linings at the same time that we replace the edge metal.
We also cut out and replace the dropout drains. They may be rusting through, and we want a clean new surface for the foam to adhere to.
Counterflashing. In certain circumstances, foam is self-flashing when lapped up onto adjacent vertical walls. In most cases, though, it’s necessary to counterflash the roof-to-wall junction so that any water that gets behind the wall cladding is redirected onto the roof.
Occasionally, for reasons of cost and practicality, we might make an exception on a reroofing job: If the roof butts to a low wall protected by an overhang, or if a short stucco-clad chimney projects from the roof, we may lap foam onto them without installing flashing. The building owner would have to agree to this and be responsible for keeping the siding watertight.
Skylights
Skylights are a notorious source of leaks. In many cases, we need to raise the curbs so that the skylights are lifted above the top of the foam.
Never let the roofer foam onto the skylight flange. The skylight should be an easily removable fixture that sits above the flow of any water or rain splash.
When we reroof a building, we remove the skylights, build up the curbs (if necessary), foam up to their tops, and then reinstall the skylights over foam weather-stripping. The roof foam is self-adhering and self-canting, so there’s no need for curb flashing or cant strips.
Equipment Curbs
It’s not uncommon for hvac units or other equipment to be installed on flat or low-slope roofs.
Placing the equipment on sleepers applied directly to the roof is asking for trouble and should be avoided at all costs.
The correct method is to put equipment on boxed curbs with sheet-metal cap pans. The idea is to separate the equipment from the roofing system so it can be replaced without damaging the roof, and the roof can be maintained without moving or removing the equipment.
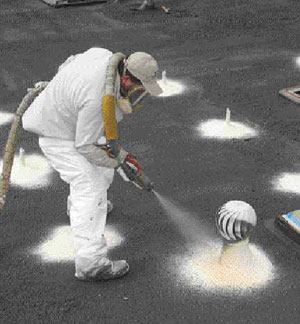
Spraying Foam
The foam can be sprayed when the prep work is done and the weather conditions are right. The roof deck must be dry and the air should be relatively warm. There should be little wind. If too much moisture is present, it could disturb the chemical reaction that creates the foam, resulting in a degraded product that leaks. Excessive wind could increase overspray and negatively affect the texture of the foam surface.
The temperature of the surface to be coated should be warm (above 50 degrees). Applicators must be willing to shut down operations when conditions aren’t right.
To handle overspray, we mask skylights, sidewalls, shingles, and anything else we don’t want foam on. Masking the edge metal allows us to apply foam up and onto the edge. We spray detailed areas like edges and roof jacks first and do the field later.
Since the foam cures quickly, we can walk on it within a couple of minutes.
Grinding and detailing. After the foam has been sprayed, we use a grinder to bring it flush to the edge metal and to make it slope smoothly into drains and scuppers. In places where the foam is too high or doesn’t look right, we grind it down.
Detailing usually involves applying polyurethane caulking to critical areas where the foam meets another material.
Coating and Granules
The final step is to apply an elastomeric coating to the foam to protect it from being degraded by UV rays. Without this coating, the foam would eventually wear away. Achieving the specified 24-mil to 28-mil coating takes two coats and 3 to 3.5 gallons per square.
Because grinding opens up the cell structure at the surface of the foam, we precoat any areas that were ground.
Base coat. The coating is applied like a heavy paint; we cut in the detailed areas with a brush or roller, and spray the field with an airless sprayer.
The base coat is tinted, so if we miss any spots with the top coat we’ll be able to tell. The tint also acts as a recoat indicator, because it’ll show through when the top coat wears out.
Top coat and granules. After the base coat has cured (usually overnight), we spray on a top coat; before the top coat dries we embed a layer of mineral granules.
In addition to creating a more consistent appearance, granules offer several functional advantages. They speed evaporation by wicking water off the roof; they increase resistance to abrasive wear; and they prevent birds from pecking at the foam. The better-quality granules provide additional resistance to UV rays.
Like most SPF roofs, ours usually go 12 to 15 years without recoating, a process that entails power-washing the roof, applying a primer, and applying one or more coats of top-coat material. Recoating a 2,500-square-foot roof costs $3 to $4 per square foot.
James Morshead is the senior project manager/technical director for American Services Co. in Dublin, Calif.


