There is little debate over brick’s reputation as a durable, maintenance-free building material. Brick buildings that are hundreds of years old are still in use today. However, many people don’t realize that the older brick buildings were not built like today’s brick-veneered buildings. Historically, brick was used to create loadbearing walls, which were often four or more wythes of solid brick masonry. These walls prevented moisture penetration to the interior by their sheer mass.
The brick masonry in today’s veneer wall is just one element of a drainage wall system, which typically consists of a single 4-inch-thick wythe of brickwork, an air space of 1 inch to 2 inches, and a separate wood, steel, or concrete block backup wall. When moisture penetration problems occur, it is usually because the people building the wall didn’t understand some of the basic principles of brick veneer construction.
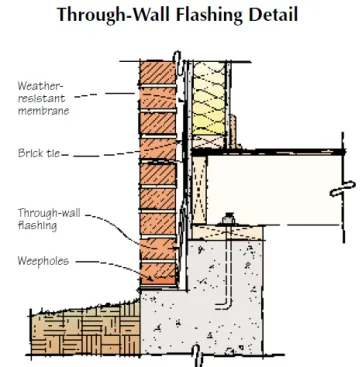
Through-wall flashing and weepholes direct water in the air space to the exterior.
Brick Veneer Is Not Waterproof
A common misconception, even among some masons, is that 4-inch brick veneer will stop all moisture penetration under all weather conditions. It is important to remember that brick is a porous absorptive material, and that water can penetrate a brick veneer wall wherever there is a lack of material: at bond breaks, hairline cracks between brick and mortar, unfilled joints, movement cracks, and even unfilled line-pin holes. There are all sorts of opinions about whether water that penetrates a brick veneer wall is coming through the brick, through the mortar, or through small cracks in the mortar. But it really doesn’t matter how you visualize the moisture entering into the wall system. What matters is understanding the simple, inexpensive details and installation practices that can prevent water problems.
The Drainage Wall System
If you are installing brick veneer, you should expect water on the back face of your bricks. It is important to take steps to allow any moisture to drain from the wall, so that it can’t enter the interior. The drainage wall concept is fairly simple: Water that penetrates the exterior wythe of brickwork travels down the back face of the brick until it’s collected by through-wall flashing and led to the exterior through weepholes.
There are three important elements in a drainage wall system: a clean air space, through-wall flashing, and weepholes.
A Clean Air Space
The purpose of a clean air space is to be sure that water can’t get across to the backup wall. The Brick Industry Association (BIA) recommends, and the International Residential Code (IRC) requires, a minimum 1-inch air space between the brick veneer and the backup wall system. Often, however, this 1-inch air space, which is little more than finger-room for the mason, is reduced because of simple variation in the materials – sheathing that is not properly attached, framing that is out of plumb, or even variation in brick size. With a larger air space, mortar is less likely to bridge the air space, and masons can remove mortar more easily from the back face of the brickwork. Because a larger air space is less likely to become clogged, more and more designers and masons are including a larger 2-inch air space whenever possible.
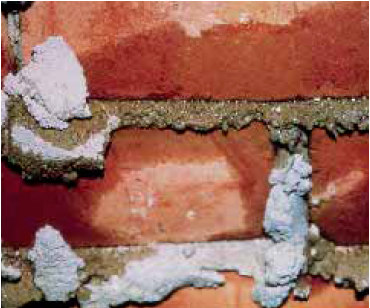
It’s also important to keep mortar droppings to a minimum. Dropped mortar can block weepholes, and can also cause bridging that allows water to travel to the backup wall. Because some bridging across mortar droppings is inevitable (particularly with a small air space), it’s also a good idea to install housewrap or #15 asphalt felt over the sheathing on wood-framed houses to help prevent moisture migration. If housewrap or felt is installed, the BIA recommends that it be lapped at least 8 inches over the through-wall flashing.
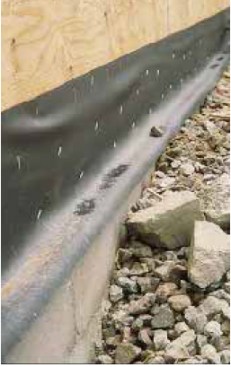
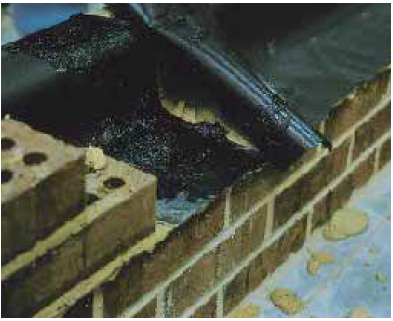
This through-wall flashing is properly tucked under the building paper, so that any water on the backup wall is directed onto the flashing. However, an overlap of at least 8 inches is recommended.
Through-Wall Flashing
Through-wall flashing needs to be designed and installed to collect the water within the air space, and to allow it to drain to the exterior. Through-wall flashing is not optional; it is required by most codes, and a brick coating is not a viable alternative. The IRC code requires through-wall flashing at the base of a wall, as well as at window and door lintels. It also requires flashing when brick veneer is installed above a roof – for example, where a two-story brick veneer house rises above the roof of an attached one-story garage.
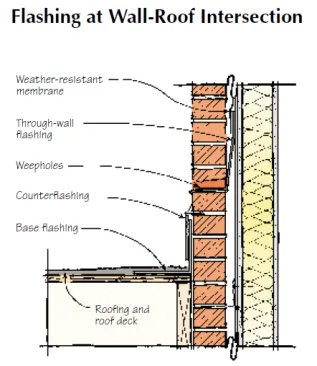
Where a brick veneer wall extends above a roof, through-wall flashing is required above the roof flashing. While the roof flashing prevents water from traveling between the roofing and the brick, the through-wall flashing stops any water that has entered the brickwork from above.
Is flashing necessary at window sills? The IRC requires through-wall flashing at window sills only when the windows do not include a self-flashing flange. Regardless of window design, installing through-wall flashing under window sills is always good practice, since any water hitting a window travels down the window and over the sill. In fact, self-flashing window flanges do not serve the same function as under-sill flashing. Flashing below the sill prevents moisture from entering the wall system, while the self-flashing window flanges simply prevent moisture from entering the interface between the window and the backup wall.
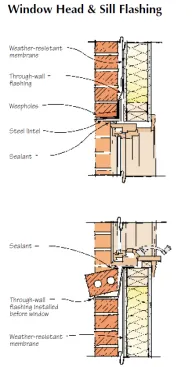
Flashing is required above the steel lintel at each window and door. Wherever flashing is installed, weepholes should be provided. It is a good practice to install flashing under a brick window sill, since any rain water hitting the window travels over the sill.
Attach the flashing to the backup wall and install it carefully, so water can’t find a route around it. For instance, if the backup wall behind the air space is concrete block, the flashing should be tucked into a mortar joint in the block wall to prevent water from getting behind the flashing. Where this is not possible, a reglet, pressure bar, continuous nailer, or self-adhesive type of flashing (such as rubberized asphalt) may be attached to the block wall.
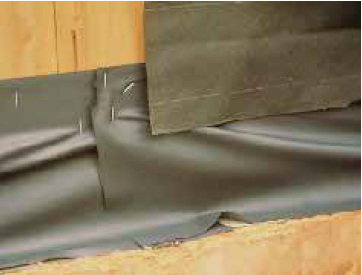
When self-adhesive flashing is used in wood-frame construction, it must be attached directly to the sheathing. Don’t make the mistake of installing the flashing on top of the housewrap or building paper. If the housewrap is installed before the brick masonry, it should be detached along the bottom or slit horizontally with a knife, and the flashing tucked under it.
If the flashing is not one of the self-adhering types, and there is no housewrap or felt, then either the flashing must be installed before the sheathing, or the flashing must be attached to the sheathing with a continuous nailer. Both of these alternatives are awkward, however, and they are more likely to create discontinuities, holes, or tears in the flashing.
If the flexible flashing is not one of the self-adhering types, use mastic to seal any overlaps.
Lapping and sealing. At the base of the wall, through-wall flashing must be uninterrupted. At the joints and corners of a house, the flashing should be lapped at least 6 inches and sealed. This is easily done if you’re using self-adhesive rubberized asphalt flashing. Otherwise, consult the flashing manufacturer for recommendations regarding the proper mastic or lap cement. Note that some flashings react with certain mastics, drastically affecting the performance of the flashings.
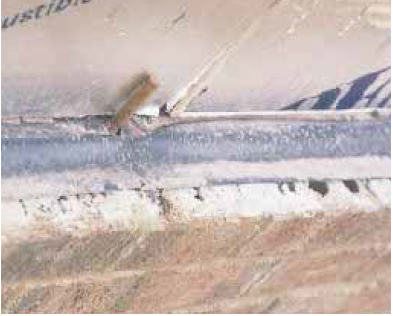
This flashing has been installed incorrectly, since it does not extend all the way to the front face of the brick. Any water is directed into the core holes of the brick instead of to the exterior.
Extend the flashing at least to the front face of the brick. Although the BIA recommends that the flashing should extend 1/4 inch beyond the brick face and turn down to form a drip, some of the flexible flashing materials can deteriorate when exposed to the weather. One solution with self-adhesive flashing is to install a metal drip in conjunction with the flexible flashing. If the flashing is installed sloppily – short of the face of the brick – then the collected water won’t be delivered to the exterior. Remember, the core holes are typically only 3/4 inch back from the face. Even if care is taken to ensure that the flashing projects no less than 1/2 inch from the face of the wall, the flashing can scoot back when mortar and brick are laid over it, allowing water to enter the cores of the brick.
Because of these problems, many installers extend the flashing well past the face of the brick until the wall is complete, then cut the flashing flush with the face of the masonry. According to the BIA, this practice is acceptable, although it is not recommended.
Flashing Types
Although the choice of flashing material is often governed by price, other factors to consider are the ease of installation and the expected life of the material once it is embedded in the wall system. Metal flashings are often used on commercial jobs, but the two most common types of flashing for most residential jobs are EPDM and self-adhering rubberized asphalt. The BIA recommends that most nonmetal flashings should be at least 30 mils thick, which means polyethylene, housewrap, and #15 asphalt felt are not acceptable flashing materials. Aluminum is unacceptable because it corrodes when embedded in mortar, which becomes very alkaline when exposed to moisture. PVC flashing has been known to deteriorate as well, raising concerns about its expected life.
End dams are required in any through-wall flashings that are not continuous, such as step flashings or window heads and sills.
Remember that the drainage wall system only works if all the materials are properly installed, and if the flashing is designed to last as long as the wall itself. Consult the flashing manufacturers for recommendations on which product to use in a specific wall system.
End Dams
If through-wall flashing is not continuous around the whole building – for example, above a window, or wherever stepped flashing is needed – the flashing must include end dams. To create an end dam, turn the flashing up sideways, against the adjacent head joint, to create a pocket. An end dam will prevent moisture from traveling off the end of the flashing and into the adjacent air space. The BIA recommends that end dams should be at least 2 inches high.
Weepholes
Most building codes require weepholes above all through-wall flashings. The sole purpose of a weephole is to allow water that has been collected by the flashing to exit the wall system. Since it is impossible to eliminate all mortar droppings between the brick and backup, the weepholes must allow for drainage even when some mortar has dropped onto the flashing.
There are three common types of weepholes: open head joints, rope wicks, and weep inserts. Open head joints are formed by omitting the mortar from the vertical joints immediately above the flashing every 24 inches. They’re simple, they’re cheap, and they work. In standard-size brick, it takes 2-1/4 inches of mortar droppings before an open head joint gets clogged. (A 2-1/4-inch chunk of mortar creates more problems than just a clogged weephole; the odds are mortar has also clogged the air space above, impeding the proper drainage of the wall system.)

The most dependable type of weephole is the open head joint.
Rope wicks are the next most popular type of weephole. Although they do not allow as much flow as an open head joint, they are often chosen to avoid the appearance of an open hole or the shadow created by an open head joint. The best type of rope for this purpose is cotton rope, because nylon, polypropylene, and polyester do not wick. Wicks should be spaced 16 inches on-center – more closely spaced than open head joints, to make up for their smaller size. The rope should be a minimum of 10 inches long, so that when the outer end of the wick is installed flush with the exterior face of the brick, the excess can be draped in the cavity or attached to the backup wall. The extended length of wick in the air space will reduce the likelihood of mortar droppings covering the entire wick.
There are also several different types of weep inserts available. These are typically made of plastic, and are designed to fit into a head joint. The smaller the insert, the more easily it can be clogged. Plastic tubes should not be used, because the openings on either side of the tube are only 1/4 to 1/2 inch, and are too easily clogged.
Weepholes must always be above grade to allow the wall to drain. Remember that the grade can change over time. For instance, when homeowners install several applications of mulch, the grade may end up above the weepholes, preventing proper drainage of the air space. In most cases, through-wall base flashing and weepholes should be 4 inches to 6 inches above grade. The air space below the base flashing should be filled solid with grout or mortar.
Through-Chimney Flashing
Most people are familiar with the visible base flashings and counterflashings that are installed where the roofing meets a chimney. These visible roof flashings prevent water from traveling between the roofing and the brick – but they don’t stop any water that is already in the chimney, such as water that may enter through the brickwork or the chimney cap. Through-chimney flashing is designed to prevent moisture that has penetrated the chimney from traveling below the roof.
Through-chimney flashing operates on the same principles as through-wall flashing. Through-chimney flashing has to be installed above the roof flashing, even if that means putting it a few courses up, so that the collected water is led to the exterior.
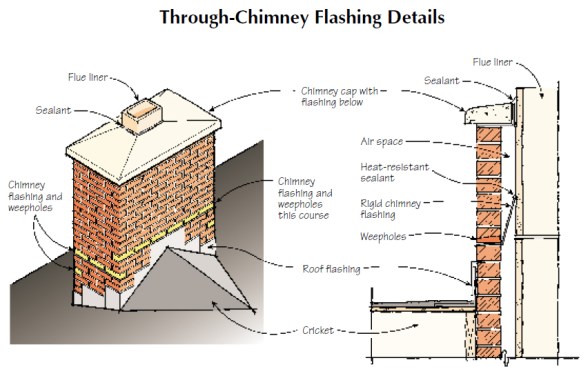
In addition to common roof flashing, a brick chimney requires flashing under the chimney cap and through-chimney flashing. The through-chimney flashing stops any water that has entered through the brickwork or cap. Through-chimney flashing is designed to collect any water that finds its way to the back side of the bricks.
Flashing should also be installed under a concrete chimney cap. This prevents moisture from entering the top of the masonry, and also prevents staining or contamination of the brick. The flashing can be laid in place above the top course of bricks, before the concrete cap is poured.
A mortar wash does not form an adequate chimney cap. A mortar wash will shrink and crack as it cures, especially when the mortar is brought to a feather edge (see “Troubleshooting Common Chimney Problems,” 7/98). Mortar is very similar to concrete, only with smaller aggregate. Remember, concrete usually needs something to give it some tensile strength and to prevent cracking – for example, 6×6 mesh or other reinforcement.
For chimney applications, choose a flashing material that can hold up to the potentially high temperatures expected when the flue is in use. Use metal flashing at the chimney cap.
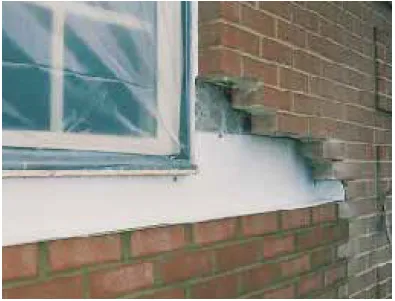
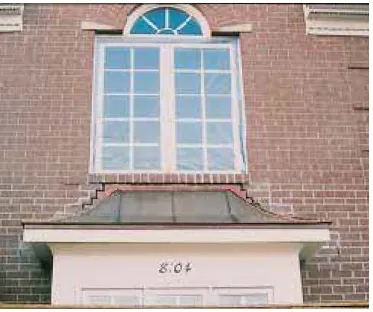
If the flashing at the head of a bay window is placed directly above the lintel, it serves no purpose, since it directs water to the interior of the house.
Bay Windows
A fairly common mistake when flashing brickwork above a bay window is to install the through-wall flashing too low. Although the IRC requires flashing to be placed directly on steel lintels, this is of little use above a bay window, since the lintel is under the roof — which is to say, the lintel flashing is inside the building. The flashing and weeps can’t direct the collected water to the exterior if the flashing is already indoors.
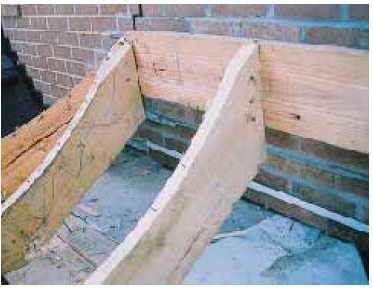
The correct location for through-wall flashing above a bay window is above the roof.
Above a bay window, install the flashing above the highest point of the roof flashing. This is similar to flashing a chimney. The flashing must continue over the entire length of the window area.
Getting By Without Flashing?
Some masons have built many brick veneer walls without flashing and weepholes, and claim that they haven’t had any water penetration problems. This is risky. The amount of moisture penetration through brickwork depends on the degree of exposure to wind-driven rain. We learned from El Niño that when more moisture is available, there is a greater likelihood of moisture penetration in any wall system. But the cost of correcting a moisture penetration problem will far exceed the cost of installing the flashing properly in the first place.
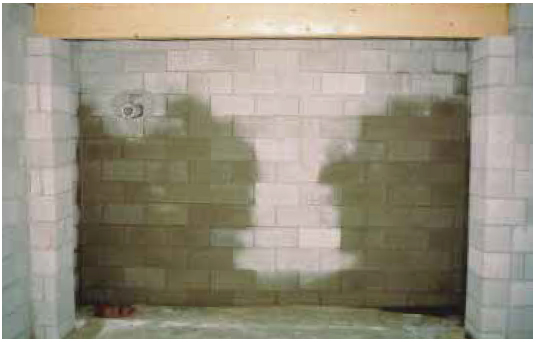
Omitting flashing and weepholes is risky. Water that penetrates brick veneer can saturate wood framing or enter the basement.
The concept of a drainage wall is simple: Any moisture that penetrates the veneer must be allowed to exit the wall before it travels to the interior. The proper materials are easily obtained, and the proper detailing and installation of a drainage wall is not difficult. When properly constructed, a brick veneer wall system is moisture-free, fire-resistant, and maintenance-free.


