Chimney Rebuild
On a recent remodeling job, the asphalt roof shingles had just been replaced, and the roofers had conscientiously replaced the old chimney’s lead step flashing, turning and caulking it into the face of the brickwork. However, due to the roughly 40-year age of the chimney, freeze-and-thaw cycling had taken its toll on the bricks, mortar, and concrete cap. The chimney still leaked, and a rebuild was called for, from the roofline up. Building a baseline. I began by covering the roof below the work area with a tarp to protect the shingles, and set up staging just below the chimney, which measured 28 inches across by 24 inches on the sloping side. I tore the old masonry down to just above the roofline, leaving the step flashing and the bricks that it covered in place (see Figure 1). The existing ceramic flue was a large, discontinued size but still in good condition, so I set it aside for reuse. Using a 7 1/4-inch-diameter diamond-abrasive circular saw blade and the plane of the roof as a guide, I cut through the lead and the brick, making repeated passes to cut as deeply as the blade allowed on the two sloping sides of the chimney. The offset of the saw’s shoe kept the cutline about 2 inches above the actual roofline. The blade didn’t cut all the way through the brick, but did go deep enough so that I could finish the cut with a chisel. Chiseling fractured a few of the bricks, so I replaced them to create an even, sloped plane.
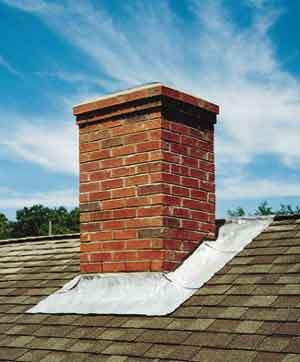
Figure 1. Newly replaced stepped flashing won’t stop the leaks in a failed chimney but will remain in place under the pan as a secondary barrier, to prevent wind-driven water penetration. |
Leaving the existing lead kept a vital, primary skirt of flashing in place around the chimney’s perimeter (Figure 2). The exposed pan flashing actually serves to counterflash the concealed base flashing. Without base flashing installed, wind-driven rain would find its way into the building.
Figure 2. Using the roof to guide his circular saw, which is fitted with an abrasive diamond masonry blade, the author cuts through the lead and brick on either side of the chimney parallel to the slope (left). The flue tile is marked with a pencil, removed, cut, and replaced. Gaps in the brick are filled and parged with mortar to provide a smooth, even base for the lead pan (right). The basic layup is identical in new construction, minus finished roofing and flashing. |
Fail-safe underlayment. On a new chimney, I cut bricks to match the angle of the roof and lay them parallel to the roofline, about 2 inches higher than the surrounding roof deck on all four sides. Ideally, the chimney goes up before the finished roof goes on. I use 12-inch-wide strips of Vycor Plus, a sticky, self-adhesive bituminous membrane (Grace Construction Products, 62 Whittemore Ave., Cambridge, MA 02140; 800/444-6459; www.graceconstruction.com), as a fail-safe underlayment around the chimney. It sticks as well to brick as it does to plywood. I install it just like flashing, working from bottom to top, making the transition from the roof deck up onto the face of the chimney. It’s important to install a layer of asphalt felt paper at the bottom of the chimney first to serve as a bond-breaker, so that the Vycor can later be lifted and interwoven in a bottom-to-top sequence by the roofers. I leave the installation of the metal base flashing to the roofing crew, making sure to inform the builder of the importance of this step in the flashing sequence. If there’s a leak, I don’t want any part of the blame game. I recommend using lead for the apron flashing, stepped flashing, and head flashing under the lead pan to avoid any chance of a galvanic reaction between dissimilar metals.


