When leaks occur around a chimney, it’s often assumed that the roof flashing is at fault. But quite often the problem is higher up. If a chimney is very old or poorly built, with visible voids in the mortar joints, water can enter through the masonry. It’s more likely, though, that the cap is the culprit.
Such was the case with a leaking 19-year-old chimney that I was recently asked to repair. When I got up on the roof to take a close look, I found the usual problems: The featheredged mortar around the perimeter of the cap had weathered away, and cracks had formed in the rest of the cap. These cracks probably started the day the mason slathered on wet mortar to form the cap. As the mortar dried, the cap undoubtedly developed shrinkage cracks, allowing small amounts of water to penetrate the cap virtually from the moment it was built.
Differential movement between the cap and the flue liner may have contributed to the cracks, too. Heat going up a flue causes it to expand slightly, and with nothing to break the bond between the flue liner and the cap, this upward thrust can make a cap crack (see “Sleuthing for Chimney Leaks,” below).
Also, this particular chimney was missing one section of flue liner. Apparently, the original mason ran short when he was building the chimney, because he used brick to finish the last 8 inches of the flue. In addition to being a code violation, this created a flat area on top of the bricks where water could pool. And, without a flue liner projecting above the cap, there was nothing upon which to clamp a metal flue cap and screen. These components aren’t always needed, but in this case, birds or squirrels had at some point taken up residence in the chimney; in an effort to keep them out, a previous owner had inserted a wooden bracket so that he could install a metal flue cap and screen. Because the present homeowner was unaware of the wooden bracket, this modification turned out to be a pretty serious fire hazard. The fact that the masonry cap leaked, therefore, may have been a blessing in disguise.
Build Cheap, or Build to Last
Building a cap to Masonry Institute of America (MIA) and Brick Industry Association (BIA) standards adds several hundred dollars to the cost of a chimney and ties up a mason’s scaffolding for several days. It’s faster and cheaper to simply apply a 2-inch-thick layer of mortar around the flue liner and taper it down to a featheredge at the outside of the chimney. That way, the mason not only uses up his mortar and finishes the chimney in one step, but he can begin taking down his scaffolding an hour or so after laying his final brick. There is an undeniable short-term economy to this method, but over the long haul such a cap is bound to fail. Properly built, the cap should last the life of the chimney, not just a decade or two.
Fortunately, the design of the new cap in this project would eliminate the major defects of the failed cap. I began by setting up scaffolding that surrounded the chimney about 3 feet below the top, creating a safe and comfortable working height. Working from the scaffold, I used a grinder, hammer, and chisel to remove the three brick courses that made up the final 8 inches of the flue. I also ground away the featheredge around the perimeter of the existing cap. With a flashlight, I carefully inspected the rest of the flue liner, finding it to be in very good shape.
Next, I cut and installed a flue liner to replace the brick I had removed. Using a 4 1/2-inch grinder equipped with a dry-cutting diamond blade, I cut the flue liner down so that about 9 inches of the flue would extend above the top course of bricks on the chimney. The concrete cap would be 2 1/2 inches thick around its perimeter and slope up toward the flue, with a rise of about 3 1/2 inches, leaving roughly 3 inches of flue extending above the finished cap.
I used refractory mortar to join the new flue liner to the old. To hold the liner in place, I used columns of mortar. Industry literature calls for a 1-inch air space between the flue liner and the structure of the chimney, but most codes also require that the flue lining be supported on all sides. To achieve this contradictory goal, the IRC states that “only enough mortar shall be used to make the joint and hold the liners in position.” The columns of mortar were what I deemed sufficient to hold the liner in place.
After letting the mortar columns set overnight, I filled the spaces around the flue liner with sand. Since the entire flue liner was already thoroughly encased in the masonry structure below this final piece of the liner, I was not terribly worried about the air space for the last 8 inches below the cap. I filled it with sand to keep the concrete from the cap from filling the space around the flue. This allowed me to hold the flue in place while accommodating any slight upward movement of the flue liner through the cap. If the chimney had had a functional air space surrounding the flue, I could have used sheet metal or tile backerboard to cover the gap on top.
Forming the Cap
The form for the concrete cap consisted of two layers. The first, made of 2x4s, created a ledge that would cause the concrete to extend 1 1/2 inches past the top course of bricks. I installed this layer of the form so that it was even with the top outside edge of the final course of bricks. Because I was working alone, I used bar clamps to position and hold the pieces initially, then tied them together with 3-inch deck screws.
The second layer of the form, made of scrap 2x6s and 2x8s, formed the outside edge of the cap. To give the cap a substantial 2 1/2-inch thickness around its perimeter, I set the top of this layer 2 1/2 inches above the top of the inner layer of the form. Once again, I used clamps to hold the pieces in place while I secured them with screws. Because I was careful to cut and fit the pieces of the form tightly, it held fast to the chimney by friction alone when I was finished. If I had not been satisfied that the form would stay put, I could have used my bar clamps to hold it in place.
A bond break is important. My next step was to wrap the flue with foil-faced bubble-pack insulation. Approximately 1/4 inch thick, inflammable, and easy to wrap around the flue liner, this product is the best I’ve found for isolating the concrete cap from the flue. It has enough body to hold back the concrete during the pour, yet contains air spaces that allow for differential movement between the cap and the flue.
Because the surface of the brick was irregular, I was concerned about the form leaking when I filled it with concrete. I didn’t like the idea of wet concrete running down the outside face of the chimney, so I caulked this seam with clear silicone caulk. To reinforce the concrete, I cut and installed 6-by-6 welded wire. I also installed 3/8-inch-by-3/8-inch strips of wood on top of the inner layer of the form to create a drip channel on the bottom of the cap overhang. To make it easier to remove these strips after the concrete cured, I rubbed paraffin wax on them.
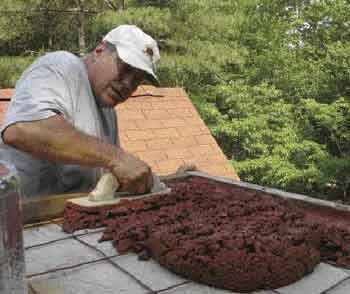
A stiff mix of colored concrete. The next day, I poured the concrete cap. Because I wanted the concrete to blend in with the chimney and the roof, I mixed in a reddish brown dye while adding just enough water to thoroughly hydrate the concrete, so that it had almost no slump. The concrete was, in fact, so stiff that it had to be pushed and pounded into place. But the stiffness prevented it from running over or through the form, and allowed me to form, stack, and shape the cap by hand. Also, because the mixture was so dry, there was very little shrinkage; as a result, no shrinkage cracks developed as the concrete cured.
My goal in forming the cap was to create straight, flat planes that rose from each side of the form to a point about 3 inches below the top of the flue liner. I wanted the intersection of these planes to form straight lines, much like the hips on a hip roof. I used hand floats to push the material into place; by lightly rubbing the surface in a circular motion, I was able to knock down the high points and fill in the low points. I used two floats at once to get a crisp line along the hips. At this point, my objective was to get the shape right. I wanted the surfaces to be flat and straight, but because I wasn’t trying to make it perfect I did everything by eye.
|
Sleuthing for Chimney Leaks
|
Chimney flashing is a simple barrier; if it’s defective, water usually flows immediately into the house. Water that goes through the cap, on the other hand, is often absorbed by the mass of the masonry. In many cases, it takes a lot of water and a lot of time before the masonry gets sufficiently saturated to cause problems. A saturated chimney, furthermore, can continue to give up water after the rain stops. So, if the owner reports that the chimney seems to leak hours after the rain has stopped, I strongly suspect the cap is the culprit. When I inspect the chimney, I check out the roof deck from the attic, if possible. If the area next to the chimney is wet or has water stains, mildew, rot, or other signs of prior leaks, water has most likely flowed through a defect in the flashing. When I get up on the roof, I look for obvious entry points for moisture: cracks in caulk joints in the flashing; missing or loose pieces of flashing; holes or cracks in mortar joints; and cracks, dips, and deterioration in the cap. I also look for efflorescence, a white, powdery film sometimes found on the face of brickwork. It occurs when large amounts of water penetrate the surface of masonry structures and dissolve salts present in the bricks and mortar. The moisture carries these salts to the surface and deposits them there. When the rain stops and the surface dries out, the salt appears in the form of a telltale white powder. Thus, efflorescence above the flashing is a strong indication that water is entering the chimney through the masonry above the flashing. When this detective work does not produce a clear-cut suspect for the leaks, I try to find the problem through the process of elimination. If the chimney can be left unused for several weeks, I drape a tarp over it and use a rope to hold it in place. This protects the cap and most of the masonry above the flashing. So, if the chimney continues to leak, I know it’s the flashing. If no leaks occur after several long, heavy storms, I conclude that the trouble is in the masonry above the flashing. In these cases, a deteriorating cap is almost always the problem. |
Cure slowly for best results. When I finished shaping the cap, I turned my attention to the proper curing of the concrete. Hydration — the chemical reaction that takes place when concrete cures — requires water, and it’s essential to keep concrete from drying out prematurely. Therefore, I began by setting a couple of sheets of plywood on the top of the flue to get the concrete out of the sun. The temperature was in the 90s and the sun was shining brightly, but this measure kept the concrete in the shade for the rest of the afternoon. That evening, after the initial set of the concrete, I covered the cap with wet burlap. Then I covered the wet burlap with plastic and used two bar clamps to hold the plastic in place. The next night, I removed the plastic, soaked the burlap with water, then replaced the plastic. I repeated this routine each day for three days to make sure the concrete stayed damp for 72 hours.
After the concrete cured, I removed the forms and did some final work on the surface of the concrete. I began by mixing up a rich slurry made of 50 percent portland cement and 50 percent sand, using enough water to make it the consistency of wet grits. I also added dye to make this concoction the same color as the concrete, then rubbed it into the surface of the concrete with a Carborundum rubbing stone. In this way, I filled in the honeycombs and knocked down rough edges and high spots.
The next day, I cut the aluminum insulation so that it was even with the top of the cap and pushed the top edge of it down into the crevice between the flue and the cap. Then I filled the joint with a gray silicone sealant to complete the job.


