I’ve been a builder for 16 years and have specialized in roofing for the last five. I do mainly asphalt roofs, but like most roofers in northern New England I’ve also done my share of traditional slate roofs and slate repairs. So I was interested when a salesman for a new slate-installation system, Nu-lok, invited me to look at doing a job with the product (Nu-lok Roofing Systems, 800/946-8565, www.nu-lokusa.com). That was three years ago, and since then I’ve done several more Nu-lok roofs. From now on, if anyone asks me to do a slate roof, I will recommend this system.
Advantages of Nu-lok
The method is easier and faster than traditional slate roofing, plus it provides a ventilation space under the entire roof, which dramatically reduces ice buildup (I’ve been able to observe this on local jobs I’ve done).
A Nu-lok roof requires about half as much slate as a traditional slate roof, because it uses a double rather than a triple lap. Not only does this save on the cost of the slate, but it dramatically reduces the weight of the roof. There’s no reason to beef up the roof structure: Any roof built to handle the ordinary dead load of an asphalt shingle roof can handle the weight of a Nu-lok roof, which is around 6 psf. In addition to the slate, materials in one of these roofs include underlayments, flashing, wood strapping, Galvalume battens, and the “link channels” that hold the slates and shed water between them.
Safer. A Nu-lok roof is also safer to install than an asphalt roof. Once the horizontal battens are in place, they act like a ladder; it’s like having permanent roof cleats in place every foot up the roof.
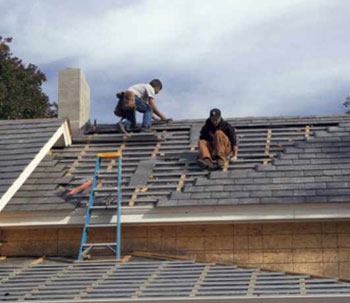
Looks the same. After the roof’s installed, you’ll be hard-pressed to tell the difference from a traditional slate roof. Visually, there are two differences, however. One is the larger reveal — 12 inches on a 16-inch slate — vs. around 71/2 inches on a conventional slate roof. The other is the taller drip edge, used to close off the ventilation space. We usually use copper for all the flashings, which darkens and blends in with the slate. Even though I work in an area known for its old slate roofs, no one — neither customers nor anyone looking at the finished jobs — has ever commented on these differences.
Easy repair. We often put on the top two rows of slate early in the job so we can finish capping the ridge without having to fight our way up the slate roof to get to the peak. We can also leave a walking path to anywhere we need access to, because the Nu-lok system makes it easy to remove and replace any slate on the roof. You don’t need any tools: You just slide the spring clips to the side and pull the slate out. To put the slate back in, you reverse the process. This makes repairs easy, too.
Materials
We use 16-inch-long by 1/4-inch-thick random-width slate, which comes from Greenstone Slate Co. in Poultney, Vt. (800/619-4333, www.greenstoneslate.com). The slate is available in several colors and shades, which vary in expense depending on availability. Mottled and colored slates typically cost more than plain gray ones.
Although Nu-lok was developed for use with natural slate, it also works with man-made ceramic slate.
Battens and link channels. The heart of the Nu-lok system is the horizontal Galvalume battens and link channels that support the slate. The metal battens get installed over 1×3 wood strapping nailed through the sheathing to the rafters. This creates an air space under the entire roof, which helps to keep icing to a minimum. It also allows any water that blows or seeps up under the slate to drain down and out at the bottom edge of the roof.
The link channels are vertical pieces, also Galvalume, that are slotted to fit onto the battens; stainless steel clips at the bottom of each link channel support the slate. There’s a link channel between every two field slates. The surface of the link channel acts like a gutter, draining water down onto the surface of the slate below. Both the link channel and the stainless steel clip have a black finish, so they pretty much disappear when you look at the roof from the ground.
We always try for the look of a traditional roof, keeping the butted edges of slates as close to the center of the course below as possible. But the fact is, even if the link channels practically lined up from course to course, you still wouldn’t get a leak.
We buy the battens, link channels, and clips through Greenstone Slate. The clips come separate, so you have to spring them into the link channels before you use them. This takes a few seconds per clip and is easy. I happen to pay my grandchildren to do it, but it’s also a good filler job for a laborer.
We purchase our copper flashings and other materials from our usual suppliers. All told, the cost to the client for a Nu-lok slate roof averages around $850 per square. A simple gable roof might cost less, but a complex roof cut up with dormers, hips, and valleys could run as high as $1,100 per square. It’s like any other major acquisition: The customer is paying for long-lasting quality, and the cost gets added to the property value.
Installation Starts With Underlayment
We first apply Grace Ice & Water Shield to the eaves and valleys, and around skylights and plumbing vents. We use the Ice & Water in addition to the boot flashing or any metal flashing that comes with the skylight. On shallow roofs — 4/12 and under — we’ll cover the entire roof.
Next we lay down Grace’s Tri-Flex 30 underlayment over the rest of the roof. We use a Bostitch cap stapler to make this go faster.
At this point, we measure to make sure the roof is square so that we can make up any irregularity with the drip edge. It’s important to have an accurate, square layout with Nu-lok; it’s harder to fudge once slate installation has begun.
Strapping
Next, we nail 1×3 strapping vertically up the roof at each rafter. We typically use 8d galvanized ring-shank nails for this, but we’ve also used stainless nails or screws when the architect requested it. Depending on the overhang detail, we run the strapping out as far as the fascia or crown molding. As with any roofing job, it’s important to have the fascia and crown in place if possible before the roof goes on. This is even more important with Nu-lok because the drip-edge flashings also double as closures for the vent space, so they need to be custom-bent for the conditions.


