Like it or not, oil-based paints are being steadily supplanted by waterborne coatings. For most applications, painters have made the required switchover without hassles or complaints, but interior trim is a notable exception. Although most major paint manufacturers now offer a waterborne interior enamel that’s designed to lay out as smooth as their best alkyd product, none of these coatings can match the tenacious bonding ability or the long working time of an alkyd.
That doesn’t mean that oil is better than latex. For Darin Crocker of PHD Painting in New Milford, Conn., it was simply a matter of changing his application procedure. Crocker has been using interior latex almost exclusively for five years, and now says he would never go back to oil.
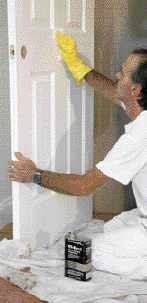
To ensure that the waterborne product securely bonds to existing paint, Crocker sands lightly with 100-grit paper; then saturates a rag with a liquid deglosser (1) and wipes down as much of the surface as he can paint in about 20 minutes (the surface needs to be tacky to ensure proper bonding).
Unlike with a slow-drying alkyd, the key to achieving a smooth finish with a fast-drying waterborne paint is to flow the product on smoothly and keep moving. To eliminate the tedium of repeatedly dipping a brush into a can of paint, Crocker prefers a two-handed approach: He first lays down a generous swath with a 3-inch roller (2), then smooths it with a top-quality 2-inch angled sash brush (3).
When painting a door, he removes as much hardware as possible and works from the inside out, doing one panel at a time before moving on to first the horizontal rails and then the vertical stiles — always painting with the grain and finishing each segment with a full-length stroke. Along the edges and at the lines where the vertical and horizontal stiles meet (4) he cuts in as carefully as he would for walls and ceilings.
Waterborne paints tend to drip and settle more than alkyds, so Crocker always double-checks vulnerable corners before moving along (5). And when forced to cut in above finished flooring, he flows the paint on an inch or so above the floor, then coaxes it down to the edge with a dry brush (6).
At the end of the day he bundles the roller and pan in a plastic bag and thoroughly cleans the brush with soap and water. After shaking out the excess water, he gently squeezes the bristles back into shape, then hangs the brush upside down to dry. Crocker keeps a pegboard in the back of his truck that serves as a drying rack for his various paintbrushes. With this type of care, a brush should be good for six months of daily use. — Tom O’Brien
Protecting Blueprints From the Elements
by Tim McNamara Meeting on site with the architect and the owner is stressful enough without having to refer to a set of prints so tattered no one can read them. And even if no one but you uses the prints, they still need to be protected from the elements.
That’s why on our jobs we keep prints inside a homemade protector box — nothing fancy, just a wood frame with a 3/8-inch plywood top and bottom. The top is attached with a piano hinge and can be propped open with a stick of wood. The box is about 3 inches high and just big enough inside to hold a rolled-out set of blueprints plus any spec sheets, window schedules, and installation instructions we have to keep up with. When we’re not using the prints, we drop the top so they won’t blow away or get rained on.
We’ve been through a couple of these boxes. The first one was pretty nice, but when it got damaged I had one of my guys throw together the one shown here. Someday when I have time, I plan to make one with a Plexiglas top so I can see inside without opening it.
Tim McNamara is a framing contractor in Rochester, N.Y.


