Painting may be the last big task to happen on some jobs, said painting contractor and instructor Charles Gilley to a roomful of builders at JLC Live in Providence last year, but that doesn’t mean it’s the last thing the builder should think about — after all, what’s on the surface is what the customer sees. “We can make the carpenter’s work look better, or we can make it look worse,” said Gilley, “but we need the builder’s help and cooperation to get the best possible results.” Whether paint performs well or poorly, said Gilley, can depend on things that the builder, not the painter, controls.
Gilley runs Charles Gilley Restoration Painting in Woodstock, Vt. He and Charles Owens, a cabinetmaker and painting contractor from Richmond, Vt., covered a broad range of painting how-to and how-not-to topics in their 90-minute JLC Live slide presentation, but the audience had plenty of questions left over for a question-and-answer session afterwards. In the following pages, we bring you some of the lore the two men have accumulated along with the spilled paint on their overalls. If we happen to leave out a question that has you scratching your head, send us a letter, fax, or e-mail — Owens, Gilley, and a few other experienced pros we know are more than willing to help builders learn about paint.
Q. When you prep an existing house for repainting, should you power-wash before you scrape and sand, or power-wash to remove dust after sanding?
A.
Always wash first, then scrape and sand. And wash just to clean off the surface dirt, not to remove paint — blasting hard enough to remove paint with a power-washer typically tears up the wood, and it also can blow water into the walls under the siding.
A thorough job of scraping takes off any paint that no longer has good adhesion to the wood, but it leaves sharp edges where the remaining areas of well-attached old paint meet the newly exposed wood. We sand after scraping in order to feather those edges into the bare wood and create the smoother surface required for fresh paint to go on at a consistent thickness. Power-washing after you sand would get water under the feathered edges and lift them up, so you wouldn’t have a sound surface. And then you’d have to wait for the wet wall to dry, when it really is preferable to prime the newly exposed wood as soon as possible.
If you just wash with moderate force before scraping, the wood will be protected by whatever sound paint is still on the wall. The wall won’t get so soaked and won’t take so long to dry. So after sanding, just dust off the surface with rags or a blower, and prime as soon as your wood is dry.
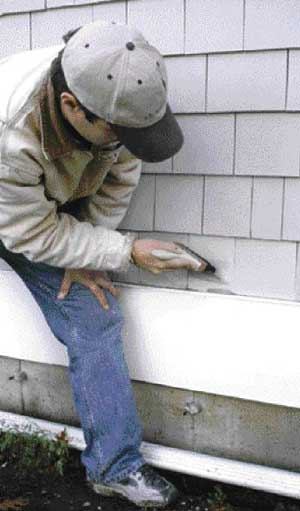
Q. How soon after power-washing will the wood be dry enough to paint?
A.
It might take a week, or it might take less than a day. There is no standard time to wait — it depends on the wind, the rain, the sun, how hard you sprayed the wall, the condition of the existing paint, and so on. But a moisture meter can give you a firm answer in every case. We use one on every job, because it eliminates guessing and arguments. Wood will dry out and stabilize at about a 10% to 12% moisture content in the outdoor air, but 15% or lower is acceptable for paint. If it’s higher than 15%, moisture will be trying to get out of the wood, and that will prevent the paint from adhering properly.
Pin-type moisture meters (see photos, below) that sell for around $200 are okay for rough lumber, or for areas of a trim board that will be covered up. For about $300 you can get a nondestructive model that doesn’t make any holes in the wood — just hold it against the surface, and it will read the moisture content as deep as 3/4 inch into the piece. Both types give a more accurate reading on dense hardwoods than on softwoods like pine or cedar — softwood may read 15% on the dial when the true moisture content is a little higher. But the manufacturers of the devices supply charts of correction factors, so you can interpret the moisture readings for different types of wood.
Q. Are new latex paint formulas changing the way you work?
A.
All the popular paint brands have been reformulated with antifreeze and coalescing agents, so the fresh paint resists freezing and can cure in cold weather. Just a few years ago, the minimum application temperature for most latex coatings was 50°F, but now we can use most exterior paints in temperatures down to 35°F. So we’ve lost our excuse — like the ad for one paint said, the good news is we can paint when it’s almost freezing outside, and the bad news is, we can paint when it’s almost freezing outside.
But the new formulas make warm weather painting trickier — that’s the flip side. On a mild 75°F day, paint tacks up and dries much faster than it used to. So in spring or fall, when the air is cool, we paint with the sun — we pick a wall to work on that is in the sunshine, or at least has been in the sun very recently, so the surface will be warm. But in summer we have to avoid the sun and work in the shade, so the paint will flow. If you paint a wall that’s in full sun, or is still warm to the touch from recent sunshine, you will get lots of lap marks — it’s hard to keep a wet edge when the paint dries so fast. Slower drying is better for the paint, also — paints cure best when they dry gradually over five or six hours.
Touch-up work is also a problem with the new formulas. You can’t be sure of getting consistent color if the weather conditions change between the time you paint and the time you touch up — even if you use the same pail of paint. If we paint a wall on a 75°F day in September and come back to touch it up on a 40°F day in October, we often notice a visual variation.
New cold-weather paint formulascan be used in temperatures as cold as 35°F. But their rapid drying in warm or hot weather may cause difficulties, and the finish color of touch-up work done in cool weather may vary from the color of walls painted in warmer weather using the same batch of paint.
Q. Is oil or latex primer better for old houses?
A.
Oil-based primers usually work better for repainting jobs, because they cut through any residual dust and penetrate into old wood. Dust repels water, so water-based primers tend to bead up on a dusty surface. However, oil-based formulas won’t be an option in the future, because new environmental rules will start to prohibit them in 2005. So down the road, we’ll just have to prep and dust more thoroughly.
Q. We’ve heard of cases where people had a lot of trouble getting paint to stick to red cedar clapboards on brand-new buildings, even though the wood was dry and clean and was primed and painted just a few days after it was nailed up.
A.
Red cedar is our nemesis. Builders used a lot of it during the boom years of the 1980s and 1990s, because it comes in long lengths and goes up so fast. But it doesn’t hold paint well, because in the manufacturing process it develops what we call a “mill glaze.” Planers in the sawmill compress the surface fibers and burnish the “extractives” in the cedar sap into a resinous or waxy glaze that resists penetration by primers and paints. If you drop water on the planed face of a cedar clapboard and the water beads up, it’s got that glaze. Paint may stick to the glaze at first, but the glaze itself is unstable — when moisture works on it, it breaks down and the paint comes off.
To make paint stick to cedar, you have to get down to sound wood: Sand the glaze off, or else cut through it by washing the surface thoroughly with a TSP solution. You’ll see the extractives coming off: When you scrub a 10-foot section of wall with a bucket and brush, the detergent water in your pail will turn bright red from the compounds you’re washing off the wood.
Q. Do you need to use a moisture meter for inside work? Is moisture a problem for inside the house as well as outside?
A.
A moisture meter is always useful on a painting job, indoors or out. It’s the only way to be sure that the wood is dry enough to hold paint — a leak or a humid environment could have left the wood close to its saturation point. And it tells you whether your wood is likely to shrink or expand dramatically after you paint. Wood inside a house cycles from 12% or higher moisture content during the hot, humid summer season down to as low as 4% or 5% in a dry, heated house in winter, and that can cause shrinkage of 1/4 inch across an 8-inch door panel or trim board. The painter needs to take that movement into account.
Q. Can you paint a new house in winter if it has no heat or only temporary heat?
A.
For inside work, we still need a minimum temperature of 50°F in order for the paint to cure properly. We’d prefer it a little warmer — not only because it’s uncomfortable to paint when it’s that chilly, but also because the paints may not flow as nicely or leave as nice a finish at 50°F as at 65°F or 70°F.
Temporary heat is another matter. Sometimes we have to paint in houses where propane heaters are running, but it doesn’t work well at all. The moisture in the burner exhaust makes the air humid and keeps the wood from drying out. You’ll get a much better paint job if you let the permanent heating system operate in the house for a while, monitor the indoor humidity with a hygrometer, and check the wood moisture content with a moisture meter until you get down to the low end of the seasonal range. Paint will have many fewer problems down the road if it’s applied to trim that has adjusted to dry winter conditions in a heated house.
Q. What are the big differences in the way latex and oil paints perform?
A.
Oil’s penetrating ability is its main advantage for repainting work. But latex has advantages that make it a better choice for a top coat. For one thing, latex coatings stay flexible longer, and that gives them a longer service life. When paints fail with age, it’s because they’ve lost flexibility — you see alligatoring when paint has gotten brittle and can no longer expand and contract along with the wood (see photos, below). Latex paints take longer to reach that point. Also, latex coatings breathe better than oil coatings, so they are less prone to peeling: Moisture in the wood can escape more easily, instead of getting trapped under the coating at the surface and stressing the adhesive bond. And finally, the acrylic colorants in latex paints hold longer than the alkyd pigments in oil paints do. We see a lot more fading with oil paints. So there are good reasons that latexes tend to be preferred for top coats in general, and for primers in cases where the superior penetration of an oil primer isn’t a significant factor.
Q. How long can you leave bare wood exposed before applying primer, and how long can you leave primer exposed before painting?
A.
The sooner you get bare wood primed, or fresh primer painted, the better (provided the wood is below 15% moisture content, or the primer has dried). If you leave wood out in the sun and air for more than two weeks, the wood fibers deteriorate and the surface begins to lose its integrity. If wood has been exposed for a month, that degraded surface should be sanded off to expose sound wood fibers before primer is applied. Use 80-grit or 100-grit sandpaper — sanding with any finer grit can actually seal the wood.
Primers also suffer if they’re left exposed for too long — 30 days is about the limit, and some suppliers will tell you to paint within 7 to 15 days of priming. Primers are intentionally formulated to be more porous than paint, because that supports a strong adhesive bond with the finish paint. A primed surface is like a lot of little fingers ready to grab on to the top coat and interlock with it. For that same reason, primers will get dirty if they aren’t painted right away. Dust, spores, pollen, smoke, and everything else that’s in the air collects in those sticky pores. Once the primer’s dusty and dirty, it loses its “tooth,” and the top coat won’t grab on to it as well. Also, the spores in the dirt will grow out into mold and mildew before long. Once the primer is dirty or mildewed, you need to wash and sand the wall again, and then prime it again, if you want your paint job to last.
Primer should be painted overas soon as possible after applying. Its porous “tooth,” intended to provide strong attachment for the top coat, will quickly collect dirt and support mildew growth if left exposed to the air. Most suppliers recommend a maximum exposure of 15 days before painting primer.
Q. What’s the best way to keep knots from bleeding through paint?
A.
Knots should be sealed with a shellac, like B-I-N pigmented shellac from Zinsser (732/469-8100, www.zinsser.com). More coats of shellac work better — you’ll get the best results from three or even five coats of B-I-N. If the extra coats are giving you too high a build, you can cut the pigmented shellac with clear shellac and get the same protection with a thinner coating.
If you’re using pine or another softwood with a lot of sap in the grain, it works well to prime the whole board on all sides with a newer product from Zinsser called SealCoat. That’s a concentrated shellac that has been de-waxed, so it can be used under any coating (unlike B-I-N and some other standard shellacs, which may repel polyurethane and some other coatings). If you seal the boards with SealCoat, the regular primer coat you put on next won’t soak into the wood and raise the grain, and the primer and paint solvents won’t get into the wood and draw sap to the surface out of the knots and grain. SealCoat dries fast, too, so using it won’t slow you down.
Q. Do you use shellac to seal knots on exterior trim, too?
A.
Shellac is not an exterior product — it has no flexibility to handle wood expansion and contraction, and it gets lifted off the wood by moisture. But it works on exteriors if you sandwich it between the primer coat and the paint coat. Prime the trim first, then seal the knots with three to five coats of shellac, then paint over the shellac. That way, the shellac will block the sap in knots from bleeding through and showing, and the prime coat will protect the shellac from moisture attack.
Q. How long should you wait before painting a fresh plaster wall?
A.
That varies for different types of plaster. These days, most people are using veneer plaster, which is applied in a thin coat and dries out more quickly than traditional three-coat plaster. But there’s really no set time. Instead of guessing — “Okay, it’s been two weeks, let’s paint” — do this simple test: Take an 18-inch square of 4-mil poly and seal all four edges to the wall with duct tape. If the plaster is still moist, you’ll see moisture beading up on the back of the poly. If you don’t get moisture, the wall is ready to paint.
But you should also check the chemistry of fresh plaster before you paint it. Lime-based plasters are alkaline when they’re first applied and gradually neutralize as they cure. For painting, you want the pH level to be close to neutral, say between pH 5 and pH 8 (a pH of 7 is neutral; 5 is more acidic, and 8 is more alkaline). You test that by dampening the plaster surface and touching a piece of litmus paper to it. The litmus paper will change color in response to the pH of the damp plaster, and you read the pH by comparing the paper’s color to a reference chart. If the plaster is still too alkaline, you have to wait a little longer. If you’re in a hurry, you can wash it down with a diluted solution of vinegar (which is an acid) to get it to a neutral reading. But there is no set time to wait for the proper pH, anymore than for the proper moisture content. The only way to know is to test.
Q. How do you deal with panel shrinkage when painting wood doors?
A.
If you paint a door in summer, you’ll often see exposed wood the following winter at panel edges (see photo, below). Masonite or other composite doors don’t have this problem, but the only way to prevent it on a solid wood door is to paint the panels before the door is assembled, and that’s not going to happen except on the occasional high-end custom job. If the customers want wood doors painted in summer, we warn them that the painter will probably have to come back and touch up the paint, and we charge for that as an extra.
Shrinkage of wood panelsin winter’s dry indoor air can reveal unpainted edges on wood door panels or on raised-panel or beadboard wall surfaces, almost guaranteeing callbacks for jobs done during the humid months of summer.
These touch-ups are trickier when the coating is a clear finish over stained or natural wood, especially if the finish is spray applied. The wet finish tends to creep into the dado and dry as a little thickened ridge. On the callback, that ridge has to be sanded smooth, and then the touch-up stain and finish have to be blended in carefully.
You also get shrinkage that exposes unpainted wood on paneling such as beadboard. But you can preprime or even prepaint those pieces before installing them, so the shrinkage won’t expose any uncoated wood.
Shrinkage can also make a caulked joint look terrible in six months, even though it looked fine when the job was done. When the wood shrinks, the caulk pulls off and splits with an ugly “fingering” appearance.
Charles Gilley Jr.is owner of Restoration Painting of South Woodstock, Vt., and has 30 years of experience in the field.Charles Owensis president of Two Dogs Painting, Inc., and has 17 years of experience in the painting trade.


