When I lived in New England, I was surrounded by decades-old traditional wood windows that still held paint quite well. But where I live in Seattle, it’s not unusual to find expensive, recently manufactured windows being replaced before they’re even five years old. I know of a three-year-old house that didn’t sell until all of its wood windows were replaced — with vinyl. Modern wood windows seem to have earned a bad reputation as being notoriously difficult to keep intact. What gives?
To prevent paint failure, make sure wood windows are properly fl…
Why Does Paint Fail?
The sash of a traditional wood window — that is, a window with panes of glass held in place with glazier’s points and glazing putty — is essentially composed of four single, dimensionally stable pieces. But a modern window, with insulated glass sandwiched into a wooden frame, can have two or three times as many pieces, which are often smaller and frequently made from finger-jointed wood. This results in a number of joints, edges, and end grains that all move in different directions at different rates, presenting openings for moisture penetration and offering a tricky substrate for paint.
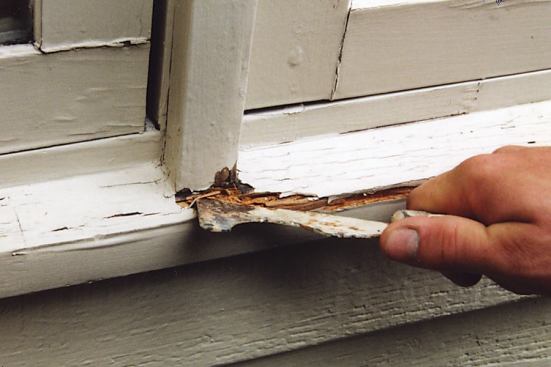
Compounding the problem, modern windows sometimes seem as if they’re designed to attract — rather than repel — water. Often, they’ll have vertical joints that act as channels, collecting water and transporting it onto the sill. If the window’s sill has an inadequate or negative slope, water will pool on it or even be directed toward the house and against the window frame’s vertical end grain. Some windows substitute wooden trim for glazing compound. Narrow and dimensionally unstable, these pieces can trap water on their unprimed backsides, bow out, and eventually rot. In other cases, a window manufacturer will substitute an adhesive for glazing compound, but it, too, quickly rots out and forms water-holding channels.
Other manufacturing practices only make these problems worse. Some windows are built with acute angles that look great to the designer but are too sharp to hold paint well. In addition, factory-primed windows are generally primed with an alkyd primer that rapidly oxidizes and dusts up if not top-coated in 10 to 14 days. This dust prevents bonding of future coats of paint to the surface. Sometimes, the window’s sash and frame aren’t completely primed or painted, leaving bare wood that invites airborne moisture to enter the window. Even unprimed windows present a problem: They’re subject to mill glazing, a condition where the cellulose in machined surfaces gets plasticized, removing the “tooth” necessary for paint to adhere properly.
When it comes to top coats, many painters who work with a brush prefer oil-based paint because of its self-leveling properties. Unfortunately, oil-based primers and top coats are too brittle for exterior applications. Modern windows, which are made up of many parts, are vulnerable to temperature extremes, expanding and contracting with changes in the weather. This thermal cycling causes inflexible oil-based paint to crack and eventually fail, which is why you generally see much greater failure on the south sides of houses. In fact, even on the same side of a house, I’ve seen differences in paint durability between the first-floor windows and the eaves-shaded second-floor windows. In every exterior application, 100 percent acrylic latex paints are superior to oil paints today. This is especially true on modern wood windows, where flexibility is crucial.
Proper Installation Comes First
Wood windows can be doomed by shoddy installation practices. For example, head flashing is so rarely installed these days that I’m actually amazed when I find a window that has it. Without flashing, storm-driven water can get under clapboards or other types of siding and start rotting the top of the frame. I see this over and over again, especially on first-story windows that don’t get protected by the second-story eaves.
Flashing is even more important when wood windows are mounted in walls clad with brick, stucco, or other types of nonwood siding. Because the wood window and the siding material expand and contract at different rates, a gap forms that can trap water against the window’s wood frame. In every case where I’ve found an unflashed window in this situation, I’ve also found rot. Typically, windows that aren’t flashed don’t get caulked around the edges, either, presenting yet another entry point for water.
Water vapor is also a problem. Even when a window’s interior and exterior surfaces are properly sealed with paint or lacquer, often the window’s edges never get finished. Especially in a tight house, the gaps around windows and doors are among the few places interior moisture — in the form of water vapor — can escape. Because there’s no impermeable membrane (in the form of paint) to prevent it, moisture can be drawn from this vapor path into the bare wood edge of the window, right around the weatherstripping. Sunlight then pulls the moisture through the wood; when it reaches the wood’s surface, it sits between the wood and the paint. The result is disbonded paint. Frequently, you’ll find the interior paint peeling on these windows as well.
Proper flashing and caulking are the best ways to avoid rot, of course. But another strategy that will prevent — or at least slow — rot is to prime the exterior of the frame all the way around, including the edges, before the window is installed.
Prep Before Painting
Whether a window is newly installed or old and peeling, the key to getting paint to stick is proper preparation. In some cases — for example, old windows that are in really bad shape or new unprimed wood windows — I’ll remove the sash from their frames to do this work. If the interior surface is already painted, I’ll immediately mask it off to protect it.
On houses with badly peeling windows, it’s fair to assume that paint that hasn’t peeled yet will peel eventually. Even so, most people cannot afford to have all of their windows stripped to the bare wood simply as a precautionary measure. So I concentrate on the worst windows, which are typically found on the south side of the house. I’ll work on them until I can no longer remove any paint, which usually takes about an hour.
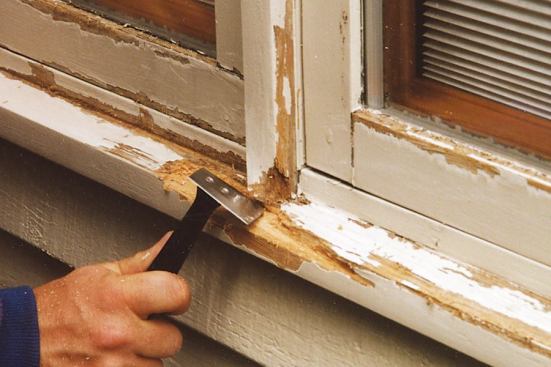
To remove paint, I use a combination of ProPrep molding scrapers (Preservation Resource Group, 800/774-7891, www.prginc.com), a palm sander, and putty knives. The fact that most of the failures noted above cause disbonding and failure down to the bare wood makes paint removal somewhat easier.
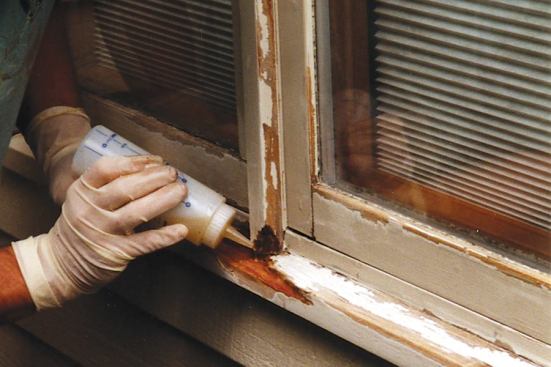
Once I’ve thoroughly scraped the window, I use Sherwin-Williams’ resin-based spackling (Sherwin-Williams Co., 800/331-7979, www.sherwin-williams.com) to putty any fastener holes made during the manufacturing or installation process. If there is any rot or even serious checking on the sill, I do repairs with epoxy.
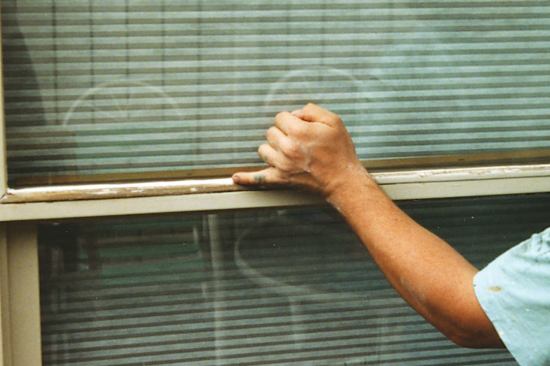
Next, I sand the entire surface with a palm sander loaded with 50- or 60-grit sandpaper. This removes any oxidized layers, roughs up the bare wood, and feathers the old paint. The feathering is crucial, as sharp edges from old paint will cut right through new paint, continually expanding the peeling area. (Look at any house with a problem paint job and you’ll see that the new failure starts right where the paint was last scraped.) I also round over any acute corners just enough to remove the factory knife edge that guarantees paint failure but not enough to be noticeable from the yard.
Finally, I scuff the exteriors of all unprimed new windows to remove mill glazing. I use a dry trim brush to clean off the dust, then wipe down every surface with a rag lightly dampened with mineral spirits, which quickly evaporates to leave a clean, dry surface ready for paint. (Don’t use a water-dampened rag, because it might raise the grain and lift the carefully feathered paint edges.)
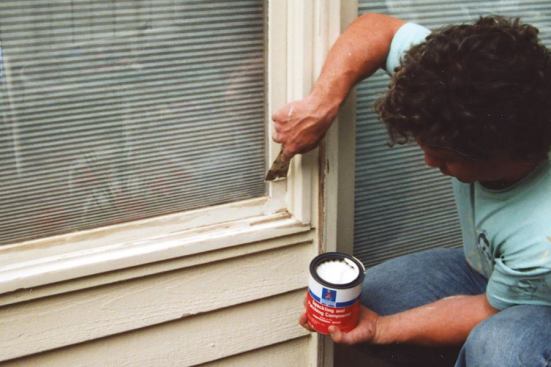
Even when I’m planning to spray the top coat, I generally hand-prime bare wood with Sherwin-Williams’ A-100 latex primer, particularly when repairs are minor. While many manufacturers claim that their top-of-the-line 100 percent acrylic latex paints can be used without priming, priming at this stage prevents dew from getting under the newly feathered edges and lifting them before I get a chance to paint. Besides, I figure that if these paints will work over bare wood, having a primer coat certainly won’t hurt them
Caulk Is Cheap Insurance
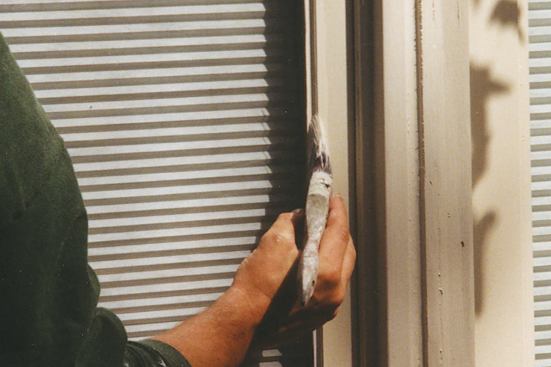

Using a 3 1/2-inch angled sash brush, the author laps the paint …
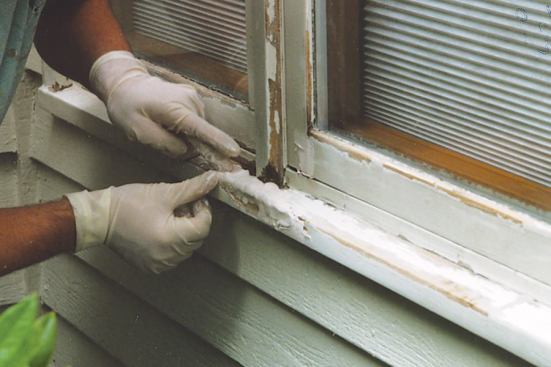
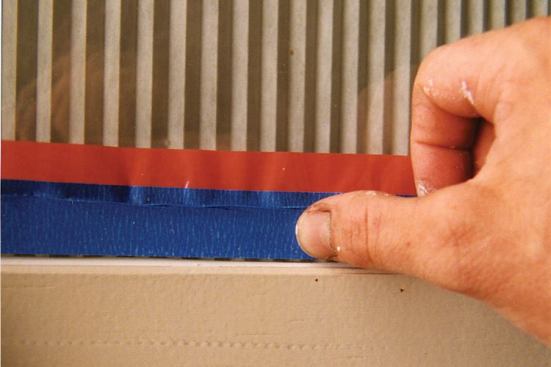
The step that gets missed most often in painting wooden windows is the caulking. Because the joinery on modern wood windows is almost as complex on the exterior as it is on the interior, both sides should be caulked with the same care. On the interior, you caulk mainly for looks; on the exterior, you caulk mainly for protection. For both, I use White Lightning (White Lightning Products, 800/241-5295, www.wlcaulk.com), a 100 percent acrylic caulk with a 40-year warranty.
I first carefully caulk each joint and seam where water can get into the trim and gain access to unprimed surfaces. Then I look for any horizontal surfaces that lack the proper slope for draining water. On these, I use caulk to build a little fillet between the horizontal and vertical sections to drain water away. Water wicked up by the end grain in these joints is one of the most common causes of failure.
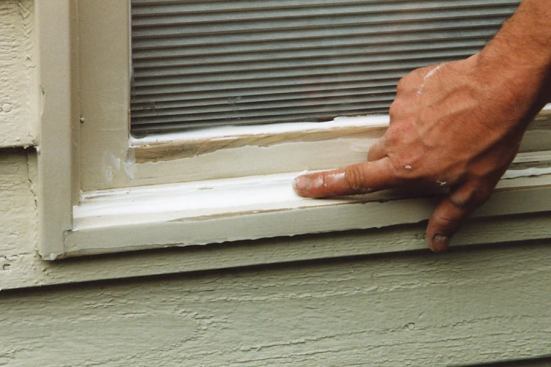
In most cases, it’s enough just to fill in any acute angles and slope the water to the edge of the sill. In extreme cases, where the sills are so rotted they need replacing, I’ll shape the new sill correctly so that it will drain — but I still caulk it very thoroughly. (Fortunately, we have a carpenter on our crew, because we replace a lot of rotten sills.)
And in cases where windows lack proper head flashing, I’ll gob caulk into the gap between window and siding (sometimes an entire tube’s worth), again forming a fillet to act as flashing.
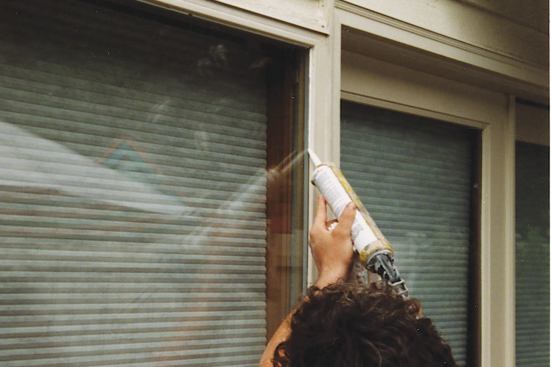
Finally, I run a bead of caulk around the glass pane, just where glazing compound would traditionally be. I apply a steady 1/8-inch bead, then smear it slightly with the edge of my dampened little finger. When done right, the caulk bead can’t be seen from inside; but without it, there’s nothing to prevent water from running down the glass and behind the wood trim holding the glass in place. Many windows come from the manufacturer with a bead of adhesive extruded into this gap. Because this adhesive quickly weathers away and leaves a channel where the water can sit, on new windows I remove the extra adhesive with a razor blade before running the caulk line. All of this is especially important along the bottom of the pane, where water constantly runs down and into the joint.
Painting the Windows
The windows are now ready for painting. Usually, I paint siding and windows at the same time, in which case I use spray equipment. But if I’m doing just the windows, I break out my short-handled 3 1/2-inch angled sash brush. A good latex brush has synthetic bristles that are much softer than those of natural-bristled oil brushes, which makes it easier to lay out the paint.
I paint windows from the center out and from the top down. Starting at the top, I first paint the glazing compound moldings surrounding the panes, then work outward toward the frame. I dip 1 1/2 inches of the bristles into the paint and clean one side off on the lip of the can. The clean side of the brush goes on the glass side of the sash, allowing me to draw a perfectly straight line along my caulk/glaze line. The paint should just barely lap onto the glass, just as if you were painting a traditionally glazed window.
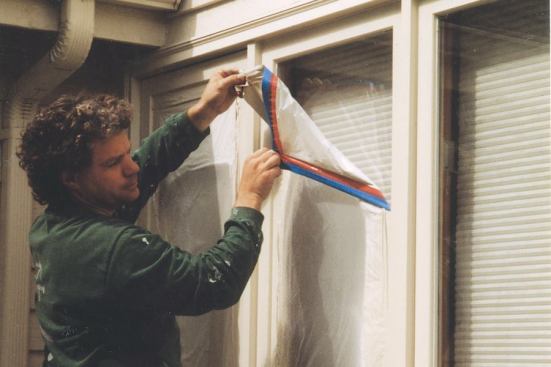
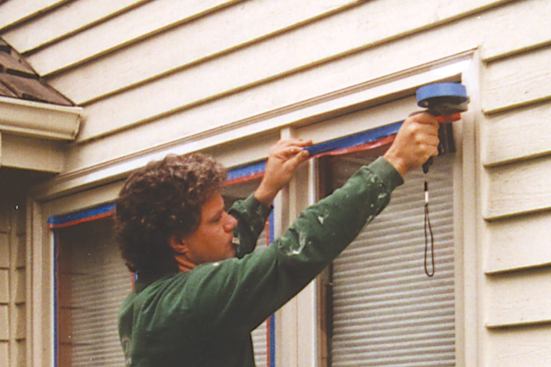
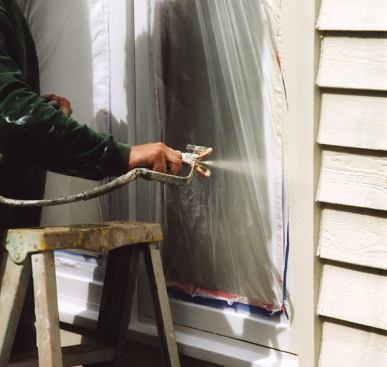
Spraying paint. Compared with brushing, it may seem that masking a houseful of windows in order to spray-paint them is a lot of extra work. But I can mask an average 35-window house in less than one day and spray it in four hours — a savings of days over traditional brushing. Plus, it’s easier to hire and train a good masker than it is a good hand-painter. And by spraying latex paint rather than brushing it, I can get a thicker, brushstroke-free finish.
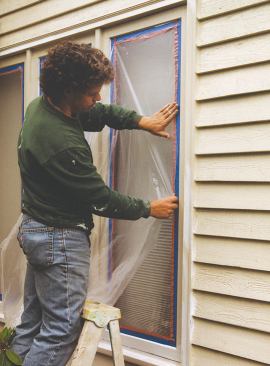
To mask, I use a 3M dual-tack tape dispenser (3M, 888/364-3577, www.3m.com), laying tape on the glass 1/64 to 1/32 inch inside my caulk/glaze line. This slight gap allows some paint to lap past the caulk just onto the glass, creating a further seal against water getting behind the caulk. Then I lay a piece of 0.31-mil painter’s plastic on the tape and trim it to size with a razor blade. If the window is unprimed and removed from the frame, I do the same to the inside glass, so that I can spray both sides of the window.
If I’m working on new unprimed windows or completely reconditioning older windows, I’ll remove the sash from their frames and lay them flat on short painter’s horses to prime the exterior side and the edges. When they’re dry, I flip them and prime the interior. This way, any blemishes from sitting on the horses will end up on the exterior. I like to use Sherwin-Williams’ A-100 latex primer for the edges and exterior, and a sandable, fast-drying alkyd primer for the interior (where flexibility isn’t as crucial). I shoot all of my trim using a 213 reversible tip and the lightest possible pressure that will give me an even fan without “fingering” — those stripes you see from a poorly adjusted sprayer or a worn tip.
For the finish coat, I use Sherwin-Williams’ new Duration satin latex. One coat goes on and dries twice as thick as SuperPaint, the paint it replaced at the top of the company’s product line. (Some homes I painted with SuperPaint still look great after 20 years.) Plus, Duration has a lifetime warranty.
I first spray around the window’s edges and let them dry. If the windows are new, I’ll paint the interiors, then thoroughly caulk and reinstall the window so that I can spray the face and frame together. Duration is thick, so I try to use vertical strokes and avoid crossing horizontal and vertical passes; I spray carefully, using quick, light passes. On a complex piece like a 15-pane French door, for instance, I’ll spray the entire door with overlapping vertical strokes, changing the angle of the gun slightly to get the top and bottom of the muntins and the left and right sides of the mullions.
I prefer to spray two light coats rather than risk runs. Over the years, I’ve found that there’s no advantage to back-brushing smooth surfaces, especially prepainted ones. Besides, brush strokes won’t level out completely with the new latex paints.
After 20 minutes or so, I check each window in case any sags have developed that need brushing out. If I spray carefully, runs will be rare, but if I find more than a few, it means that I need to go lighter with the spray gun. After all, with the windows already masked, a second coat of paint is a piece of cake.
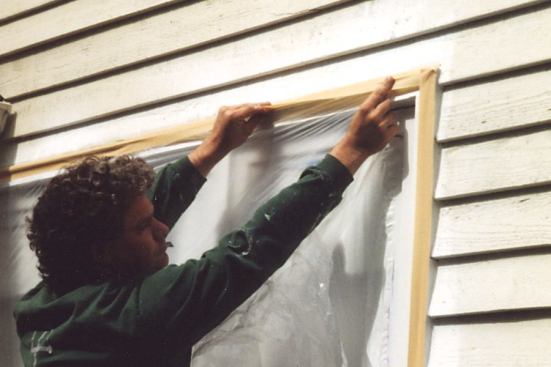
If I’m spraying the siding, too, the windows should be dry enough to mask over after about 24 hours in warm weather. I lay 3M 2040 1 1/2-inch yellow masking tape flat around the face of the window frame and flush to its edge, burnishing the outside edge down and leaving the inside edge unburnished. Then I tuck plastic under the loose edge and trim it to fit with a razor blade. (I’ve found that yellow dual-tack tape doesn’t hold as well for extended periods in this application.) Then the siding can be sprayed with abandon. Again, it takes less than a day to spray a typical 3,500-square-foot house.
Jon Tobey is a painting contractor in Monroe, Wash.


