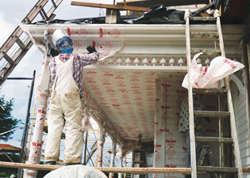
With safety gear on, surface ready, and surroundings protected, I was ready to start applying the material. Relying on my test-patch results, I sprayed the Peel-Away on heavily and evenly, about 1/8 to 1/4 inch thick, depending on the thickness of the paint layers. To get an even coat, it’s necessary to direct the spray pattern perpendicular to the surface to be coated. This wasn’t difficult when coating flat surfaces, but it got trickier when it came to the multi-surfaced decorative trim pieces and turned spindles, since the sprayed material won’t go around corners. When necessary, we’d apply the compound with a brush, trowel, or even a rubber-gloved hand. At this juncture, it helped to have an assistant or two to keep the process going, because the special paper provided with the Peel-Away system has to be applied over the wetted surface. One side of the paper is plastic-laminated to prevent the stripping compound from drying out while it’s working. The paper has to be applied with the plastic side out, and be embedded in the material, avoiding trapped air bubbles as much as possible (Figure 5). Trapped air can promote failure by allowing the compound to dry on the surface.
| Figure 5.The paper is carefully pressed into place in an effort to eliminate air bubbles, which would prematurely dry the stripper. |
Capturing the details.
Typically, one person keeps the spray process going, while the other two follow up with the paper application. This is fairly easy when covering flat surfaces, but the intricate trim on this Victorian slowed us way down. We used scissors to cut the shapes for good tight wraps around all of the trim pieces. It wasn’t necessary to fit the paper into every contour, but rather to create a “package” around the pieces, and contain the stripper in the recesses of carvings and small dentils. The trick was to apply the paper firmly to the surface without manipulating it too much, thereby maintaining an even distribution across the surface and on the corners. Papering the gingerbread reminded me of wrapping odd-shaped Christmas presents: At each new section, I’d have to decide how to wrap each element. Each container of Peel-Away is supposed to cover a specified number of square feet, and the paper should cover that area, but I found that because of all the details, I ran short and had to order more. Removing the paper.
It took about two days for the Peel-Away to loosen the paint – then I began the removal process. It worked best to start from the bottom and work toward the top, in order to prevent the upper sheets from pulling away the lower sections. Exposing too much area at once can cause drying, which makes cleaning up the details much more difficult. After working a putty knife under the paint at the edge of the paper, paint and paper lifted off in large sheets from the flat siding and trim areas, but in much smaller pieces on the intricate surfaces. We removed as much as we could by hand before beginning the rinsing process, which further cleans the surface and removes residual solvent. Rinsing can ordinarily be done with a hose and a scrub brush, but using a pressure-washer was the only way to get the more intricate gingerbread clean. You have to be careful with the pressure, though – use too much and you risk damaging the wood. At this point we had removed about 98% of the paint from the surface. The remaining 2% left in nooks and crannies had to be removed by hand with small scrapers or picks, while the paint was still soft from the solvent-process (Figure 6). Once all of the paint was off, the surface had to be neutralized with Peel-Away neutralizer solution – essentially acetic acid – and allowed to dry. Skipping this step would be asking for trouble, because the wood would remain chemically hostile to paint. After neutralization, I checked the pH level with the manufacturer’s litmus paper. Some areas had to be treated a few times to get the pH level close to neutral – between 7 and 8.
| Figure 6.After stripping, the remnants of the original painted surface are removed with small picks and scrapers, a hose and scrub brush, or by pressure-washing. |
Waiting to Paint
Sixty to ninety days of drying time is required before the newly stripped wood can be repainted. I used a moisture meter to monitor the moisture content in the wood as it dried. Acceptable moisture levels for painting depend on the equilibrium moisture-content of wood for the region you’re working in. Repainting was fairly straightforward once all of the old paint was removed. To be on the safe side when selecting paint, I consulted a technician at Peel-Away, who recommended a water-based acrylic primer called X-Out Plus (XIM Products, 1169 Bassett Rd., Westlake, OH 44145; 440/871-4737; www.ximbonder.com). It’s formulated to permit any excess moisture still present in the wood to evaporate off, while sealing bleeding stains in the wood – even the tannins present in redwood or cedar. Two coats of primer followed by two topcoats of Sherwin Williams Super Paint, a good quality latex, made the house look like new again (Figure 7).
| Figure 7.After neutralizing the stripped surface with an acid solution, the author allowed the wood to dry for more than two months before repainting with two coats of primer and two topcoats. |
Steve Allen
is president of Allen Painting in Fortuna, Calif.


