I grew up in a 250-year-old home in eastern Pennsylvania that was full of interior architectural details — huge strap hinges, exposed log ceiling joists, a raised-panel wainscot in the dining room. Even as a young boy, I admired those panels and moldings.
Unfortunately, building a room full of true raised-panel wainscot is a lot of work and a heavy drain on most budgets, so we’ve come up with a simple, straightforward way to create the look of panel wainscot without the extraordinary expense.
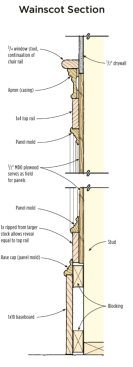
We start by striking a level reference line around the perimeter of the room with a rotary laser, marking the desired top of the chair rail. In the room shown here, the chair rail was a continuation of the 5/4 window stool. Whenever we can, we use full 1-inch stool, which fits with the period detailing we like.

If we’re working in a room that already has drywall, we carefully remove the 1/2-inch board below the reference line and clean up the studs. One thing I hate to see is a receptacle in the middle of a wainscot panel or — even worse — cut into a stile. So we also take this opportunity to relocate the wiring in such a way that receptacles can be mounted horizontally on the baseboard, centered between the floor and the base cap.
Next, we attach the 1/2-inch MDO plywood that serves as the field for our panels and as a nailer for the stiles and panel molding. We spend some time laying out the plywood seams so that they fall behind the stiles, and we mark them on the walls so we have no excuse for missing.
I prefer an odd number of panels, and I like them to be taller than they are wide, though that doesn’t always work out. In this project, we wanted to keep the panels on all four walls as close as possible to the same width, so they ended up being almost square.
We made the top rail and stiles from 1×4 poplar, and the bottom rail from wider stock, which allowed us to keep the 3 1/2-inch reveal; the larger stock also served as a nailer for the base cap. We used a 1×10 base with a custom 5/4 by 17/8-inch base cap.
Frame assembly is usually quick and easy. We cut all the parts to length on the miter saw, then assemble the frame with biscuits and glue. No clamping is necessary, as we immediately attach the frame to the wall with 2 1/2-inch finish nails, making sure to hit the studs. When you do this, remember to make one corner stile 3/4 inch wider than the overlapping one so the reveals remain the same.
Here, we ran the base cap around the perimeter of each panel instead of using a different panel mold. We had this profile custom milled; it laps the 3/4 material nicely, and you have to look closely to determine whether it’s one or two pieces.
We finished up with the installation of the 1×10 baseboard and base cap.