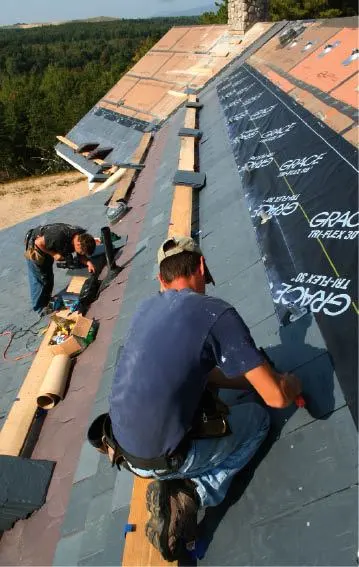
I’ve worked on a lot of natural slate roofs in my 20
years as a roofer and general contractor, but it wasn’t
until last year that I got my first synthetic-slate job. The
client was building a new home in northern New York state, and
he wanted to use Authentic Roof slates (Crowe Building
Products, 888/533-3358,
authenticroof.com).
After carefully reviewing the product literature and grilling a
roofer who provides manufacturer-sponsored training, I felt
confident that there wouldn’t be much difference between
installing the natural and synthetic materials.
Authentic Roof slates weigh about the same per square as
high-quality 30-year architectural shingles and about
one-fourth as much as real slate. That weight difference
appealed to me, but an even bigger advantage on this project
proved to be the fact that these slates are much easier to work
with than stone slates. Besides being large (40 squares), my
client’s roof was complex, with a big masonry chimney, a
barrel-vaulted porch roof, and five valleys. Moreover, it had
an extensive photovoltaic system with dozens of aluminum
standoffs that we had to cut around and flash (see
Figure 1). It made the job a lot more appealing to
know that we’d be able to easily drill the slates and cut
them with a utility knife, shingle cutter, jigsaw, or table saw
without worrying about damaging them.


Figure 1. Because synthetic slate is so much easier
to cut than real slate, it’s also faster and easier to
install. That made it a good choice for this 40-square roof,
which features a barrel-vaulted front porch (top) and dozens of
solar-panel roof standoffs (bottom).
Since completing the project, I’ve recommended Authentic
Roof slates to several customers. And I’m installing
another synthetic slate roof this spring. At about $450 per
square (materials only) — compared with $130 per square
for architectural asphalt shingles — synthetic slate is
definitely a premium roofing material. But it’s a good
fit for the harsh Adirondack climate where I work, because it
resists wind and ice damage and mold growth.
Product Characteristics
Authentic Roof slates are made from a proprietary
thermopolymer olefin compound that consists mostly of recycled
postindustrial waste from auto-industry products. The shingles
taper from about 1/4 inch thick at the butt end to 1/8 inch
thick at the top, and measure 12 inches wide by 18 inches high.
They’re available in three standard shapes and six
standard “color-through” hues and come packaged in
25-slate bundles that weigh about 42 pounds apiece. It takes
roughly 185 slates to cover 100 square feet when the exposure
is 6.5 inches (recommended for roof slopes between 7/12 and
9/12).
A square of Authentic Roof shingles weighs between 280 and 330
pounds, depending on the exposure; by comparison,
1/4-inch-thick natural slate roofing weighs at least 800 pounds
per square. Roof framing for synthetic slate shingles is the
same as for asphalt and metal roofs.
Because Authentic Roof slates are made from plastic, they can
be cut, hammered, and walked on with little risk of damage.
They have a Class 4 impact resistance (the highest rating),
Class A “stand-alone” fire rating (not dependent on
the underlayment), and a 110-mph wind resistance rating.
They’re also UV-protected and come with a 50-year
warranty. The company has a 20-year track record.
Cuts can be made with a utility knife by first scoring the
shingle and then snapping it on the score line (Figure
2). For repetitive cuts, we used a Shingle Shark
asphalt-shingle cutter (800/231-5647,
qualcraft.com). Both
methods work fine for straight cuts, but a jigsaw worked better
for curved cuts around the tubular skylights and L-shaped and
rectangular cuts around the photovoltaic mounting blocks. We
even used a portable table saw to cut some slates.
Figure 2. Authentic Roof slates can be scored with a
utility knife and snapped (left), or cut with a jigsaw
(center). A Shingle Shark makes quick work of repetitive cuts
(right).
Layout and Starters
When we arrived on site, the roof deck was already sheathed
with Zip System roof sheathing (800/933-9220,
huberwood.com). This
5/8-inch-thick sheathing has an integral waterproof top layer,
and the seams are sealed with a special tape. The product is
meant to be watertight without an underlayment, but for added
protection and to satisfy Authentic Roof’s installation
instructions, we opted for a layer of Grace Ice & Water
Shield (866/ 333-3726,
graceconstruction.com)
at eaves and valleys and around penetrations.
Everywhere else, I used Grace’s Tri-Flex 30, a synthetic
roof underlayment. I prefer it to felt because it resists tears
better and doesn’t wrinkle when it gets wet. I also like
that it’s packaged in lightweight 10-square rolls. We
used painted 26-gauge galvanized drip edge and flashing per
Authentic Roof’s recommendations.
The company warns installers to mix slates together from the
25-piece bundles and from every pallet they’re shipped
in, as inherent color variation could show up as unintended
patterns in the finished roof. Our pallets arrived on a tractor
trailer without a boom, so we had to hump all the material onto
the roof ourselves. The way the shingles are packaged, I
can’t see how you could store them on a steep roof
anyway, so be prepared for the extra time that unpacking,
mixing, and stocking the slates will require. I used a rope and
a milk crate to get them onto the roof (Figure
3).
Figure 3. The slates weigh about the same
per square as asphalt shingles, but they’re much bulkier.
Here, the author uses a milk crate to stock the roof a dozen
pieces at a time.
Starter shingles are made by removing 6 inches from the top of
the company’s standard 12-inch-by-18-inch slates. The
manufacturer suggests several ways to do this, but the fastest
way I found was to use a portable table saw equipped with a rip
fence. Before installing the starters, I snapped a chalk line
so that they would overhang the drip edge by one inch. Once
I’d checked that my planned layout would have reasonably
sized pieces of shingle at the rakes, I snapped a pair of
vertical layout lines as well.
Shingle Installation
The first shingle course is placed over the starters with the
joints lapped halfway. Unfortunately, Authentic Roof slates
can’t be installed with a roofing nailer, since the nail
has to be placed in the exact center of the molded nail hole,
with the nail head flush with the surface of the slate. This
holds the relatively temperature-stable slates in place while
allowing the roof deck underneath to expand and contract with
changes in temperature. We used 1 1/2-inch hot-dipped
galvanized nails; copper and stainless roofing nails can also
be used.
Authentic Roof slates also have spacing tabs that project from
the edges and automatically gap the shingles 3/16 inch apart
(Figure 4). Each slate has an exposure guide
on the face. Exposures can be adjusted from 6 to 7 inches,
although the company recommends a 6-inch exposure for high-wind
areas. Using blue chalk to prevent staining, we snapped a line
for every course.
Figure 4. The slates have tabs that keep
them spaced 3/16 inch apart and a built-in exposure index.
During installation, the author snaps a chalk line for each
course.
Valleys
Authentic Roof recommends using W-shaped valley flashings,
which have a rib down the center (Figure 5). I
use W-shaped — rather than V-shaped — valley
flashings on most roofs anyway, because they’re better at
preventing water and melted snow from getting under the
shingles that line the valley. That’s an important
benefit during our harsh North Country winters.
Figure 5. Valleys are lined with peel-and-stick
underlayment before the 26-gauge galvanized metal W-flashing is
installed; the slates butt directly against the rib in the
flashing (left). Since they can’t be installed with a
pneumatic nailer, the slates are hand-nailed (right).
I nailed each valley flashing over a layer of Ice & Water
Shield, then sealed the edges to the roof deck with additional
strips of the membrane. A layer of synthetic underlayment laps
over everything.
At the valleys, I cut and installed the slates so that they
butt up against the rib. This detail — which minimizes
the appearance of the valley — is one that I’ve
used successfully with real slate roofs.
Decorative Shingles
In addition to standard slate-look shingles, Authentic Roof
makes decorative Beaver Tail shingles (with rounded corners)
and Mitered Edge shingles (with clipped corners). My
client’s roof had decorative bands of red Beaver Tail
shingles integrated into the design (Figure
6).
Figure 6. Like natural slate, synthetic slates have
slight color variations, so bundles must be mixed before
installation (left). To keep the decorative rounded slates in
alignment with the field slates, the author uses a spacer block
(right).
Inexplicably, the Beaver Tail shingles are slightly narrower
than the square shingles. As a result, I couldn’t rely on
the molded spacing tabs if I wanted to maintain the vertical
layout. Instead, I made spacer blocks a little thicker than the
tabs. We inserted them between shingles so we could match the
layout on the square slates. Other than the spacing issue, the
decorative shingles install just like the square-cut
version.
Curves. The barrel-vaulted porch on this house was
originally supposed to have a soldered copper roof, but this
was eliminated from the budget. Luckily, Authentic Roof slates
can be warmed up with a heat gun and shaped to conform to a
curved surface. It was pretty easy to mold the slates to follow
the porch roof’s convex and concave curves
(Figure 7).
Figure 7. Authentic Roof slates can be heated up and
molded to fit such curved shapes as barrel-vaulted roofs.
Hip and Ridge Caps
The manufacturer’s cap slates look a lot like standard
slates except that they have a crease molded into the back.
Once the shingles are heated with a heat gun, the shingle can
be folded along the crease to match the roof’s pitch. By
late October — when we were capping the ridge — the
mornings were quite cool, so to save time we’d preheat a
stack of shingles with a torpedo heater and finish up by
heating individual shingles with the heat gun (Figure
8).
Figure 8. In cold weather, the slates are stored in a
warm area and heated to above 50°F so they’re
easier to cut (top). Cap slates — which have a ridge
channel molded into the back — are warmed with a heat
gun, then bent into shape (bottom left) and nailed into place
at a hip or the ridge (bottom right).
The caps can also be installed over a ridge vent, as long as
longer nails are used. The manufacturer recommends shingle
installations over vented roofs only.
Winter Installation
Cooler temperatures complicate Authentic Roof slate
installation. The manufacturer suggests keeping the slates at a
minimum temperature of 50°F, but sometimes
that’s just not possible.
When the thermometer dropped below 40°F, the slates
were tough to cut, so we took to warming a stack with a
kerosene space heater. I would then make a few cuts at once
while the shingles were still warm enough to cut easily. This
became especially important for the many cuts required at the
hipped cornice returns that flanked the gable ends.
I had figured that the job would take about four weeks if I
worked with one or two helpers. It ended up taking about twice
that long. This was partly because we were working with a new
product; but also, the early-winter weather slowed us down.
Twice, the half-completed roof was buried in snow. It was
critical that we waited for the roof to dry because the
shingles are extremely slippery when they’re wet or
snowy.
On my next synthetic-slate roof installation, I’m
assembling a bigger crew to speed installation and we’re
making the starters and caps ahead of time. I charge about $240
per square to install synthetic slate — about $80 more
per square than I charge to install architectural asphalt
shingles, but as much as $160 less per square than real
slate.
Roger Ouimette is a general contractor in Champlain,
N.Y.