As a metal-roofing contractor in the Upper Peninsula of Michigan, I am frequently asked to fix “roof leaks” that have less to do with roofing than with the way poorly insulated houses lose heat. For example, warm, moist air from inside a house may escape into the attic and condense on the underside of the roof sheathing; when the homeowners see water stains on the ceiling of the room below, they assume there’s a roof leak.
But by far the most common problem is ice damming, which occurs when heat from the attic melts the snow on the roof. The snowmelt runs down the roof beneath the accumulated snow, refreezes when it hits the cold air at the eaves, and blocks the flow — causing an ice buildup and, often, a leak.
Ice dams happen for a number of reasons, but mostly they involve insufficient insulation or poor roof venting. We see ice dams all the time on the older capes in this area, which have second-story sloped ceilings underneath 2×4 or 2×6 rafters. Typically, the rafter bays are stuffed full of batt insulation, but this means the roof is only insulated to R-11 or R-19 — not R-38, like it should be. And with no vent channel to allow outside air to keep the inside surface of the roof cold, the snow on the roof quickly begins to melt.
Another common problem is that the attic insulation is thin or compressed where narrow rafters land on exterior walls. This creates another spot where interior heat can easily bleed through to the roof, melting the snow at the eaves. The wider rafters on newer homes don’t necessarily guarantee good ventilation in sloped ceilings: Even if the bays are deep enough, skylights, hips, and dormers can block the flow of air.
While it’s possible to fix these problems from inside, we’ve found it’s often cheaper and easier to deal with them from the exterior while reroofing the house. Our company installs about 30 roofs per year; for two-thirds of them, we create an insulated, ventilated cold roof on top of the existing sheathing.
Our system contains one or more layers of rigid insulation, wood or metal edge trims, perforated metal vents at eaves and ridge, and a new layer of sheathing held off the insulation by 2x4s. The 1 1/2-inch air channel created by the 2x4s provides sufficient ventilation above the insulation to maintain a cold roof surface and prevent ice damming. The insulation creates a thermal break and increases the R-value of the roof assembly. In cases where the roof or attic was not well insulated or ventilated to begin with, we always add enough rigid foam to turn the area below into conditioned space. We can then close off or remove the existing roof vents, secure in the knowledge that the underside of the existing roof sheathing will never drop below the dew point.
Initial Work
On a typical job, we remove the existing roof, then cover the sheathing with a synthetic roof underlayment like Titanium UDL-30 (800/567-9727, interwrap.com) or RoofTopGuard II (706/232-3027, rooftopguard.com). The underlayment isn’t strictly necessary, but we install it to protect the house while we’re doing the work. On jobs where we know for sure there will be time to do the entire buildup and dry in the roof by the end of the day, we’ll skip this layer of underlayment.
Plumbing stacks. In our region, snow can accumulate on a metal roof and creep like a glacier, which can damage plumbing stacks that are close to the eaves. To avoid this, we reroute the stacks so they penetrate closer to the ridge.
Insulation
Next, we install a 2×4 nailing plate around the perimeter of the roof — a single 2×4 thickness for 1 1/2 inches of insulation and two 2x4s for 3 inches of insulation. After that we cover the area inside the nailers with 4×8 sheets of 1 1/2-inch extruded polystyrene (XPS) rigid foam, securing them to the existing roof sheathing with cap nails.
When there are two layers of insulation, we alternate the 4×8 sheets with 2x4s on the flat all the way up to the ridge. This second layer of rigid foam is fastened to the first layer with cap nails, and the horizontal 2×4 “purlins” are secured with long Torx-head screws (800/263-0463, grkfasteners.com).
The purlins provide nailing for the 2x4s that will create the vent space. Although they do interrupt the double insulation layer, we prefer to use them because it’s faster and easier to nail the spacers to purlins than to fasten them to rafters with 8- to 10-inch-long screws.
If the roof is getting only a single layer of foam, we may skip the 2×4 purlins and fasten the spacers by screwing all the way through to the rafters. At about R-5 per inch for XPS — more if we use polyisocyanurate — a 3-inch layer of rigid insulation adds R-15 to the building.
Edge trim. We cover the edge of the perimeter nailer with an L-shaped metal trim, which we prefabricate in our shop on a heavy stationary brake. We use 24-gauge Galvalume steel with a Kynar paint coating, to match the new roof.
The insulation trim looks best when it’s installed over a single 2×4 nailer; with a double nailer, it can look too wide, depending on the other fascia details. In that case, we may use a piece of flat wood trim instead of the metal.
Vent Space
The ventilation strip along the eaves is formed from perforated metal — 20-gauge Galvalume with 1/8-inch holes drilled on a 3/32-inch stagger that we buy from Direct Metals (800/711-4939, directmetals.com) or McNichols Co. (800/237-3820, mcnich ols.com). We bend it into a C-channel that will accept flat 2x4s — the ends of the ventilation spacers that run up the roof slope.
To ensure a straight edge, we nail the vent strip to a snapped line. The perforated metal projects 2 inches beyond the edge of the roof; when its top and edge are covered with roofing material, this leaves a 2-inch vent space along the bottom.
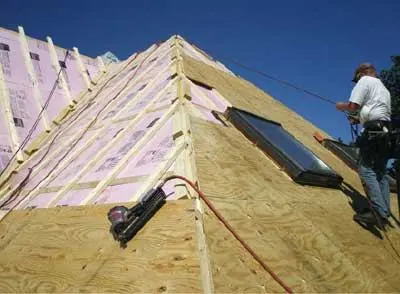
We install the 2×4 spacers 2 feet on-center, tucking the bottom ends into the vent strip and running them up the slope to the ridge on top of the insulation and edge nailers. We run the spacers long at the top, then snap a line at the ridge and cut them to length in place. If the roof has sagged, we can flatten it by shimming under the spacers.
Sheathing. We nail the spacers to the purlins or — on roofs with a single layer of rigid foam — secure them to the rafters or decking below with screws. We then sheathe the new roof surface with 5/8-inch CDX plywood, stopping it short of the ridge so that the roof can vent to a ridge cap.
When the sheathing is complete we install a custom-bent metal drip edge — an L-shaped piece with a hem on the exposed edge. The vertical leg is 3 inches long, which covers the sheathing and the outer edge of the vent strip and leaves a reveal that helps conceal the bottom of the perforated vent.
At this point we’re ready to put down underlayment and then roof. We always install standing-seam metal, but there’s no reason composition shingles or some other roofing couldn’t be installed over this buildup.
Dan Perkins owns Dan Perkins Construction in Ishpeming, Mich.


