One way to give shingling projects a unique look is to use repeating geometric designs, a basic technique I described in an earlier JLC article (see “Decorative Shingling,” 6/06).
But it’s also possible to build complex patterns and free-form scenes with cedar shingles. In this article, I’ll demonstrate how to build a meandering vine with leaves. The trick is to build out the design with multiple layers of shingles, and to use tapered shingles — or “ramps” — to ease the transition between layers.
Sketching Out the Design
Though simple to install, a vine-and-leaf design offers plenty of room for creativity. You can lay up a single vine or let it branch in several directions; the design can “grow” up the entire wall or just partway.
Vines are installed as the field shingles are being installed — one course at a time. I start by sketching out a route for the vine on the housewrap. Even though part of this sketch is covered as each course of shingles is applied, it’s easy to retrace the route by eye as the courses go up.
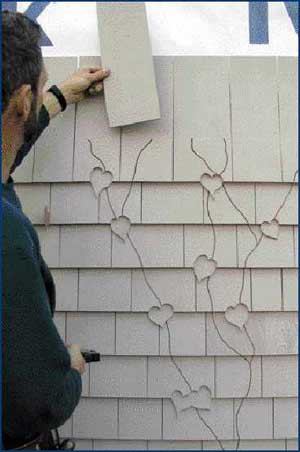
Vines — which are simply slots cut into the exposed part of shingles — can start anywhere on the wall, and terminate either by dying into a soffit or by narrowing over two or three courses and then curling to an end, just like a natural vine.
Personally, I think the shadow lines alone create plenty of contrast, but to highlight the design, some clients like to paint or stain the vine brown and the leaves green.
To form leaves, I trace the outlines of precut patterns onto shingles, then cut out the design with a jigsaw. While not every shingle course needs to have a leaf, I do cut a vine into each course to continue the design.
Growing the Vine
As each shingle course approaches the vine I’ve drawn on the building paper, I stop applying field shingles. Instead, I center a precut undercourse shingle that’s at least 5 inches wide on the vine route and fasten it in place.
This shingle will back up the vine and provide water protection.
Undercourse shingles. Because they need to cover only the top lap (upper two-thirds) of a full shingle, I make undercourse shingles by cutting off the exposure portion (typically 5 inches for white cedar) and keeping only the top portion of the shingle.
While this undercourse step isn’t strictly necessary (joints between shingles expose the top lap beneath anyway), the vine slots sometimes extend diagonally across the shingle exposure, which tends to channel more water back toward the building than ordinary vertical joints between adjacent shingles do.
In some cases, I apply more than one undercourse shingle, because a wide undercourse is less likely than a narrow one to appear as a bump in the wall. I make the bump less noticeable by mixing up narrow (5-inch), medium (12-inch), and wide (18-inch) undercourses from course to course. Then I chalk in the vine route over the top of the undercourse shingle to serve as a guide for the next course.
Ramp shingles. I use ramp shingles whenever I need to blend overlaying shingles back down to the level of the field shingles.
I rely on two types of ramp shingles: sideways shingle ramps and planed ramps.
To make sideways shingle ramps, I simply rip a full shingle lengthwise into 1-inch-wide strips. Although I typically do this on a table saw, it can also be done easily with a utility knife.
To make a planed ramp, I use a block plane to bevel the face of the shingle so that one outside edge is about 1/16 inch thick.
For more complex designs, I often use combination ramps, especially when ramping a layer over a full-thickness shingle undercourse. Rather than planing a 3/8-inch shingle butt to a featheredge, it’s easier to plane it to just 1/4 inch to 3/16 inch and then apply a sideways ramp to the bottom edge.
To make undercourse and ramp shingles, I always save shingle cutoffs from previous sidewalling jobs.
After installing the ramped undercourse, I select a field shingle to cut the vine slot through, mark (in chalk or faintly in pencil) a square line across the “vine” shingle at the next exposure above, and sketch the route of the vine in chalk.
Next, with a jigsaw or coping saw, I cut out the vine slot, making parallel cuts to establish the width of the vine up to a point 1/4 inch above the exposure line. While I do this, I’m careful to brace the shingle well to avoid splitting it. Before fastening the “vine” shingle to the wall, I sand and prime (or stain) the cutout slot as necessary, then add an extra fastener on either side of the slot.
Forming the Leaf
When it’s time to cut in a leaf, I follow the same sequence as above, but instead of applying an undercourse shingle over the area of the vine, I use a full shingle. Since this shingle will form the bottom of the leaf, it is sometimes stained or painted a contrasting color.
After aligning the leaf undercourse shingle with the butt of the shingle course below, I mark — faintly, in pencil — a square line across the shingle at the next exposure above.
Then, holding or tack-nailing the shingle in place, I position one of my cardboard leaf templates over the exposure line and the vine line and sketch around the bottom of the leaf pattern just up to the square exposure line on either side.
Leaves can be oriented in any position: mostly below the butt line of the shingle course, mostly above it, or anywhere in between. They can also be oriented to the left or right of the vine, or directly over it. On my designs, I like the position of each leaf to vary as the vine rises up the wall.
Next, I cut out the shingle around the leaf and below the exposure line, sand around the edge of the leaf, and prime or stain the edges as needed.
Once I’ve repositioned and fastened this leaf undercourse shingle to the wall, I install as many additional undercourse shingles on either side as desired, then apply ramp shingles to the sides of the undercourse shingles.
To finish the pattern, I fill in the next course of field shingles, taking care to select another wide shingle to completely cover the vine sketch.
I hold or tack-nail this shingle in place and, faintly in pencil, mark a square line across the shingle at the next exposure. Then I overlay onto the shingle the same leaf template I used on the leaf undercourse below, and sketch around the top of the leaf pattern with a pencil.
I also draw in the route of the vine from the leaf, across the exposure area of the shingle, up to the next course exposure line, and 1/4 inch beyond it.
After cutting out the top of the leaf and the vine slot, I sand the cuts, prime or stain as necessary, and fasten the leaf-and-vine shingle to the wall.
It takes me about 15 minutes to cut in each vine and leaf crossing a course. For a single vine with leaves on every other shingle course, I typically charge $100 per linear foot — a relatively low price for such a high-visibility upgrade.
Mike Guertin is a builder and remodeler in East Greenwich, R.I., and a member of the JLC Live construction demonstration team.


