I run a design-build company in Chatsworth, a neighborhood in greater Los Angeles. We specialize in large-scale remodels and custom luxury homes. In this area, some municipalities allow a new home built as part of a teardown to be permitted as a remodel rather than as new construction, provided it’s built on the existing foundation. This can make a big difference in a project’s cost and scheduling, because the regulatory track for new construction is often cumbersome and costly, involving more layers of site engineering and soil analysis than are required for a remodel.
We were able to take advantage of this distinction with the project discussed in this article. By the time the clients hired us, they had already spent nearly a year in preliminary permitting for the teardown and were understandably ready to get on with the actual work. The design for the new home would increase the existing footprint substantially, and all things being equal, it might have been more practical to completely remove the existing concrete and start from scratch.
To be absolutely sure that it made sense to keep the old slab, I evaluated the pros and cons of each approach. For example, while tying into the existing concrete would take more time than simply pouring a new slab, I was sure it would be less time-consuming than the permitting process for a new home.
I also weighed the cost of demolition — breaking up and hauling away the concrete — against the cost of leaving it in place, including having to cut off several feet along the front edge to meet new city setback requirements. Another factor was that, with a remodel, the owners would pay a school tax based on the additional square footage only; with new construction, the tax would be assessed on the entire structure.
All things considered, it would save several thousand dollars — as well as speed the work — if we kept the existing slab.
Slicing and Dicing the Slab
Besides being set back a few more feet, the new footprint was oriented slightly askew of the original, which meant that few of the existing footings would align with the new work. This wasn’t really a problem, however, because the original foundation was designed for single-story loads and would require underpinning in any case to support the new two-story structure.
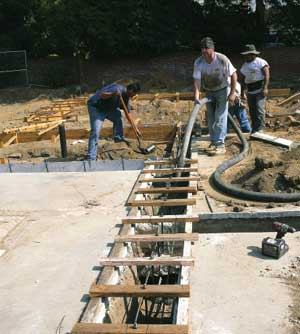
The layout process differed little from new construction, except that in some areas we were working with an existing slab. We cut the concrete to accommodate new interior footings, column pads, and plumbing and electrical lines. We also cut out a few sections that had gotten damaged during demolition and excavation, to eliminate the chance that any of these weak spots might telegraph through to the new finish floors.
Otherwise, the old slab was in good condition and easily met the 4-inch minimum thickness required by the engineered plan. The sawing operations took about two days to complete.
New Footings and Stem Walls
With the help of a backhoe operator, we removed the cut-out sections of concrete and trenched for the new footings. As is typical for California, all the footings — as well as the slab — required engineering, and the plans included a rebar schedule and specs for seismic hold-downs.
Since the site was known to have expansive soil, all the new footings had to be 2 feet deep. Many of the existing footings bottomed out at 18 inches, so in a couple of places we had to hand-excavate underneath them to reach the required depth. We used #5 rebar and 3,000-psi concrete for the new grade beams. The column pads were typically 12 inches thick — ranging in size from 1 square foot to 16 square feet, depending on the load — and reinforced with #4 rebar.
Quadruple verification. To make sure all the anchor bolts and seismic hardware are properly installed in the right locations on our projects, our crew foreman carefully checks all the formwork before any concrete is ordered. As job superintendent, I double-check the layout. Then the project engineer performs a site inspection and signs a Structural Observation report, confirming that all is according to plan. Last, the city inspector checks everything on site and collects the engineer’s report.
Once the inspector signs off, we pour. The pads (poured first for steel moment-frame installations) get a city inspection without the engineer.
Fill and Compacting
Because the lot on this job sloped, the stem walls at the rear of the slab were higher than in the front, requiring a fair amount of fill. Soil fill has to be compacted in 6-inch lifts, which made it an impractical and expensive option given the size and complexity of the slab layout. Plus we would have had to pay a soil technician to supervise the entire backfilling operation.
Gravel, on the other hand, doesn’t require compacting and can be placed in one shot. We used 375 tons of 3/4-inch stone. Though not required, we opted to compact it — by vibration — as common-sense insurance against minor settlement that could crack the slab.
On top of the stone, we spread 2 inches of clean sand, installed a 10-mil vapor barrier, and covered that with another 2 inches of sand to protect it from punctures.
Doweling the Slab Edges
To create a stable cold joint, we doweled the new slab into the old one. We first drilled 1/2-inch-diameter holes 8 inches deep every 16 inches along the existing slab edge. After blowing the holes clean, we injected SET 22 High-Strength Epoxy-Tie adhesive (800/999-5099, simpsonanchors.com) and inserted #4 rebar. Once the epoxy had set, we wire-tied these dowels into the #4 rebar grid in the new slab areas.
To ensure compliance with the design specifications, the municipality requires that a deputy inspector be on site during doweling operations. He observes the process and signs off on a form for compliance, later collected by the city inspector.
Slab: Infill and New
Because of its size, the slab took three days to pour. We used a 2,500-psi mix. Concrete reaches its design strength at 28 days, but construction operations can resume after 48 hours. In our typical hot weather, we usually mist the slab for at least the first few hours to control curing.
Later in this project — a couple of weeks away as of this writing — we’ll pour 3/8 inch of lightweight self-leveling concrete over the entire slab (as well as a 1 1/2-inch-thick layer over the subfloor upstairs). This will add $10,000 to the cost but will eliminate minor irregularities and provide an optimal substrate for the finish floors.
All told, reworking the slab took about seven weeks, or two weeks longer than if we’d started from scratch with an all-new foundation. Weighed against a lengthy and costly permitting process, I’d say we made the right decision.
Alon Toker is president of Mega Builders in Chatsworth, Calif.


