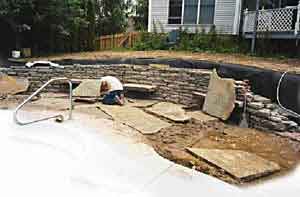
When we design and build a stone retaining wall, our goal isn’t merely to change grade or hold back an embankment; we also aim to enhance the landscape. The retaining wall shown on these pages, for instance, which we built around a new in-ground swimming pool, provides seating and helps define a roomlike space in the backyard. The wall was necessary because of the slope of the yard, but locating it between the pool and the house gave us the opportunity to create a landscape design as beautiful as it is practical.
Like the majority of the stone walls and fences we build, this one was installed “dry,” which means that no mortar was used. And while it isn’t exceptionally tall, stone retaining walls can be virtually any height (though a practical limit is about 8 feet); built right, they will last almost forever — or at least until the bulldozers come and redevelop the site.
On the other hand, if improperly built, even a low wall can quickly collapse into a pile of rock. What follows are the techniques we use to make retaining walls last as long as the stone they’re built from.
Native Stone Is Best
While it’s possible to build a stone retaining wall out of practically any type of rock, we prefer to use native stone. There are two reasons for this: A native stone will look like it belongs in the landscape, and shipping costs will be significantly less.
Here in the Northeast, we can choose from a number of stones, including Pennsylvania bluestone, limestone, and fieldstone; all can be found within a five-hour truck drive and are available in various shapes, sizes, and colors.
To keep the cutting and fitting in check, we like to use stone with a flat bottom and a clean face. That way, all we need to do is dress the front of the stone with a hammer (to make it look hand-cut) and set it, which creates less waste and saves on labor and materials cost. Most sedimentary stones available in our part of the Northeast, including limestone and the sandstones (such as bluestone), fit this bill.
Of course, each variety of stone works differently, and some need to be worked with a hammer more than others for a good fit. Some stone masons lay up walls without ever picking up a hammer; others — using special stone hammers and chisels — cut every stone.
I’m somewhere in between; I allow the site and the stone to tell me which approach works best. In certain cases, a wall will fit the site better visually if the stone is left in its natural state; other times, a more refined and worked stone looks better.
To build this particular wall, we used a Pennsylvania flagstone called Colonial Wall Stone. It’s actually a quarrying byproduct that would probably be discarded if not for its excellent qualities as a drywall-building stone. We buy it by the ton, paying about $150 to $200 per ton delivered; each pallet is filled with stones with (we hope) at least one flat face. The stones fit together quickly with little cutting, which allows us to work not only artistically but efficiently.
On a good day, an experienced waller and helper can hand-cut and fit about two tons, or roughly 25 to 30 face square feet (measured on the finished face of the wall).
Accounting for Existing Soil Conditions
Because we do much of our work in new construction, where cuts and fills are common, we need to determine where excavation has taken place to prevent our walls from moving or settling after completion.
We’ve found that freeze/thaw cycles do a good job of settling disturbed subsoils, so as a rule of thumb we insist on waiting at least one winter before building on any new-construction sites. While this policy occasionally costs us a project, I tell impatient clients that the only thing I can guarantee if the site isn’t properly settled is that the wall will settle instead.
If the site has been filled with more than a foot of soil, and if the client does not want to wait a winter to start the project, it’s possible to settle the soil with water. Under these circumstances — or if there’s any doubt about soil compaction — we excavate to create a sunken area; this is where we plan to build. Before doing any work, we set up soaker hoses and direct the homeowner to run the water for one hour per day over two or three weeks. The excavation holds the water in the area and allows it to gradually percolate into the ground, settling the soil fully.
Sometimes a site will settle more than expected, in which case we just fill back in with crushed stone that’s been compacted in 3-inch lifts with a plate compactor. It’s extremely important to have close to 100 percent compaction, or the wall will settle.
Once we’re sure that the subsoil is fully compacted and won’t settle, we can go ahead and roughly lay out the wall and cut the grade. In most cases, we use a simple laser transit for layout, marking straight lines and elevations with string and stakes and constantly checking our drawings to make sure we are staying within the parameters specified in the original design.
Of course, I always leave room for changes in my designs and make adjustments in the field as necessary. Rarely does a final installation exactly match the original plan.
For laying out straight walls, we simply measure and mark a few key points and connect the dots. For curved walls like this one, I mark out on the plan the various center points of the radii for each curved section. Then, using a large screwdriver that’s been inserted through the steel loop at the beginning of a roll-up tape measure and shoved into the ground, I measure out and paint exact curves for the base materials. Once the base is installed and compacted, I do the same for the wall itself.
Prepare the Base
While many stone-building books indicate that it’s okay to place the base stones of a wall directly on excavated ground, this works only in a frost-free climate.
In our area, where we expect a frost depth of 42 inches, we need to account for frost heave, which is one of a stone wall’s biggest enemies (see “Frost Heave”, below). The only way to minimize frost heave is to reduce the presence of water within the wall. To that end, we prepare a stable, well-drained base and make sure that water has a way to drain out.
Frost Heave
In more extreme cases, freezing backfill material pushes the wall horizontally. When the ground thaws, the material settles down, but the wall itself remains in the same position as when the soil was frozen. Over the course of years, this freeze/thaw cycle continues to push the wall outward. Gradually, even a wall that was battered into the slope at an angle will begin to lean away from it; eventually, the wall fails. |
|---|
Sizing the base. Generally, the retaining wall’s height determines how wide its base needs to be. In most cases, retaining walls are about half as wide at their base as they are tall. Since this wall’s maximum height is about 4 feet, the base of the wall is approximately 2 feet wide.
How far the base extends below grade can vary from 6 inches to as much as 2 feet, and is determined by the size of the wall and the type of subsoil.
In general, well-compacted, gravelly soils that drain well and lock together tightly require a minimum base depth. In sandy soils, we’ll dig a little deeper before running our plate compactor, and in clay we try to provide maximum base depth. Clay soils expand when they’re wet, so they should be wet when compacted; if you build on dry clay, it will heave the wall when it eventually does get wet.
On this site, the soil was a combination of clay and gravel, so we dug a trench about a foot deep for the wall base.
Sometimes, especially when the soil is wet, the stone base material can “blow” into the soil, compromising the integrity of the base. Therefore, we usually line our base trenches with landscape fabric after we’ve compacted the trench, to separate the base stone from the soils. Fabric isn’t critical when working with gravelly soils — but it can’t hurt, either.
When in doubt, we always err on the side of having too much base.
After excavating the trench, compacting the soil as necessary, and placing the landscape fabric, we install a base layer of crusher run, a mix of crushed stone and stone dust that locks up solid when compacted.
Sometimes we’ll also use plain compacted crushed stone, but we never use pea gravel, as it acts like ball bearings. Crushed stone locks in tight when it’s been compacted and drains well, two very important features of a wall base.
To ensure that we get as close to 100 percent compaction as possible, we run our walk-behind plate compactor over the crushed stone until the machine “hops,” which indicates that the stone is completely compacted. (To see how this feels, run the compactor for a second or two on a solid surface, like an asphalt roadway; since the compactor cannot tamp this surface any further, it will “hop.”)
Drainage. Water trapped behind or under a wall can move the wall by hydrostatic pressure as well as by frost heave. Dry-stacked stone walls naturally allow water to weep out from the wall face, but we also provide drainage with perforated 4-inch pipe wrapped in landscape fabric and placed at the base of the wall.
In most cases, we run the pipe to daylight away from the wall, but if we don’t have the necessary pitch, we’ll run the pipe to a dry well located a good distance from the wall. Pipe is not critical with most stone walls because there is plenty of room for water to weep through. But since this type of pipe is so inexpensive, it never hurts to use it.
Because a retaining wall has to withstand the pressures of the slope it is retaining, we typically dig the area behind the wall back to its angle of repose — the angle at which a slope is self-sustaining for a given type of soil. This angle is heavily dependent on the soil type but, as a very loose rule, it averages about 45 degrees.
With the final height of this poolside wall as our guide, we dug into the slope so that the bottom of the cut was 2 feet back from the back surface of the wall (to allow for crushed stone at the base of the wall). The distance from the top of the wall to the cut line was 2 feet plus the height of the finished wall.
After the excavated slope was covered with landscape fabric, all of this excavated area was filled with #2 crushed stone (a large crushed stone of up to 2 inches in size) to allow for drainage.
In cases where plantings will be used, we usually backfill to within about 12 or 18 inches of the top, lay down another layer of landscape fabric to keep the soil from filtering down into the crushed stone, and then fill in with topsoil.
Laying Up the Wall
We keep three basic principles in mind when building with stone: battering, through-stones, and “1 over 2, 2 over 1.”
Battering. When building a freestanding stone fence, battering — stepping back the face of the wall slightly as you go higher — moves the center of gravity to the center of the wall, making it more stable in the event of ground movement. But in a retaining wall, the stakes are much greater. Battering a retaining wall dramatically reduces the amount of force exerted on that wall by the soil and backfill materials.
Like most of our retaining walls, this wall was battered back approximately 10 percent, or about one inch per foot. To achieve consistency in battering a curved wall, we use a spirit level to check the plumb as we build up. But there’s no substitute for experience, and we “eye” the wall a lot to be sure it looks right.
Through-stones. A stone fence essentially consists of two walls built back-to-back; through-stones extending through the structure from front to back tie together the two sides. On this short retaining wall, through-stones weren’t really necessary, as the mass of the wall and the battering help to keep it from falling away from the retained slope.
But we did create benches in the wall that serve a similar function; we placed the 6-foot-long slabs of stone so that they would project about 18 inches from the face of the wall. Each bench is like the proverbial tip of the iceberg; with more than 4 feet of stone buried in the wall and the gravel beyond, you can be sure that these seats will not move.
On taller walls, we’ll occasionally use geogrid — a netlike landscape textile — to separate the soil layers and to tie the wall to the slope, much as a deadman does. Geogrid is commonly used with segmental block retaining walls. While we didn’t use it for this short wall, it’s relatively inexpensive and a lot less costly than rebuilding a wall.
1 over 2, 2 over 1. Dry-stacked walls rely on two forces of nature: gravity (or mass), and friction. To maximize both forces, we always use as large a stone as we can. To increase friction, it’s important to overlap joints as much as possible (Figure 6). One stone sitting on top of two will apply gravity and friction to both, creating a much stronger wall. By avoiding long, vertical seams, which act like fault lines and become points of failure, we essentially tie the whole wall into itself.
As the wall goes up, we’re careful to lay up stones so that their longest edges project into the wall — rather than orienting them parallel to the wall’s face — even when the stones have especially clean and beautiful faces. This technique results in a stronger wall.
When we build our walls, there is always rubble left over from cutting or breaking rock. We use this “waste” as infill, tightly packing the rubble behind the face of the retaining wall. And we place the infill carefully — rather than just tossing it in — so that it doesn’t settle over time. We also use pieces of rubble to shim the face stones into position, leveling them and locking them in place.
Coping
The most common way to cope — or cap — a wall is to select stones large enough to span the wall’s width. Then the stones must be carefully cut to fit, leveled, and placed on top of the wall. The tighter the fit, the less water these coping stones will allow into the wall.
We often use flagstone to cap our stone fences and retaining walls. Ranging in thickness from about 11/2 to 3 inches, flagstone (sometimes called “stand-up” because it’s stood up on pallets as it’s quarried) is typically used for paving pathways, walkways, and patios. We buy it by the tractor-trailer load; when we take delivery we separate out the really thick pieces and save them for coping stones. Since short retaining walls are invariably used as seating, we make sure the caps are large and stable. Indeed, their smooth, consistent surface makes for a nice seat-wall or tabletop.
We usually use shim-rocks to level up coping stones as we place them, but we sometimes use mortar too; we place it in such a way that it does not show along the face of the fence or between the coping stones. Although the mortar separates from the stone over time, it still acts as a perfectly formed shim stone, supporting the decorative coping stones.
To build this wall, we used about 18 tons of Colonial Wall Stone, 5 cubic yards of crusher run base, 1,000 square feet of landscape fabric, and roughly 23 cubic yards of #2 crushed stone. Labor time was about 130 man-hours, and the total installed price was approximately $11,000.
Bruce Zaretskyowns Zaretsky & Associates, a design/build firm based in Rochester, N.Y.


