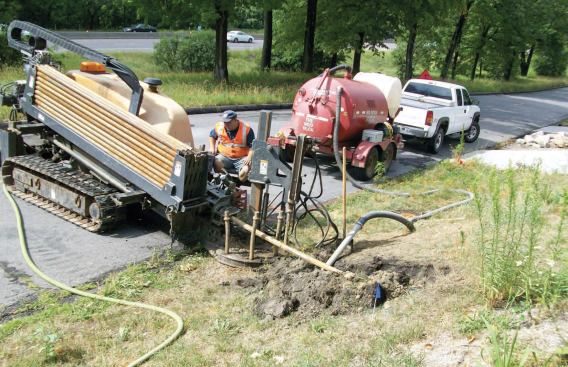
Download PDF version (980.4k) Log In or Register to view the full article as a PDF document.

My company, Access Builders, often works with banks on foreclosed properties. These bank-owned properties typically just need to be cleaned up and put back on the market, but sometimes we have to deal with an unfinished home that a builder forfeited before receiving a certificate of occupancy.

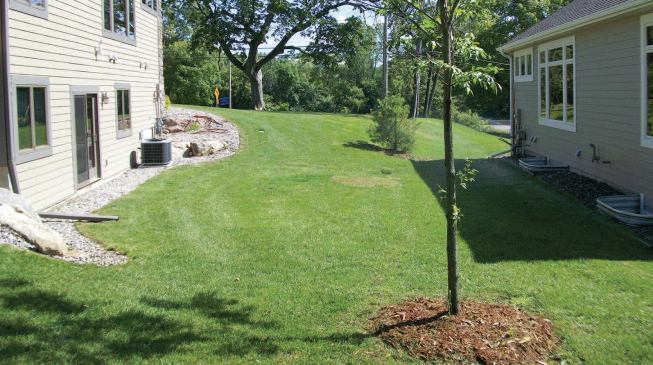
On one such project in an outer suburb of Minneapolis, we had to address a serious grading problem. The bank owned two duplexes built next to one another on a considerable slope, and the original site plan called for a swale to be dug between the two buildings to divert runoff from the higher unit out to the street.

Unfortunately, the builder never followed through with the grading. By the time we got involved, the driveways were in, the sod was laid, and the landscaping was 90 percent complete. In addition, there were several large trees designated for preservation that would be destroyed if the swale were dug in accordance with the plan.

Finding the Right Sub

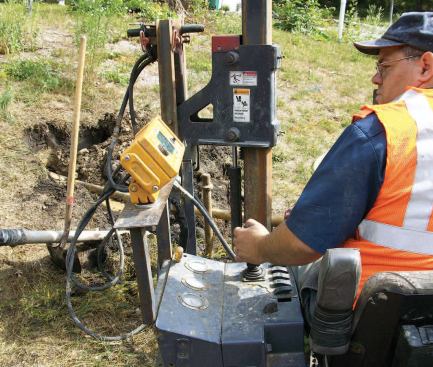
I met at the site with the city engineer and our excavator. The engineer insisted that the runoff had to be diverted. It was our excavator who first brought up the possibility of having a directional-boring company pull a drain tile through. Although this seemed like an unlikely solution to me at the time — I assumed that only municipalities, utilities, and other deep-pocketed entities could afford directional boring (also known as trenchless excavation) — the engineer agreed that it was an option, as long as he approved the specifications.

Weighing our options. Our excavator determined that digging the swale to the original spec would require about 100 feet of digging and the removal of up to 400 yards of soil. His estimate was $5,500, not including replacing sod or building the required retaining walls. In all, we figured, it would cost about $8,500 to finish the swale as originally intended — plus any fines for removing protected trees and the costs for replacing them.

Before seeking other estimates, we checked with the engineer who drew the original drainage plan. He also felt that horizontal boring could work and told us that generating the numbers and redrawing the survey would cost less than $1,000. So far, so good.

But after a dozen phone calls to various companies and two on-site consultations, my doubts began growing. I was getting bids anywhere from $4,000 to $6,000, not including material or engineering costs. It was looking as though directional boring would not save us much money after all.

Irrigation, but in reverse. As luck would have it, our longtime irrigation contractor gave us the lead we needed. I hadn’t realized it, but irrigation companies often sub out directional-boring jobs when their supply lines need to traverse driveways and other obstacles. When I mentioned the holdup on this project, he gave me the phone number of Goldade Ditching, a company accustomed to working on small projects like ours. The person I spoke with there readily gave me a rough estimate over the phone, which came in well below the numbers we’d been hearing. Excluding materials, Goldade priced the job at $14 per linear foot to pull a 4-inch pipe, $16 per foot to pull a 6-inch pipe, and $20 per foot to pull an 8-inch pipe. I said I didn’t think a pipe as large as 8 inches would be necessary, but it turned out I was wrong.

The Final Plan

We submitted a revised plan to the city engineer calling for 100 feet of 6-inch HDPE (high-density polyethylene) pipe running the same path where the swale was supposed to be, with a single 12-inch by 12-inch catch basin on the low spot between the two properties. According to our engineer, that system would handle the water from a 50-year storm event. That seemed reasonable to us, since even if such a storm occurred there was no danger the water would flood into either house — excess water would simply run across the yard of the lower house before reaching the street.

Revising the revision. The plan was rejected. The city engineer wanted the system to be designed for a 100-year storm instead, which has a 1 percent likelihood of taking place any given year. Although that’s a typical standard for dams, levees, and storm sewers, it seemed like a lot to expect of a yard drain. But because I’ve found that maintaining a good relationship with city officials usually pays off in the long run, I agreed to try again. Our second plan was for two 12-inch by 12-inch catch basins and a fusible 8-inch HDPE drain tile; it was approved.

Not your father’s drainpipe. Fusible HDPE drain tile is heavy-duty stuff that has little in common with ordinary corrugated drain tile. The 8-inch pipe we needed has walls nearly an inch thick, which is necessary to allow it to withstand the tremendous pressure of being pulled through the soil. It came in 50-foot lengths that cost $400 apiece, and even after I had them cut in half at the plumbing supplier so I could bring them to the site on my ladder rack, each 25-footer weighed 200 pounds. While I was at the supplier, I also picked up the fusing machine needed to weld the sections together.

Boring the Hole

When I showed up at the job site, the excavator’s two-man crew had already set up the boring machine and was making good progress (see slideshow). For this job, Goldade brought out a Case 6030, which is considered medium-sized. The 6030 can push or pull at 30,000 pounds of pressure and is capable of pulling a 14-inch pipe more than 1,000 feet.

While running this equipment efficiently takes plenty of experience, the basic concept of the boring machine is straightforward: A drill head is attached to the end of a steel drill rod (2 3„8-inch, in this case). The rotating rod is pushed through the ground until it reaches the end of its length, then another rod is attached, and the process continues. Water from a tank mounted on a vacuum truck is pumped through the rod to loosen the soil, and the excess water and mud are sucked into a tank on the rig.

Steering the bit. The spinning drill head tends to go in a straight line until it hits a large rock or other obstacle. If the obstacle isn’t too big, the bit will often spin it aside and keep going, but this can cause it to veer slightly off course. A transmitter built into the drill head allows a crew member with a hand-held monitoring device to determine its precise location at any point along the way.

If the bit does start to wander, the solution is to turn off the rotation and drive the bit forward without it. Because the drill head is shaped at an angle, advancing it without spin will cause it — and the drive shaft behind it — to move right, left, up, or down, depending on its orientation. The positioning information is relayed back to the boring-machine operator, who adjusts the controls as required to “steer” the drill head toward the target. (More sophisticated machines used on public works projects and other big jobs are sometimes computer-guided by means of GPS coordinates.) On this job, the drill head surfaced within a foot of the marker stake.

Fusing and Pulling the Pipe

Joining the pipe sections with fittings would greatly increase soil resistance, so instead they’re welded together with a pipe-fusing machine that heats the sections and presses them together.

First a section of pipe is loaded into each end of the welder and clamped in place, then a hydraulic ram forces the ends into a cutting blade that reminded me of a two-sided deli slicer. The “facing” blade shaves off a thin layer of material to provide a clean surface and ensure that the ends of the pipe will line up perfectly with one another. Next, the blade is replaced with a heating element, and both sides of the pipe are heated up simultaneously to about 500°F.

Finally, the two sections of pipe are pressed together with 300 pounds of force and held there until the melted plastic cools. Because 100 feet of 8-inch HDPE weighs 800 pounds, I had to use my truck to pull the pipe into position after the last weld was completed.

Back-reaming and pulling. Given the heavy clay soil, the excavators decided to smooth and enlarge the borehole with a back-reaming bit as they pulled the pipe through it. This was a matter of screwing a sleeved pipe puller to the HDPE pipe, then mounting the reaming bit ahead of it with a swivel coupling. With everything in place, the boring machine was put in reverse to draw the pipe back down the borehole. The maneuver went off without a hitch, and we were in business.

Finishing Up and Counting Costs

Installing the catch basins was easy. We cut back the 8-inch HDPE a bit in order to get the right elevation, then used 8-inch corrugated pipe to attach the basins to one another. We tried to pick the naturally lowest areas for the location of the basins, but to ensure maximum water drainage we dug back another few feet around each basin and sloped the ground toward each basin even more.

Where the pipe met the road, we put down landscaping fabric and covered the area with rock. The city engineer also required us to put 2-inch foam under the fabric and rock, because the water main was located 8 feet directly below the area, and he was worried about freezing.

The bottom line. Our final costs for the project were as follows:

  • $1,000 in engineering fees

  • $2,000 for directional boring

  • $800 for 100 feet of 8-inch HDPE pipe

  • $200 rental fee for fusing machine

  • $500 for basins and landscaping

The final tally of $4,500 turned out to be just about half what we would have spent to do the same job according to the original site plan. I wouldn’t hesitate to use this approach again if a similar situation comes along in the future.

Mark Petersen is co-owner of Access Builders Corp. in Shakopee, Minn.