As a GC and foundation subcontractor since 1984, I’ve seen countless new products designed either to improve job-site efficiency or to produce a better home — few do both. A couple of years ago, though, we found one that does: Form-A-Drain from CertainTeed (800/233-8990, www.certainteed.com).
Labor Savings
Form-A-Drain works much like the dimensional lumber and metal footing forms I’ve used for years. But unlike traditional lumber or metal forms, which must be stripped once the footings are poured, these hollow plastic forms are left in place to become the home’s foundation drain.
Using this system saves us a half-day’s work on every foundation — two to three hours that otherwise would be spent stripping, cleaning, and moving footing forms, and a couple of hours for installing footing drains later. But more important, Form-A-Drain is in most cases a better foundation-drainage system than perforated pipe. Whereas schedule-20 or corrugated pipe can be easily sloped the wrong way or improperly positioned, Form-A-Drain is always in the right spot for effective drainage, and it provides drainage from both sides of the footing. (For this reason, Form-A-Drain works well as part of a radon-control strategy, if needed.)
At around a half-pound per lineal foot, Form-A-Drain forms are far lighter than their wood and metal counterparts. This makes them easier to maneuver around the job site, which is helpful on some of the difficult sites where we build in coastal Maine.
Components
The 12-foot lengths of Form-A-Drain are joined with slip couplings and drywall screws. The couplings are sold precut and in 12-foot lengths. We buy the 12-foot lengths and cut the material ourselves, because it takes only a little time and saves us from having to carry another box of small pieces. Inside/outside 90-degree corners and 45-degree transitions are available also, as well as L-shaped and T-shaped fittings for stepped foundations. You also can use the coupling stock to make your own corners if you run out or need a custom angle.
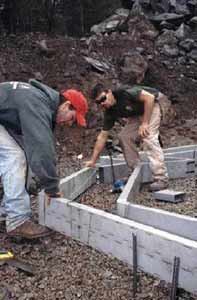
Staking the Corners
Like many sites around here, the lot shown in the photos has ledge just below the surface. After blasting and excavating, we typically bring in some crushed stone to level the bottom of the hole and create a capillary break under the foundation.
The first step in setting the forms is to stake the foundation corners and run strings between them. We measure off the string, 4 inches for the outside form and 12 for the inside form. Starting at one of the footing’s outside corners (usually the one with the two longest walls), we drive a couple of rebar pins into the ground, one at the inside and one at the outside of the corner.
We then make up two corner assemblies, each consisting of a length of Form-A-Drain attached to a corner piece. We make up one for the inside and one for the outside, making sure the drainage perforations are facing out. The corner pieces have knockout holes that allow us to slip the assemblies over the pins. This holds the corners in place while we’re getting started.
Setting the Forms
Next, we connect the 12-foot lengths, using slip couplings and drywall screws. You can cut the plastic with a handsaw or recip saw, but we generally use a circular saw because it produces the fastest, cleanest cut. Special blades aren’t required — we just use inexpensive abrasive blades from the lumberyard.


