I prefer to build stairs using housed stringers, which means that the ends of the treads and risers are wedged and glued into mortises routed into the stringers. While this approach sounds like a lot of work, it doesn’t take much longer than crafting a decent set of notched-stringer stairs. What you get for the extra effort is a stronger stair, since you haven’t notched away half the stringer, and one that’s practically seamless.
While I first used this technique to build interior stairs, I particularly like it for exterior ones. The tight, glued joints at the stringer tend to keep out water, and I pitch the stairs about 1/8 inch per foot of run to prevent water from puddling. Stairs built this way stand up to the weather without the cupping and cracking common to most porch or deck stairs. And because each riser acts as a beam supporting the tread above, I’ve never felt the need for more than two stringers. I’ve built porch stairs that were 8 feet wide using just two housed stringers.
Preparing the Stock
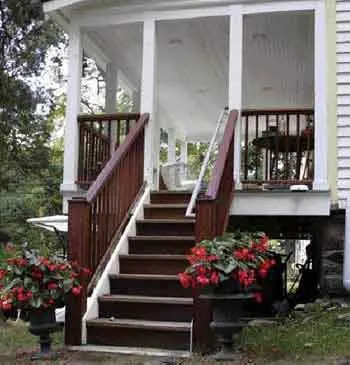
You can use any rot-resistant material for exterior stairs. For the project shown on these pages, I chose relatively cheap pressure-treated 2x12s for the treads, since they would be painted to match my client’s painted porch floor. The stringers (which would also be painted) are treated 2x10s; because they remain mostly intact, they’re actually much stronger than notched 2x12s. I used 4/4 meranti — a fairly rot-resistant tropical hardwood that’s readily available in my area — for the risers, in part because PT stock isn’t available in the 1×8 or 1×10 sizes that I needed. In addition, meranti risers clear-finished with a Penofin penetrating oil finish (707/462-3023, www.penofin.com) would nicely match the meranti porch railing that I’d already made for the deck.
When I’m building a set of stairs, I select the best stock I can, checking for knots, digs, and pitch pockets and cutting out as many defects as possible. I pay close attention to the bows and crowns in all the stringer, riser, and tread stock. In every case, any crown faces up. Additionally, when I lay out the stringers, I make sure that the bows in them will face each other. That way, the bows more or less cancel each other out, resulting in a straight, square stair.
After cutting the treads and risers to length, I rip them to width. To straighten the edges, I like to rip both sides of the stock. These treads are 11 inches wide, which, with a 1 1/4-inch overhang, gives me a run of 9 3/4 inches. After ripping the treads, I bullnose them with a 3/8-inch roundover bit. This bullnose perfectly matches the radius left at the front of the mortise by the 3/4-inch-diameter bit I use to hog out the mortises. I rip the risers to the stair rise of 7 1/2 inches, except for the bottom one, which has to be one tread thickness — 1 1/2 inches — narrower.
Laying Out the Stringers
There are two main differences between laying out housed-stringer stairs and notched-stringer stairs. Unlike notched stringers, housed stringers are laid out from the bottom edge of the stringer. And instead of marking the bottom of the tread and the back of the riser, the layout marks you make for housed stringers represent the top of the tread and the front of the riser.
I set stair gauges on my framing square exactly as if I were going to notch the stringers, with one gauge on the 93/4-inch run and one on the 7 1/2-inch rise. Working from the bottom, I lay the square on the stringer, mark the run line, then remove the gauges and shift the square forward along this line by about 2 inches. Holding the square exactly on this line, I reset the gauges, then lay out the first riser and tread.
As I move the square down the stringer to lay out the rest of the treads and risers, I align the original 9 3/4-inch run length on the square with the riser line I’ve just marked; if I’m moving up the stringer, the original 7 1/2-inch riser height on the square lines up with the tread I’ve just marked.
When all the treads and risers are laid out, I mark the top and bottom cuts. The top cut is one riser thickness behind the face of the top riser. I like to make the bottom plumb cut about half the thickness of the newel beyond the bottom tread nosing.
Starting at the back-of-the-tread/bottom-of-the-riser intersections, I use a square to transfer index marks to the second stringer. When laying out the second stringer, be sure that those same tread and riser intersections align with the index marks. You may have to fudge one or two by as much as 1/8 inch, but as long as you stay within that tolerance, the stringers will be consistent and your stair will be square. Fudging the layout in this way may require you to plane some of the treads for an exact fit.
Because more than half the stringer will be visible to anyone walking up the stairs, I pay attention to knots and the like. Simply shifting the layout 6 inches one way or the other can place wood defects behind the treads and risers, making a piece of #2 material look like #1.
Cutting the Mortises
You don’t need a lot of specialized tools to build a set of housed-stringer stairs.
To cut tread and riser housings, I use my old 2 1/2-hp Bosch plunge router (anything smaller would be straining) with a pattern routing bit (I use a CMT 811.690.11B) guided by a jig I make from plywood scraps. I use a Kreg pocket screw guide to help me fasten everything together (Kreg Tool Co., 800/447-8638, www.kregtool.com).
A simple jig. The key to housed stringer stairs is the jig and a pattern routing bit. To match the 1-inch depth of the available pattern routing bits, I make my jig 1 inch thick by gluing up two 16-inch-by-20-inch thicknesses of void-free 1/2-inch plywood.
I mark the cutouts in the jig several inches longer than any stair layout I’ll ever make, since they have to be long enough for the mortises to extend through the bottom of the stringer, and any extra opening beyond the bottom of the stringer helps in clearing chips. It’s okay to make the jig larger, but don’t make it any smaller, or the clamps used to hold the jig in place will get in the way of the router.
When I cut out the opening, I plunge cut with a circular saw and finish up with either a jigsaw or hand saw. Since this jig will guide the router bit, any flaws in the cuts will show up in the mortises, so I cut carefully.
Rout in a clockwise direction. I clamp the jig to the stringer so that the top of the tread and the front of the riser align with the layout marks. The tread nosing, of course, sticks out past the riser mark. Using a 3/4-inch-diameter pattern routing bit, I cut 1/2-inch-deep mortises in two passes, making sure that the bit is lowered enough that the bearing rides on the jig. (If the bearing doesn’t ride on the jig, the bit will cut into it.) To minimize any chance of nicking the jig, I lower the bit into the jig beyond the stringer before starting the router.
With such a large bit buried in a tough southern yellow pine stringer, feed direction is critical. I move the router clockwise so that I don’t jam the router by climb cutting, and stop when necessary to clear chips. To avoid tear-out where the back of the tread meets the front of the riser, the routing passes are made working from the top to the bottom of the right stringer and in the opposite direction on the left stringer.
After cutting the mortises, I make the top and bottom cuts in each stringer with a circular saw.
Assembling the Stair
Before putting the stair together, I cut wedges from 9-inch-long scrap riser material with a miter saw. The wedges are beveled at 4 degrees, which is done by setting the chop saw to 2 degrees, then flipping the stock end-for-end at each cut. I eyeball the cuts so that the sharp ends of the wedges measure about 3/16 inch, and cut two for each tread and riser. A word of caution: Don’t cut too many wedges from each piece of stock; to keep your fingers intact, throw away at least 3 inches of each block.
Next I set the stringers upside down on horses and firmly seat the top and bottom treads in their mortises with their crowns facing up. Then I check that the back of each tread aligns with the riser cut above (“above” and “below” in this case refer to the orientation of the stair once it’s installed). If the tread’s too wide, I plane it down to fit. With the tread seated and the stringers bar-clamped together, I drive home a heavily glued wedge on each side, stopping when the end of the wedge starts to splinter. If the wedge has intruded into the riser mortise below, I chop off the intrusion with a chisel. For glue, I prefer to use Titebond III (Franklin International, 800/669-4583, www.titebond.com), which is rated for outdoor use, but PL 400 (OSI Sealants, 800/999-8920, www.stickwithpl.com) or a polyurethane glue would work, too.
After I’ve set the top and bottom treads, I check for square by measuring the stair’s diagonals. If the treads are squarely cut, the stair should be dead on. If it’s off a bit, I adjust the stringers to get the diagonals even. Then I set and wedge the rest of the treads, cutting back any wedges that extend beyond their tread with a handsaw.
Gluing sequence is important. When placing the risers, I make sure that any crown faces the tread above. First, I run a bead of glue along a riser top, then quickly seat it in its mortises so that it contacts the tread above. This smears the glue around, and helps prevent drips.
Then I pull the riser away from the tread below and run a bead of glue along the back of that tread before sliding the riser back into position. Finally, I liberally apply glue to a pair of wedges and smack home a wedge on each side of the riser, occasionally tapping the riser to keep it seated against the tread above.
Screws complete the assembly. Using a Kreg jig, I drill three pocket screw holes into the top of each riser. Epoxy-coated 1 5/8-inch deck screws driven here pull the tread and riser snugly together, and help ensure a sound glue joint. Using the Kreg pocket screw bit (any countersink bit would work, but this one’s handy), I then predrill for 2 1/2-inch stainless steel screws into the back of the tread below. As soon as the last riser is in, I flip the stairs over so that I can scrape off any glue drips.
Setting the stairs is a piece of cake. Two or three guys can move them into position, and half a dozen screws into the top riser secures them.
Andy Engelis a carpenter and writer in Roxbury, Conn.


