For more than 25 years, I’ve specialized in installing finished stairs and railings, working for different builders on a freelance basis. Typically, by the time I’m called in to finish a staircase, the stringers are already in place under a rough work stair, and the drywall is installed, covering the underside of the carriage. Ideally, the builder will not bolt the stringers directly, but space them off the studs with 2-by cleats. This avoids having to fit the drywall and the skirtboards to the stringers and makes the skirts more substantial and stable. However, I do sometimes find the stringers nailed directly to the studs. In that case, I have to cut the skirtboards to fit the stringer profile, a less desirable approach I’ll discuss later in this article.
Primary Checkup
One of the very first things I do on every new staircase is check the rough stringers. I haven’t worked on a perfect set yet. No matter how carefully they’re cut, the lumber shrinks as it dries, and the tread profiles become distorted. Furthermore, builders typically gun-nail stringers to the wall, and during the course of construction, foot traffic tends to deflect them downward. I check for this by snapping a chalk line on the wall between parallel marks made at the tips of the top and bottom tread cutouts. If the distance between the line and the intermediate tips grows, the stringers are bowed. To prevent further sagging, I bolt them to the studs at the middle of the run, using 6-inch self-tapping RSS screws (grkfasteners.com). Then I cut and glue shims to true the rough treads parallel to the line.
Next, I consider the walk line and the handrail. If a newel post is going to land on the bottom tread, I’ll add blocking to anchor it.
I typically prefer the tread nosing on solid-riser stairs to project by 1 /4 inches. So when I order treads, I usually add 1/4 inches to the rough tread dimension, plus a 1/4-inch allowance for a rabbeted tongue at the back of the tread. Thus, a 10-inch rough tread calls for an 11 1/2-inch-wide finished tread. Scotia molding provides support for the overhang.
Interlocking Joinery
When I install treads and risers, I like to make an interlocking joint between them. This creates a larger surface area for gluing and provides good insurance against movement (see “Building Squeak-Free Stairs,” 9/02). To draw the joint tight, I install 1/4-inch self-drilling Fastap screws (screwoutfitters.com) from the back of the riser into the tread. I prep the risers by drilling pilot holes at the bottom of the groove. Thus, the body of the screw tends to force the tongue slightly upward, tightly closing the joint. For gluing stair components, I use PL 400 (loctiteproducts.com/pro). This adhesive creates a strong, permanent bond and is self-filling, eliminating small gaps and movement between pieces when it sets.
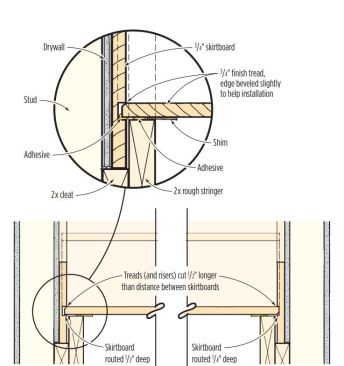
Housing the treads and risers in the skirtboards further improves the quality and appearance of a stairway. On an enclosed stair, this is done by routing the stair profile on one skirtboard 1/2 inch deep and on the other only 1/4 inch, inserting the tread or riser into the deeper rout first, and then sliding it back to fit in the shallower side. The treads have to be 1/2 inch longer than the distance between the skirtboards. However, this method makes it nearly impossible to use that interlocking joint at the back of the tread. So, I’ve developed a modification that lets me house the treads and risers and still lock the risers onto the treads.
First, I cut and fit the skirtboards and temporarily tack them in position. Then I trace the tread and riser profiles for the entire stair directly on both skirtboards, using a short mockup of the assembled parts. I use a torpedo level to check that the treads are level and the risers plumb. So that I can use the interlocking joint, I place a 1/4-inch shim behind the riser before tracing the profile. This 1/4 inch is equal to the tongue’s projection on the back edge of the tread; it allows me to drop the riser behind the tread and force it forward onto the tongue. Of course, this means that the slot I rout for a 3/4-inch-thick riser must be 1 inch wide.
I rout the skirtboards using an old Rockwell Model UST template to guide a router fitted with a 1/2-inch straight bit. The template was given to me by a retired carpenter and is no longer in production. Before acquiring this tool, I would make a simple template out of 1/2-inch plywood for each new staircase. The template guides a 3/4-inch top-bearing pattern bit around the profile of a tread and riser combo.
Check the treads. It’s a good idea to check the tread nosing profile against the one made by the pattern bit. It’s not uncommon to find some of the treads in need of further rounding, since they don’t all come perfectly shaped from the supplier. If I have to do any reshaping, I either use a roundover bit or simply tune up the inserted ends of the nosing with a little planing and sanding. Likewise, the tread thickness can vary slightly from one piece to the next. This isn’t much of a problem if you’re simply butt-fitting treads between skirts, but it’s definitely an issue if you’re housing them. If necessary, I’ll run all the treads through a planer to a common thickness.
Finally, I give the routs just enough play to allow the treads and risers to slide in the housings without resistance. Shims force the resulting hairline gaps closed on the visible side, while adhesive fills them from the underside and prevents squeaks.
With the skirtboards completely routed and the housings checked for a smooth fit, I give them a light sanding and install them permanently, using nails and construction adhesive. I let the adhesive set for a couple of days before proceeding. The adhesive is important because I commonly insert shims under the treads to compensate for the stringer shrinkage and distortion mentioned earlier. As I work up the staircase, the incremental pressure of this successive shimming may force the skirtboard upward if it isn’t securely glued in place. I learned this the hard way years ago, when I reached the top of an installation only to find the skirtboard hovering 1/2 inch above the floor — not a good moment.
Once the skirts are installed, I can fit each tread into the deeper skirt first and then slide it back into the shallower side, leaving both ends embedded 1/4 inch. I always dry-fit every component first before applying adhesive. I add a bead of construction adhesive to the bottom edge of the routs and to the tops of the rough stringers. I pull the tread forward, shim it upward as needed, and face-nail it — with one nail at each end — into the outside stringers. I always drill pilot holes and hammer nails in by hand; hardwood stair treads are pretty tough on nail guns; also, the nails don’t always set properly — and I find that they don’t hold as well, either.
Locking the Parts in Place
Tim Healey
A slight block-planed bevel on leading tread corners helps ease the tilt-in installation.
Routs in the skirtboards are cut to allow the treads and risers to be deeply inserted on one side…
…then withdrawn halfway to engage the opposite, shallower skirt.
At this point I drop the riser in behind the tread, again checking first for a good, smooth fit. I then apply adhesive to the stringers and to the locking groove and drive the riser forward onto the tongue of the tread. A precut 1/4-inch shim driven between the riser and stringer permanently locks the riser onto the tread. Adding screws from the back is almost redundant at this point, but it’s cheap insurance and can slightly improve the joint’s appearance.
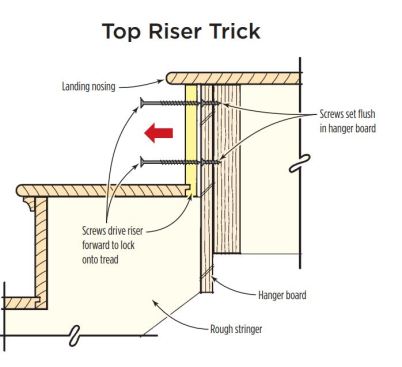
Top Riser Trick
By the time I arrive to work on the stairs, the finish flooring — including the overhanging nosing at the upper landing — is often already installed. This precludes both shimming the top riser forward onto the tread and screwing it through the backside. Instead, I have come up with a trick that works quite well. First, to make the joint tight, I bevel the tongue so it’ll wedge into the groove like a cork in a bottle. Next, I dry-fit the riser in the skirts and drive finish nails at the four corners, through the riser into the stairwell header. Then I pull the nails and remove the riser. Where the nails marked the header, I drive four drywall screws flush. I apply construction adhesive to the riser groove and the skirtboards, reinstall the riser, and drive 2-inch or longer screws through the original nail holes. When these screws hit the drywall screwheads, they can’t penetrate further, so the threading action pulls the riser forward to lock onto the tread. I let the adhesive set for a couple days, pull the screws, and fill the holes.
Tim Healey
Incidentally, I’ve learned to install the starting riser last, just in case I drop another brand-new, $30 chisel inside a just-completed staircase.
Dealing With Cut-Out Skirtboards
On a recent job, the builder had nailed the stringers directly to the studs and covered both the treads and the risers with plywood subflooring, glued and nailed. I had no choice but to cut the skirtboards to fit the stringers. This creates a saw-toothed board with fragile points that can easily break off along the grain during installation. On this job, I housed the treads only and scribe-fit the risers to the face of the skirtboards. To keep the skirtboards stable on the walls, I glued and nailed them and allowed the adhesive to cure for a few days before continuing.
When installing over solid subrisers, you have to rely on the shims alone to drive the riser onto the tread. And you can’t screw the risers to the treads from behind, so I take special care to make tight-fitting but still easily assembled joints, with adhesive alone holding them together. On open rough stringers, you can easily reach under the treads to shim out any play. But in this case, I had to insert the shims from the front via the slight gap between the finished riser and the underside of the tread. Glued and nailed scotia molding covers this gap in the completed stair.
Ken Reis is a freelance carpenter and an Interior Millwork Specialist for Mid Cape Home Centers. He lives in Brewster, Mass.


