I was a lot more courageous in my youth: I tore through empty subdivisions at breakneck speed on my minibike, raced through prickly pear cactuses on horseback, and even built my first stair — three stories high — using only a framing square, a circular saw, and an Audels carpenter’s guide.
It’s been more than 30 years since I cut those stringers, and until last summer I didn’t build another stair. I’ve worked around them a lot, installing more than my share of skirtboards, landing balustrades, wainscoting, baseboard, and so forth. But it took a recent job and a new employee, Daniel Parish, to motivate me to learn how to install finished risers, treads, and balustrades. Along the way I relearned a lesson I’ve encountered throughout my career: Having the right tools reduces the learning curve.
Before starting work on the stairs, we collected and read several books on the subject, watched Jed Dixon install stairs and carve stair parts at JLC Live, and researched stair tools. Some of the tools we already owned, and a few of the jigs we made on the job. But we also ordered some promising specialty tools before starting work, and we were glad to have them.
SCRIBING AND CUTTING THE SKIRTBOARDS
The first step was to install the skirtboards on both sides of the stair.
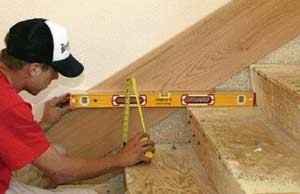
A couple of levels. With the closed skirt tacked to the wall, we used a 32-inch Stabila level to trace level lines from the highest point of each rough tread. We then traced a plumb vertical line from the nose of each rough tread. The 32-inch level is perfect for this task. The tool must sit all the way back on the tread so you catch the highest point, but it also must span beyond the nose of the tread below. A 24-inch level would work, but you’d have to trace pencil lines around your fingers. The extra length you get with the 32-inch tool makes the job easier.
On the open side of the stair, Daniel wanted to miter the risers into the skirtboard. We called Jed Dixon to ask him the best layout technique for marking these cuts. Jed recommended tracing the outside edge of the level. Fortunately, we had an assortment of levels handy; we found that the 16-inch level worked best for this job. We could have just traced along the face of the riser to mark the short point of the miter, but the rough risers were nowhere near plumb, so the mitered risers would have looked terrible.
A pencil won’t fit between the level and the riser, but Jed’s advice — to mark the outside of the level for both the riser and the treads — worked great. We then moved the skirt to a set of sawhorses and transferred the scribe lines to the opposite side of the level.
A couple of saws. Making the cut where the tread meets the open skirt isn’t crucial because the cut gets covered by the nosing and the scotia molding under the tread. We used a worm-drive Skilsaw and made these cuts freehand.
The cut for the riser is mitered at 45 degrees, however, so it’s got to be perfect. Eyeballing that cut was out of the question. To ensure a perfect miter, we made a shooting stick from a length of 3/4-inch hardwood screwed to a piece of 1/4-inch plywood. After the two pieces were screwed together, we ran the circular saw through the stick at a 45-degree bevel. Once this was done, it was easy to align the short point of the shooting stick with the pencil marks on the uncut skirt, clamp the stick down, and run the circular saw with the saw table snugly against the 3/4-inch fence.
In order to cut the miters on both right-hand and left-hand skirtboards, you need two types of circular saws. Our Skilsaw worm drive bevels to the left, and we used a Makita sidewinder saw for the right bevel.
Starting step. The 16-inch level was also perfect for leveling the bullnose step before making the careful scribe to the skirt. And it was just long enough to plumb the newel.


