Drive through a neighborhood that has a lot of older stucco homes, and you’ll probably notice some obvious patch jobs where windows have been replaced. Window replacement is one of the most common home improvements people make in any type of house, but it takes special skill to blend the repairs into an existing stucco surface.
Looks are the least of it. Tying into the parts you can’t see — the existing lath, flashings, and building paper — is a more serious challenge than making a good visual match. Metal lath gives the stucco structural integrity, and the building paper and flashings beneath the lath are the wall’s last line of defense against water. It’s difficult to cut and patch those components without introducing leak points or creating the potential for cracks.
My company does stucco work on new and existing buildings in Northern California. Although the principles are the same in both, remodeling projects are harder because we have to tie into existing stucco and because old windows are often replaced as part of the project. Sometimes existing windows are removed and covered over, and sometimes new ones are added where they didn’t exist before.
Removing the Old Windows
Most of the houses I work on were built after 1960, so the original jambs have fins. The first thing you have to do when you replace that kind of window is tear out the stucco around it.
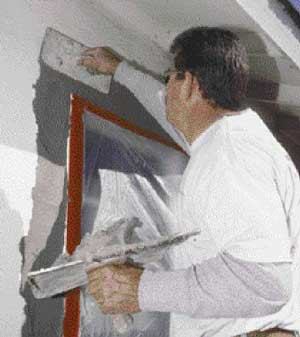
The biggest mistake you can make is to use a circular saw to cut out the stucco. For one thing, the patch is more likely to show if the joint between the old and new stucco is a straight line. It’s much better to have an irregular or jagged joint. Even worse, if you remove stucco with a saw, you’ll cut through the building paper, and that’s a hard mistake to fix. I can’t overemphasize how important it is to maintain the integrity of the paper. Stucco may look weatherproof, but it’s actually water permeable. If the paper is damaged, water can get through to the structure.
Breaking out stucco. The proper way to remove stucco is to break it back from the opening with a hammer or pneumatic chisel. If you fracture it into small enough pieces, it will fall away from the lath. The idea is to do that without damaging the existing building paper.
Many of the older homes in this area are open-stud; that is, there’s no sheathing. Building paper is fastened directly to the studs, and the lath and stucco are applied over it. Newer homes have plywood shear walls, but even then large areas could be open-stud.
Don’t hammer beyond the edge of the framing when you beat back stucco; otherwise, you’ll break the paper. Normally, there will be two studs on either side of a window and a double sill below. This means you can remove 3 or 4 inches of stucco without breaking the paper. You can take out more at the top, but only if there’s a header there.
Old stucco is often very hard, but you should be somewhat gentle when beating it back. Bashing away wildly pokes holes in the paper, even if it is over framing. If you destroy paper, you’ll have to break back to an undamaged section. The beat-back is the most time-consuming part of the job, so there’s no point in doing more of it than you have to.
Once you’re down to bare wire, pull the nails that hold the lath to the frame, separate the lath from the paper, and fold it back from the window. The next step is to fold the paper back far enough to get at the nails in the fin. Pull them out and remove the window from the building.


