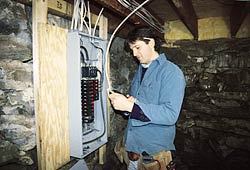
Rewiring old houses is not just a skill — it’s an art. You have to be part electrician, part carpenter, part plasterer, and part magician. And like most magic, it’s all an illusion. We can’t always get wires to where we need them without disturbing the existing walls. The trick is knowing how to make it look like we weren’t there. I was lucky enough to apprentice under an expert rewirer. He taught me not only electrical contracting but a little about all of the trades.This knowledge has served me well when working in old houses.
Have a Plan
When rewiring a typical house, I’ll wire the first floor by working up from the cellar, then run a few feeds up to the attic and wire the second floor by working down from there. Planning is at least half the battle. Try to coordinate with other remodeling crews working in the house at the same time. If the plumber has to open a wall anyway, you may as well run your wires before it’s closed up again.
Pulling Wires
To snake wires from one part of the house to another, I use 1/8-inch-wide metal fish tape. It’s stiff enough that I can shove it through some obstructions (like plaster buildup) and flexible enough to detour around others (such as blocking and cleats). It’s usually easiest to pull the wires through the wall cavity in the same direction that you fed the snake in. Since snakes come in 50- or 100-foot lengths, I often cut them shorter to avoid having to pull all of it up on a shorter pull. I recommend getting the longest snaking jobs done first in case you have to cut the snake shorter for another pull. I store my snakes coiled up, so I have to straighten them before I start work. If the snake is still coiled, it will coil up inside the wall cavity. On each end of the snake I bend a hook approximately 1 inch long and about 1/4 inch across. To attach three-wire Romex to a snake, cut through two of the wires at a 45-degree angle about 5 inches from the end (see Figure 1).
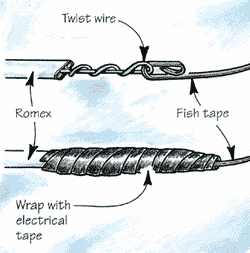
When attaching Romex to a snake for a long pull, the author makes a strong, twisted loop, as shown, and wraps the whole connection in electrical tape.
Bend the third wire through the hook on the end of the snake. Tape everything shut to avoid snagging inside the wall. If a pull is long or there is likely to be a lot of friction to fight, twist the wire around itself a few times before you tape it.
String.
In straight chases or in balloon-framed buildings, it’s often easiest to use a string and a slim weight. I can usually get the string to the bottom with just a couple of shakes. In difficult areas, it’s a good idea to pull an extra string when you pull the wires — you may need it later.
Snake Grabber
With a little patience and finesse, one person with a “snake grabber” can do some of those difficult snaking jobs that usually take two people. This is a tool that I make from BX cable, aircraft cable, and a short length of fish tape (Figure 2).
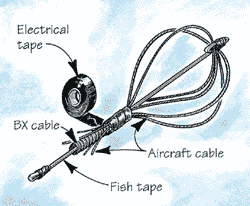
The author’s homemade "snake grabber" uses aircraft cable inside a stud bay to help hook a snake that is probing the wall.
To use the snake grabber, slide the cable end into a 3/8- to 3/4-inch-diameter hole, making sure the cable feeds into the wall. Pull the piece of fish tape toward you while holding the handle still, then twist the tape half a turn. The cables will now fill most of the bay. Now stick your snake into the bay with an open hook on the end. Push the snake up and down in the bay until you hook the grabber. Pull the handle gently back to the end and gently guide the cable that is hooked on the snake out through the hole, pulling the snake out with it. (If your hole is bigger than 3/4 inch, be careful not to pull the grabber into the wall.) The snake grabber obviously works better in an uninsulated wall, but I have had some success with it in insulated walls, too.
Using a Tone Generator
Sometimes when I am having difficulty locating a snake, I use my tone generator (Figure 3), which can locate a conductor or other metal object.
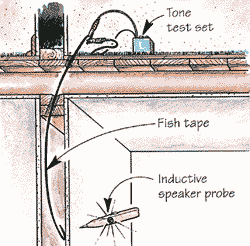
A tone generator turns a fish tape into a transmitter. Using a speaker probe (or radio tuned between stations), you can locate the tape inside a finished wall.
To use the tone generator, I clip one of its leads to a snake I have fished up a wall. The tone generator causes the snake to emit an electronic tone that can be picked up by the tone amplifier. (An AM radio will also work adequately instead of a tone amplifier; for best results, tune the radio so that it’s not on a station.) Hold the amplifier or radio near the area of the wall where you think the snake is. The tone will get louder the closer the receiver gets to the snake.
From the Cellar Once you determine which walls you want the wires to run through, the next job is to find places in the cellar where you can drill access holes. Finding these walls can sometimes be a challenge, but there are usually clues — like pipes, heating ducts, and other wires — to lead you in the right direction. When you’re ready to drill, it’s a good idea to post a “spotter” upstairs. The spotter rests a hand on the floor and baseboard near where you’re aiming. If you miss the wall and the bit starts chewing into the baseboard, the spotter will feel the difference in the vibration and tell you to stop before you do any serious damage. Remember to drill slowly to give your spotter time to react. If the wall cavity you’re aiming for is near a doorway, the spotter can often feel both sides of the wall. Otherwise, I have the spotter feel the side that would be the most trouble to fix. When a floor is going to be carpeted or covered with linoleum or tile, you can sometimes cut a hole in the floor to help gain access to an area. If a room already has carpeting, you can sometimes drill carefully at the edge of the carpet with a small feeler bit. Be extra careful not to snag a carpet thread while drilling. You can unravel a large section of carpet in just a few seconds if you don’t pay close attention. If the baseboard sits off the wall a little, you can sometimes drill a hole behind it with a small feeler bit to help locate the wall. You can also lift shoe moldings and carpet strips and drill where the hole won’t be seen (Figure 4).
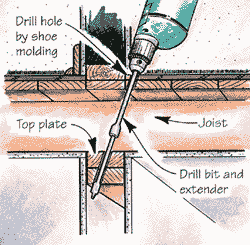
By removing the shoe molding at the edge of a carpeted room, you can drill an inconspicuous hole through the floor.
On an old wood floor that has not been refinished recently, there is sometimes a small crack between the boards that you can fit a small drill bit in to give you a reference point to help find the wall. Always remember to patch these small holes into the cellar. You don’t want to create a draft.
Sill Drilling
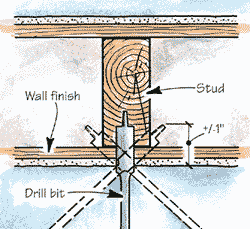
It’s easier to locate exterior walls, but before drilling, remember to take into account the width of the sill and the depth of the wall. In old buildings, the sills tend to be 6 to 8 inches wide, while the walls are typically 31/2 inches deep. So you have to drill at an angle through the sill to get inside the wall (Figure 5).
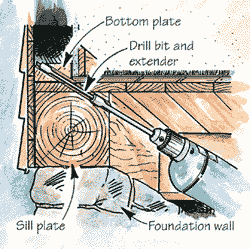
When an old sill is deeper than the wall, use a bit extender and drill at a shallow angle.
Often, the easiest way to figure the angle is to find a wire or pipe already drilled at the necessary angle and try to duplicate the angle. To further complicate the situation, many old foundations are made of stone. The stones protrude at irregular intervals, making it difficult to drill exactly where you wish. Also, many old foundations have been braced by having another foundation poured inside the old one; this makes the foundation even deeper and more impossible to drill. When faced with this situation, you may be able to drill up at the window wells (Figure 6).
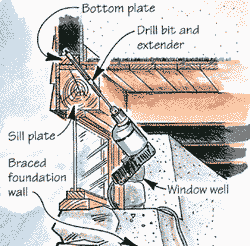
For old foundation walls that have been reinforced with concrete, a window well sometimes provides enough room for drilling.
Feeds to the Attic Plumbing chases and chimney chases are the first places to look when trying to find a route for feeds to the attic. When these don’t work, you should check to see if any closets line up from one floor to the next. You may be able to run a piece of pipe in the corner of the closet to pull your feeds through. If there is an obvious way to get wires to the attic (such as a chimney chase or plumbing chase), I usually pull a few up there, then work down into the walls. It’s also easier to find walls from the attic because they were often framed before the ceiling was covered. All you have to do is lift the insulation and look (Figure 7).
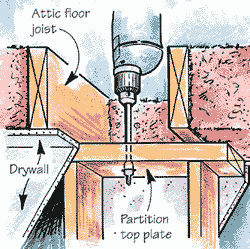
Finding partition walls from the attic is usually easy — just lift the insulation and look for the top plates.
Notching
It’s often necessary to make notches in the wall and ceiling to get around framing members. These should be as small and neat as possible. The most common place I have to notch is where the wall meets the ceiling (Figure 8).
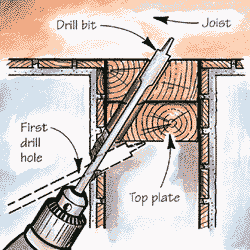
After drilling one hole to find the bottom edge of the top plate, you can drill at an angle that will pop the bit through the center of the wall in the attic.
Say I’m running a wire from a wall switch to a ceiling light. The goal is to get a wire from the wall bay up into the joist bay. Using a 1/2-inch spade bit, I start at the corner and drill to find the bottom edge of the top plate. I then drill up from the corner through the plate into the joist bay. You may also have to make notches to get from one stud (or joist) bay into the next. After finding the stud, I drill a 1-inch-deep hole in its center. I then drill at a tight angle in both directions to get access into both bays (Figure 9).
To run a wire across a stud or joist, the author drills three holes: one straight in, and one each at a tight angle into each bay.
This leaves only a small hole to patch.
Cutting in Boxes
After establishing where I want a box to be (Remember: Measure to the height of the other boxes in the room, not the cover plates!), I trace the outline of the box onto the wall. Then, depending on the wall finish, I often scribe the outline of the box with a razor knife. With wood paneling, scribing prevents splintering; if the wall is wallpapered, it prevents tearing. On a skim-coat plaster wall, scribing with a razor knife prevents the plaster edge from splitting and peeling away from the blueboard. Next, using a 3/8-inch spade bit, I drill out the corners of the box, then cut it out with a cordless jigsaw. I carry two hole saws for cutting in round boxes: a dull one for cutting through plaster and a sharp one for cutting through wood and wood lath.
Plaster and Lath
Cutting rectangular boxes into true plaster and lath requires a little more work. After determining the approximate location of the box, I drill 1/8-inch holes about 1/4 inch apart until I find the space between two pieces of lath. I work my way up until I find the next space, then I center the box on the piece of lath before tracing the outline of the box. I drill out the corners, then I use the razor knife to scribe and completely remove the plaster. I like the cordless jigsaw for cutting lath because it vibrates the wall less than a keyhole saw. A recip saw or corded jigsaw will shake the wall to pieces. When using the cordless jigsaw, I never let the shoe touch the plaster. Any vibration will turn the plaster to dust. To finish the cut, slide a screwdriver behind the middle piece of lath and hold the lath firmly between your thumb and the screwdriver. Then cut the lath on one side, leaving 1/4 inch uncut. This helps keep the lath from vibrating while you cut the other side. After removing the middle piece, you can grab hold of the top and bottom pieces while cutting them out.
Metal Lath
My first impulse when I find out that a job has metal lath walls is to run away. After my heart stops pounding, I pull out my jigsaw with as many metal blades as I can find — I often go through two blades for each box I cut in. The lath will also destroy a drill bit after a couple of boxes. Another thing to make working with a metal lath wall more difficult is that you can’t use a tone generator. If the energized snake touches the metal lath, the lath will become energized, making an accurate reading impossible.
Patching
Patching your holes may be the most important part of the job. A good patching job creates the illusion that you were never there. I like to patch holes as I go so I have time for another coat before going home. Go light on the spackle to avoid sanding. For small holes, I use Onetime, a lightweight spackle from Red Devil that dries so quickly I can get a second or third coat on in the same day. For larger holes, I’ll use a quick-drying mix-up powder like Durabond. This dries even harder and faster than spackle, giving me a solid base coat in a short time. The stuff dries in about 15 minutes, so mix up only what you can use quickly.


