

Photojojo!
If you follow a few simple guidelines, you can take surprisingly…
If you’re like most deck builders, when you’ve finished your latest deck, you whip out your trusty point-and-shoot camera or smartphone to grab a photo or two for your website. (If you don’t have a website yet, check out “Make the Internet Work for You,” January/February 2011.) But no matter how terrific your design skills and craftsmanship are, if the photos on your website don’t show your work in the best possible light, you run the risk of losing potential customers before they even pick up their phone to call you. Here are a few simple tips that should help you improve your shots, regardless of what kind of camera you use.
Smartphone or DSLR?
I am a full-time deck builder, but I’ve been involved with photography in one way or another since I was a kid, and I currently offer classes to amateur photographers. Whether my students use a digital single-lens reflex camera (DSLR) or a simple point-and-shoot camera, I teach them how to take better photos. Decent photos can also be taken using a modern smartphone, if you know a few tricks for getting the most out of it.
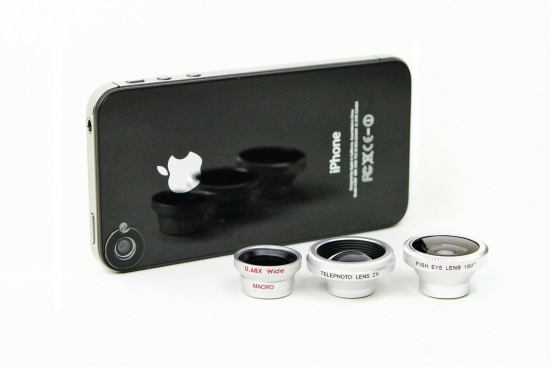
With a DSLR, you can change lenses and automatically or manually control settings such as shutter speed and aperture opening. You can’t adjust settings quite so easily with a smartphone or a point-and-shoot camera, but many still have an impressive array of built-in functions, and some even can be used with interchangeable lenses — for example, I have an Olloclip lens kit (olloclip.com) for my iPhone.
One important advantage of a smartphone is that you can immediately upload a photo to a Facebook page or blog. And since smartphone cameras are equipped with a powerful computer, you can use apps to modify, edit, or manipulate your photos digitally.
Avoid These Mistakes
Whether using a smartphone or an expensive DSLR, most amateur photographers make two simple mistakes. If you can avoid them, you will be well on your way to becoming a better photographer.
Mistake #1: The photographer is too far away from the subject. Inexperienced photographers tend to step too far back and include too much information in the photo. The cure, of course, is to simply get closer. Practice filling the frame with your deck by taking a few steps toward it before you click the shutter. Also take shots of certain parts of the deck, not just of the whole thing — you may be surprised at the results.
Mistake #2: Not taking enough photos. Most amateur photographers don’t take enough shots and consequently have limited choices when it comes time to pick the best one. I typically shoot several dozen photos of each subject, often finding that the one I end up liking the most is a shot I would never have thought would work.
There’s no reason not to take a lot of digital photos. Back in the dark ages of film photography, the cost of developing and printing had to be factored into the price of every roll of film you shot, but with digital photography, the cost of dozens of photos is essentially zero.
Once you get in the habit of filling the frame with your subject, and shooting four or five times more photos than you are currently shooting, you will find that the number of decent photos you get will climb dramatically.
Pay Attention to the Light
Believe it or not, high noon on a bright, sunny day is the worst time for taking outdoor photos. Direct overhead sunlight casts harsh shadows and increases contrast and can be very unflattering to your subject. The best times to shoot a deck or outdoor scene are usually early in the morning and in the evening, preferably when the sun is low or just below the horizon. Once the sun is behind trees or bouncing off clouds, the light softens and becomes much more forgiving. And photography is about light, if nothing else.
By the way, I think that the only source of light worse than direct sunlight is the flash that comes on your camera. I mention it here as a side note, because it will rarely come into play when shooting a deck. You will probably be too far away, with too much available light to have to worry about your on-camera flash, but when you are shooting people and other things, try to avoid the on-camera flash whenever possible. Your photos will be much better in almost every case with available light than with the light from your flash.
Think About Composition: The Rule of Thirds
When you look through a viewfinder, do you simply place the subject so that it is dead center in the frame? To achieve a better composition, try dividing the frame into thirds and putting the main part of the subject across one of those lines. In doing so, you are following a principle of design that you see in paintings and professionally-made photos every day, but perhaps were unaware of.
In fact, one of the best ways to learn photography is to take note of how professional photographers light and frame their subjects. You can see high-quality photos every day in magazines, billboards, and on the Internet; to improve your photos, train yourself to see what the pros do and then try to mimic them.
Photo Editing
After I’ve finished a deck, it usually takes the homeowner a while to add landscaping and make the deck look like a finished project. This is where photo editing software comes in handy. Once a photo has been downloaded to your computer, there are a lot of options for making the photo look better for presentation.
While it would be unethical to photographically alter a deck to make it look like something it isn’t, I don’t mind “adding” shrubbery and grass to the scene. It’s like a jeweler putting a ring in a velvet-lined box; it doesn’t change a thing about the ring, but it sure makes it look nicer.
Adobe Photoshop is the standard photo editing tool for anyone who wants to work a little magic with photos. The full-blown software package is pricey, but the consumer version — Photoshop Elements — is reasonably priced and should allow you to do most of the editing you’ll need.
With Photoshop, you work in layers, like an artist working on clear sheets of acetate. You can add text or graphic elements to your original photo, then modify or delete these layers without changing the original photo.
This article is too brief to help you get started with Photoshop, but there are numerous training videos on YouTube and articles on the Web that can give you the recipe for almost any type of editing you want to do. I often get instruction that way when I’m attempting something I’ve never done before.
The Next Step
If you get bitten by the photography bug, you’ll want to eventually invest in a DSLR camera and a tripod. With a dedicated digital camera and interchangeable lenses, you will be able to shoot photos under more difficult conditions — such as in the late evening or at night — and control the depth of field, which is not possible to do (for the most part) with a point-and-shoot camera.
By far, the two main brands the pros use are Canon and Nikon, and their high-end cameras and lenses can cost thousands. But you don’t have to spend a fortune; even the basic kits sold online or at big-box stores for a few hundred dollars come with a very useful lens and everything you need to get started. If you want to spend even less money, shop eBay or look for a refurbished camera online. Here’s a useful tip if you are buying a used camera: Every modern digital camera has an internal memory that records how many times the shutter has been clicked — ask the seller to give you that information so you can get an idea of how much use the camera has had.
When I want to get the best possible shot, I use my Nikon D700 DSLR. But there are also shots on my website that were taken with point-and-shoot cameras or my phone. Some decks are worth going back to at a better time of day with my Nikon, and some are only worth a quick shot with my phone. But if you check out my website (nicedeck.com), you might have a hard time figuring out which is which.
Brian Snider started Deckbuilders in 1996. The company specializes in decks and outdoor structures and is located in Huntsville, Ala.