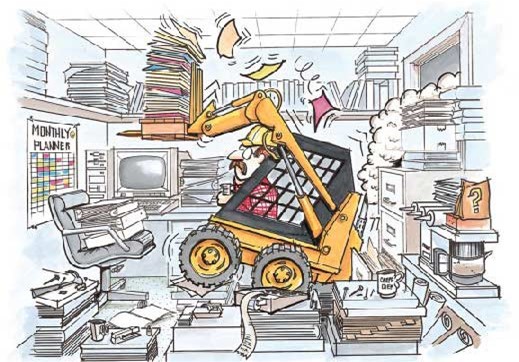
I make a living helping contractors organize their businesses. While my work includes setting up bookkeeping systems and installing software, it typically begins by reorganizing the office space itself. Often, when I enter the office of a new client for the first time, I am faced with yet another case of Stack Syndrome: Papers cover the desk, piles of magazines, catalogs, and assorted junk mail litter chair seats or corners, while heaps of just plain stuff (coats, drink containers, lunch boxes, a handful of drywall screws) occupy various horizontal surfaces. Although this can be daunting, it is simply evidence of a single problem: There is no system in operation that assigns a location to everything coming into the office.
Most of my clients run reasonably well-organized construction projects. They spend most of their working hours coordinating the dozens of people and hundreds of tasks required by even the simplest remodeling project. They’re good at it because they know what’s important and what’s not, and can make on-the-spot decisions that keep the job moving toward completion.
When it comes to the huge quantity of paper that flows through their offices, however, these otherwise competent managers are sometimes overwhelmed. Unlike their job sites, their offices have no rules for determining how to store their paperwork and other business tools so that everything is at hand when they need it. In the short run, calling the lumberyard to schedule a material delivery is more important than filing the latest tool catalog, so they do what’s easiest
— make the call and leave the catalog sitting in an ever-growing stack of paper. Then, when they need to replace a burned-out circular saw, they spend hours sifting through piles of paper looking for the catalog. It gets worse when it’s an invoice, tax document, or estimate that’s buried at the bottom of some pile.
The situation reminds me of a problem a cabinetmaker friend had with his shop employees. They would spend precious time agonizing over which side of veneer plywood should be used “face out.” Observing the time loss generated by a dozen men spending precious shop time repeatedly flipping pieces of plywood over and back again, this man declared one simple rule: Count flaws — dings, knots, sap stains, odd graining, whatever. If side A has three and side B has two, use side B face out. No agonizing, no deciding, just counting.
I have created a similar system for handling every- thing in a construction office. It’s called the 1-2-3-4 System and there’s just one rule: Organize office paper and equipment according to how frequently it will be used.
Office Categories
Everything in the office falls into one of the following four categories:
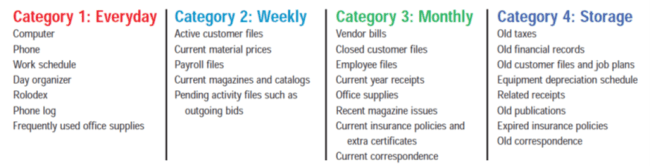
- Category 1: Everyday. These are items, like your computer, telephone, telephone log book, and stapler, that you use multiple times during every day.
- Category 2: Weekly. Some office items you use several times a week. These could include active customer files, supplier price sheets, current catalogs, and various in-house forms, such as time cards or customer screening sheets.
- Category 3: Monthly. Files and equipment you need to get to about once a month probably include recently closed customer files, paid vendor bills for the current year, and less relevant catalogs. Stationery, printer, copier, and other supplies and equipment would also fit here.
- Category 4: Storage. You may need to get at these items sometime, but not regularly. These could include old customer files and anything older than one year that needs to be kept for tax or corporate purposes. (Check with your accountant and get a list of what needs to be kept for how many years.)
Office Zones
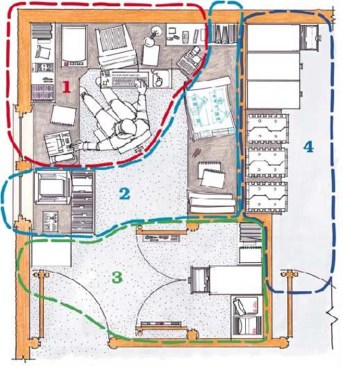
Each category applies both to sorting office items and locating them in your office. As you design your office layout, you will need to create a zone for each category. Category/Zone 1 items should be at hand; Category/Zone 2, just over your shoulder; Category/Zone 3, across the room; and Category/Zone 4, in the attic, the basement, or some other room. As you’re organizing your office, take some time to evaluate how well the current layout of your office functions and what possible changes you could make. Plan your zones. And don’t forget to remove the things that don’t belong in the office (more on this below).
The Big Reorg
Now it’s time to begin reorganizing. You can fiddle around with it for days, but I recommend that you take the plunge and devote a weekend to it.
Clear it out. The first step is to empty your office of absolutely everything. As you do so, conduct a preliminary sort according to the four categories, but don’t discard anything yet. Don’t review each particular item at this point either. Otherwise, you’ll never get the office emptied out. If the furniture is too big to move, leave it, but empty every drawer, closet, nook, and cranny. If you have bulletin boards, strip their non-essential contents as well (you should probably leave your scheduling board untouched). If possible, make your sort piles outside the office space. Simply designate four different floor areas and make your piles. If you have a zillion catalogs and magazines, make a separate pile: You’ll decide later whether each belongs to Category 2 or 3, or simply needs to be discarded.
Sort and discard. Now go through the piles a second time to make sure everything’s in the right category. This is often the hardest part for contractors, who as a group tend to keep everything “just in case.” When it comes to Category 1 office supplies, don’t be afraid to throw junk away. Unlike job-site materials, it’s often cheaper to buy new supplies rather than scrounge around with unorganized odd bits.
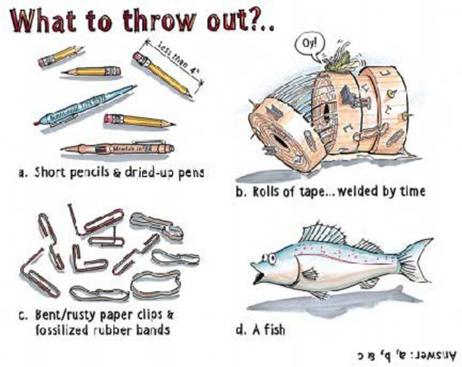
For instance, discard all pencils shorter than 4 inches (or give them to your crew for their nail pouches), and chuck any pens that don’t work (shaking them won’t help). If you find a box of staples that doesn’t fit any stapler you now own, toss it. Rolls of tape welded by time into a single sticky mass, scraps of papers covered with calculations whose purpose you don’t remember or names of people you don’t know — throw them all away.
Some Category 1 supplies are best stored in two locations. For instance, you need ready access to current stationery, but you don’t need 500 envelopes in your desk. Select a reasonable quantity of each item to remain in Category 1; the rest should be relegated to Category 3.
Category 2 items may need to be put into new folders, or be punched for insertion into binders. If you discover outdated office forms, send them to recycling or cut them up and staple them together to form memo pads. (Hint: If you staple the upper left- hand corner from behind, so the staple ends show, the papers will be easier to tear off.)
Category 3 items may need folders and consolidating. Every customer should have an individual job folder, and eventually you will want each folder to contain a check-off sheet for recording contacts, site plans, estimates, invoices, and other pertinent related documents. Depending on the number of vendors you use, you may elect to have a folder for each or a folder for all vendors whose names begin with the same letter of the alphabet. Either way, you will need to acquire some hanging file folders with alphabetical tabs.
Category 4 items need to be sorted according to type. Get standard file storage boxes and put all your tax returns together, your old customer files together, and so on. Label each box and, in accordance with your accountant’s instructions, write on each box the date when its contents can be discarded.
When you get to your piles of catalogs and magazines, sort by name first. For instance, you’ll probably find that you have all the catalogs from Builders’ Gizmos Unlimited from 1989 till now. Keep the current one; recycle the rest. If there are catalogs for which there is no current issue, it seems unlikely that you’ve ever ordered from it. Ditch them or tear off and file the cover (with ordering phone number); if you need a current catalog, you can call for it.
If you haven’t read the last three issues of a magazine, ditch the back issues because you’ll never read them either. If you’re paying for a subscription to a magazine that you’ve decided you don’t like, cancel it. For those magazines you want to hold onto, box similar issues together. Label and date the box. Later, if you find you haven’t opened the box in a year, heave it.
Put Everything Back
Once you have your piles weeded out (they should be smaller now), you can see how much space you’ll need to accommodate the items in each category. This is a good time to rearrange the office furniture or to install additional storage capacity. For example, one 6-foot-high, 2-foot-wide bookcase will provide 16 linear feet of catalog, magazine, or binder storage while taking up only 2 square feet of floor area. Try to avoid single-purpose furniture, like a printer stand. Instead, put your big laser printer and an answering machine on top of a 30-inch-wide 2-drawer lateral file which will also hold 5 linear feet of files.
Moving furniture often gives you a different perspective of your work space, so look the room over carefully before automatically putting things back where they used to be. Theoretically, you should have more room now. Distribute your items according to a layout plan using the four category zones (see Office Zones illustration, above).
Category 1 items need to be ready at hand. They will go on top of your desk or within arm’s reach. This could mean placing them in desk drawers or on shelves next to or above the desk. You should never have to get up and walk to reach a Category 1 item.
Category 2 items need to be nearby as well. They will go in desk drawers or a bookcase or file cabinet next to the desk. Some, like supplier price sheets, may belong in a three-ring binder. (Hint: Always purchase a bigger binder than you think you’ll need. You’ll avoid wasted time spent attempting to cram stuff onto the rings. Buy different colors to save your- self wasted time getting out the wrong binder.)
Category 3 items should be in the office but not underfoot. It’s a waste to keep year-old files in your desk; the space is better used for current work. A file cabinet on the far side of the room works well; some- times file storage boxes in a closet can work if they’re the stackable kind that can be accessed without taking the pile apart.
Category 4 items, unless you have loads of space in the office, should be kept elsewhere. Keep these confidential items in your attic at home or in labeled boxes in a secure area at work. You’ll probably never have to get into them, and when the date on the box is reached, the contents can be discarded.
By finding a home for existing things, you’ll have set the stage for future paper management. When a bill is paid, there should be a file folder in a Category 2 location ready to receive it. When an addition to a customer file needs to be made, there should be a file folder in a Category 2 location. When a new catalog comes in, it should replace the old one, which is recycled. Junk mail should be recycled without being opened. Once internalized, the habit of assigning things to their category-based home should help protect you from Stack Syndrome.
Keep Out of the Office
There’s also a fifth category, which I call “this doesn’t belong in your office so find another home for it.” In this case, I am defining “office” as a space designated for the running of the business, where telephone calls are made and received, estimates are created, bills and invoices are processed, and payroll and other confidential information is stored. I often find that while my contractor clients have no problem with Categories 1- 4, we run into trouble with Category 5. Since I assume that encouraging extraneous people to congregate in your office is a bad thing, I recommend removing the following from the office space:
Coffee machine. Unless you meet with clients in your office, provide coffee for the crew elsewhere if at all. The time lost in making coffee is minimal, but the downtime for office staff who then have to work through the distraction of chatting workers (or who succumb to the temptation to join in and thereby get nothing done for that period) is substantial.
Personal possessions. Remove items such as coats, boots, and lunch paraphernalia. Build a storage unit for lunch boxes outside the office (you’re a carpenter, you can do that) or buy a big Rubbermaid storage unit with doors if dust is a problem. Hang your own coat on a wall-mounted hook or rack (preferably in a closet out of sight) and avoid space-hogging coat trees.
Tools and work-related detritus. Don’t clean out your tool pouch in the office; do it in the shop, your truck, or your base- ment at home. Keep a big jar outside the office door for those mysterious screws and fasteners that you “might just need someday.” Tools just don’t belong in office space. Besides, if you never keep them there, then that’s one less place to hunt for something that is missing.