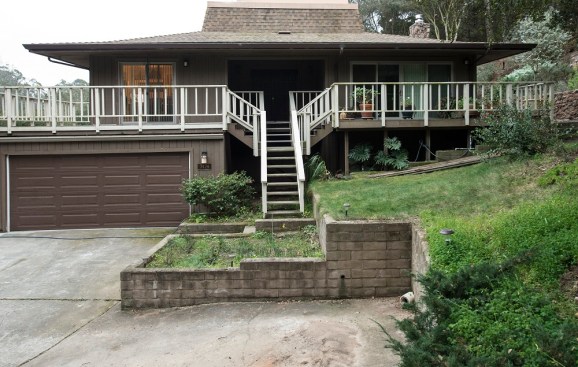
When it came time to renovate my home’s aging wood deck, I wanted to replace it with an extensive single-level exterior living space that would require a lot less maintenance. Complicating matters, my California home was located on a small site with a steep slope and changes in elevation from both east to west and north to south.
Bruce Stenman
Problems with the existing deck included a narrow staircase, poor illumination, multiple levels, and a non-code-compliant guardrail that blocked the view.
To fit the complex project into a tight space, I used a hybrid approach that combined the design flexibility of freestanding deck framing with a durable, maintenance-free stone paver surface supported by Silca System plastic grating. The project also involved considerable concrete and masonry work that performs both a structural and aesthetic function.
I’m a homeowner, not a professional deck builder. But I have a background in commercial construction, and I acted as the general contractor on this project. I was on site every day, specified and purchased the materials, and provided the construction details to the deck contractor–who had little experience with three-dimensional concrete construction–and the concrete contractor–who lacked experience and knowledge regarding wood framing.
Concrete Work
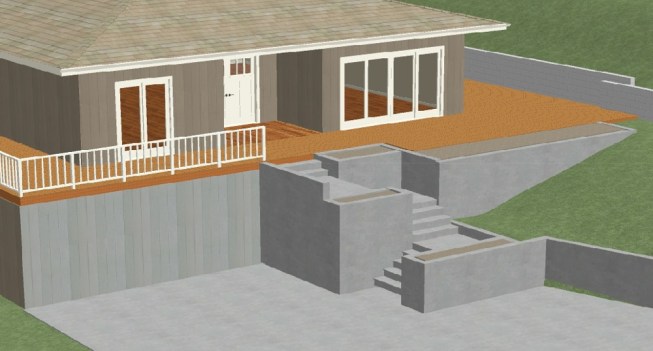
To ensure that all the pieces would fit together perfectly, I used 3D architectural software from Chief Architect called Home Designer Pro to flesh out the design and provide accurate working plans for the concrete contractor. In particular, the project relied on the positioning and structural integrity of three large planters, with an average depth of 8 feet.
Bruce Stenman
The author used a CAD program to flesh out the design and provide accurate working plans for the concrete contractor.
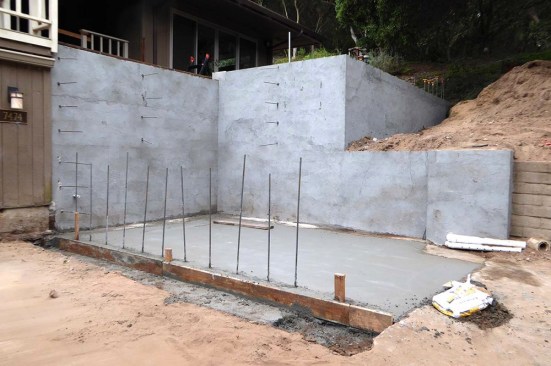
Because the planters needed to function as retaining walls as well as support the many cubic yards of dirt that they would contain, I had my plans reviewed by a structural engineer. After demolishing the existing deck and doing a fair amount of site work, we formed and poured footings for a combination retaining wall and slab and curb along the stone garden wall, and for the stairs leading to the hot-tub area. We also formed and poured the deck footings, all to the engineer’s specifications.
Forming and pouring the stairs and landings was precise work. Here, the CAD plans were critical, as was the tripod-mounted laser that I used to ensure that all of the elevations were correct within ¼ inch, especially for the 17 steps from the entry area down to the driveway. It’s quite different to be doing this with concrete forms where there are no do-overs, rather than building stairs using wood.
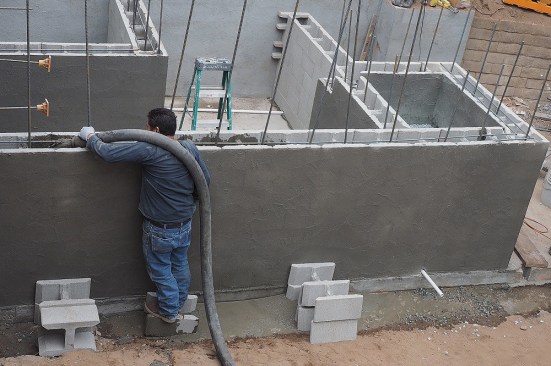
We built the planter walls using masonry block that we then coated inside and outside with Quikrete Quikwall surfacing bonding cement. SBCs are used to build dry-stack (without mortar) block walls while providing a stucco-like waterproof surface. To strengthen the walls, we placed rebar vertically and horizontally inside the blocks, and then filled the cores of the blocks with concrete.
Bruce Stenman
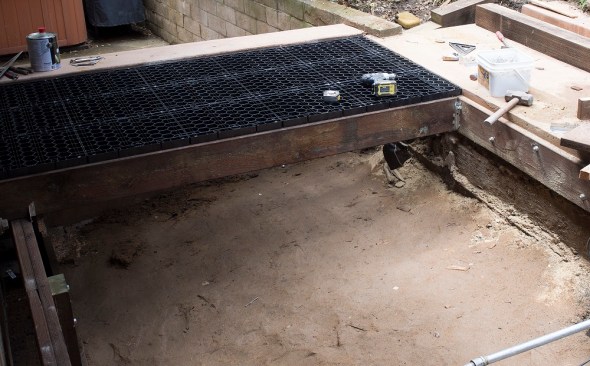
Considerable sitework was required to improve drainage prior to pouring new deck footings, retaining walls, and the slab that would support the planters and staircase.
Bruce Stenman
The planter walls were built with masonry blocks that were held together with surfacing bonding cement (SBC) rather than mortar. The walls were reinforced with rebar, then filled with concrete.
A Freestanding Deck
The planters, front and rear poured concrete steps, and the retaining wall act together to lock the deck framing into place, eliminating the possibility of lateral movement. Consequently, the framing only needed to support the static load of the deck surface material and the live load of people on it. And because the structure of the house precluded a strong ledger connection, most of the deck framing is freestanding.

Bruce Stenman
Except for slightly reduced joist and beam spans, standard deck framing is used to support the Silca Systems grating and stone pavers. The author included SST HD2A holddown connectors and robust cross bracing as a precaution against seismic activity.
We framed it using 6×6 posts and double 2×10 beams to support the 2×10 deck joists, all of which are ground-contact-rated PT lumber. To meet local seismic requirements, we connected the joists to the beams with Simpson Strong-Tie HD2A holdown connectors. And because of my experience in the 1989 Loma Prieta earthquake, which badly damaged the house that I owned at the time, we reinforced the framing against lateral movement with plenty of 2×6 and 4×6 cross bracing, even though code in my area doesn’t specifically require it. We also used plenty of blocking between the joists to stabilize them.
Because I had specified PT lumber rated for ground contact, I also specified hot-dip galvanized hardware, including joist hangers, hurricane clips, bolts, washers, nuts, lag screws, and through bolts. Since neither Home Depot nor my local building supply stores seemed to stock HDG hardware, I had to order most of it online.
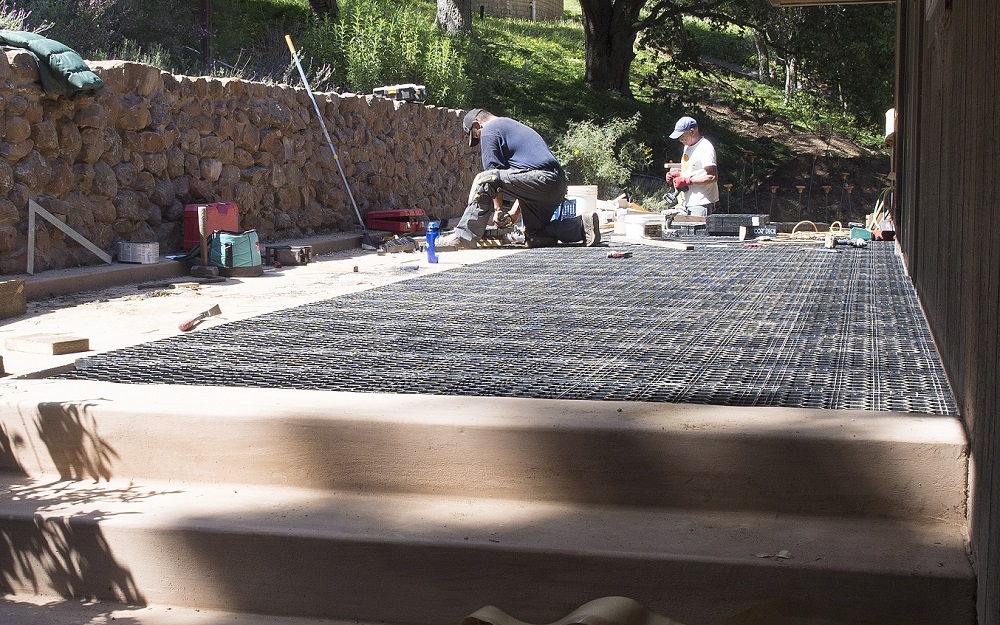
Installing the Stone
Though I initially considered ipe decking, I decided on stone because of the reduced maintenance it would require (just an annual pressure-washing). The 30mm-thick (about 1 ¼ inches) travertine stone pavers that I chose for the decking surface are supported by plastic grates from Silca Systems. In my research, I discovered several different grating systems, but the Silca grating comes in compact 18.25-inch-by-16-inch-by-1.5-inch sections that are lighter and easier to handle than some of the other systems.
The grates are sized to fit over joists with standard 16-inch-o.c spacing, and according to the manufacturer, are capable of bearing the weight of pavers up to 3 inches thick. Each 4-pound grate covers about 2 square feet and fastens to the framing with four screws, one at each corner.
Bruce Stenman
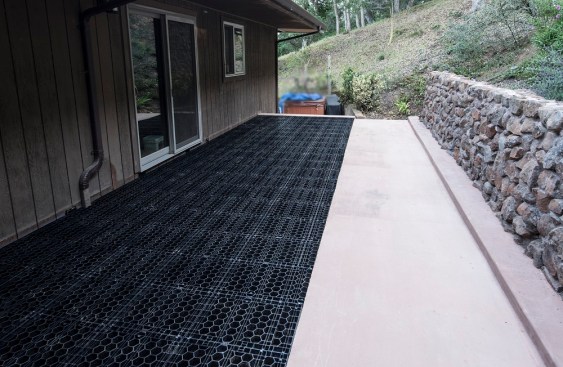
Silca Systems plastic grates are light and easy to cut, and they attach to the deck framing with four screws. Here the framing has been dropped slightly so that the pavers can extend seamlessly over the adjacent retaining wall and concrete slab.
Bruce Stenman
Prior to installing the stone pavers, the author applied an isolation membrane to the slab. The pavers over the slab were set in thinset mortar, and simply glued to the grating with construction adhesive.
The cost for the grates was about $5.95 per square foot delivered to my door; I needed enough to cover approximately 1,000 square feet. I paid about $6 per square foot for the travertine pavers, so the total material cost for the pavers and grating was roughly equal to the cost of ipe, which would have been about $13 per square foot in my area.
To make sure that deck framing is capable of carrying the added weight of stone pavers, Silca offers technical support, including engineered details (signed off by a structural engineer), framing requirements, post spacing, and footing dimensions. For pavers that are 1 ¼ inches thick, for example, Silca recommends a maximum joist span of 12 feet 10 inches when using 2×10 SYP PT framing 16 inches o.c., compared with a 14-foot (maximum) span for conventional wood or composite decking.
There was nothing tricky about installing the Silca System; the framing is standard-issue deck construction, the grating is easily cut with a saw when necessary, and it is quickly fastened to the framing with a screw gun.
Before installing the stone tiles or pavers, landscape cloth can be laid over the grating to allow the joints to be filled with polymeric sand or grout. But I chose to leave the gaps open to avoid maintenance problems with grass growing in the sand, to allow water to drain off the deck, and to maintain airflow around the deck framing below. I used construction adhesive to bond the pavers to the Silca grating.
Bruce Stenman
The 1 1/4-inch-thick travertine pavers were set in a Versailles pattern. Commonly used for indoor tile installations, this pattern does not have continuous grout lines.
Along the side of the house, the paver surface extends out over a concrete slab, which is part of the retaining wall. Here I bolted a ledger to the concrete curb supporting the slab edge and hung the joists from the ledger so that the top surface of the Silca grating panels rested 1/8 inch above the adjoining concrete slab. This allowed for a layer of thinset mortar between the stone and the slab.
Before installing the pavers, I coated the slab with Merkrete Fracture Guard 7000, a liquid-applied crack-isolation membrane. Once the membrane cured, I set the pavers in Mapei Ultra Flex polymer-modified thinset.
This approach makes the top surface of the paver deck look seamless, even though a third of it rests on a concrete slab and two-thirds of the pavers are supported by joists that are from 20 to 40 inches above ground level. One benefit of this approach is that airflow under the house and through the wall vents is maintained without the use of metal ducts and powered fans.
Finishing Touches
When I built the planters, I installed individual water supply pipes for irrigating each one, along with PVC drain lines that feed into the French drain lines. Then I half-filled them with rock for drainage, installed a layer of landscape fabric, then filled them the rest of the way with soil.
At the same time, I added wiring for the 8-Watt LED fixtures for the steps. Instead of placing smaller lights in the risers, I attached the fixtures to the concrete block walls, which we dressed up with 12-inch-by-24-inch stone veneer panels. The lighting from a single fixture is adequate to illuminate an entire flight of steps, so only five lights were required to light all 15 of the 60-inch-wide stair treads, instead of 45 riser lights. In addition to being less expensive and easier to maintain, the wall-mounted lights provide better illumination of the steps with a more-attractive overall effect.
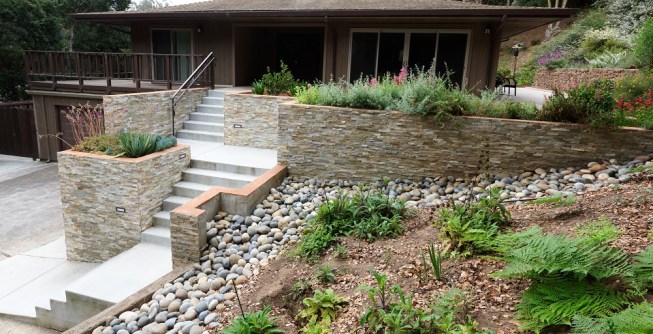
Bruce Stenman
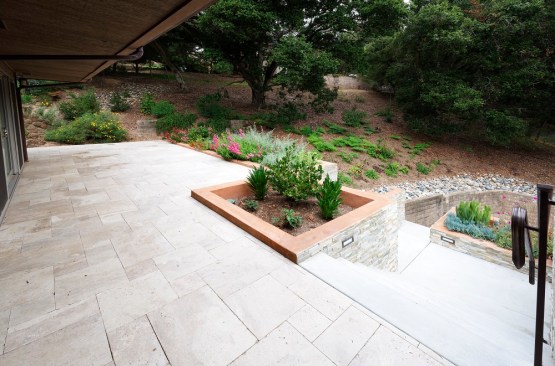
In addition to offering a no-maintenance stone paver surface, the new deck features wider stairs and landings for easier access, more outdoor living area, and improved drainage on the sloped site.
Now when I look from my house out over the deck, I can see flowering plants that add color and soften up the view, instead of a railing. That’s because the planters are at deck level and at least 36 inches deep, which eliminates the need for a railing here. And I can relax, knowing that I’ve greatly reduced the cost and need for annual maintenance.


