1. Main Attraction Installing an arbor on the edge o…
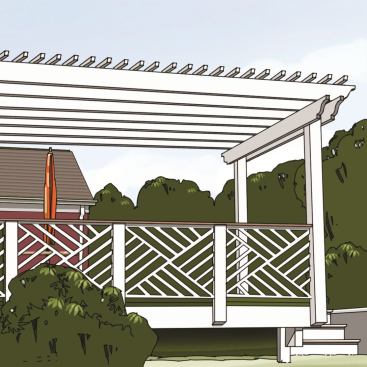
Many of my company’s deck and porch jobs include an arbor or two. Arbors are popular because they’re functional as well as attractive and can be customized to fit just about any outdoor space. They can be used, for instance, to cast partial shade on a sunny section of a deck. Planting vines to climb on them can offer even more protection from the sun.
Arbors also serve a number of design needs. Centered on a door or stairway, an arbor defines and adds visual emphasis to the entry. An arbor in the middle or at the edge of a deck forms an outdoor room that entices people to walk toward its sheltering shade and protective cover, whereas an arbor installed out in the yard creates a focal point in the landscape, drawing visitors’ eyes toward it.
We build our arbors on site, usually assembling them one stick at a time in place. If the arbor is small, we might fabricate the whole structure before lifting it into position.
Components
All the arbors we build share the same basic structural components: columns (or posts), cross beams, joists, and cross-lathing.
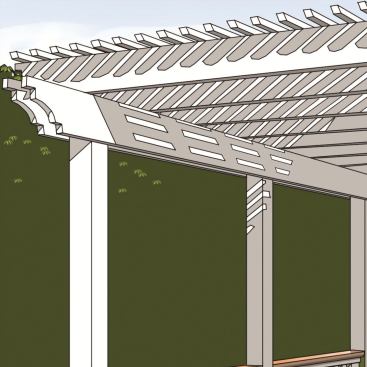
The smallest column we’ll use is a 6×6 — anything smaller is prone to bowing and looks undersized. Cross-beam and joist sizes vary depending on the length and width of the arbor, but even on a small arbor, a 2×8 cross beam would be the smallest we’d use. Anything smaller would appear skimpy.
As a general rule, we size the joists as we would for low-slope roof rafters of a similar length. For a small arbor with 2×8 cross beams, we use 2×6 joists. If the cross beams are 2x10s or 2x12s, we use 2x8s or 2x10s for joists. Deck design and spans affect column counts and spacing as well. By upsizing the beam, you can span a larger area.
Bolting two cross beams together and attaching them to one side of a column can look too massive and heavy, so I prefer to flank the column with one beam on each side, for a lighter, more delicate look. On small arbors, we attach the cross beams flush to the sides of the columns with double 1/2-inch bolts. For larger arbors, an alternative is to cut a 1- to 11/2-inch-deep notch in the top of the columns. This method transfers the load to solid wood and to the bolts; another advantage is that the notches hold the beams in place during assembly. We locate the bolts within 11/2 inches of the top and bottom of the beam to help with lateral stability.
We lay out the joists so they are spaced evenly along the beam on approximate 16-inch centers and install them directly on top of the beams with toenails or toe screws, paying careful attention to blow-outs that could be seen from below.
I’ve seen some arbors where the joists are notched to drop down onto the beams. While this is an option, there isn’t really any advantage to it. And it is possible that from below the gaps around the notches would be visible and unattractive.
For the final layer of the arbor — the lath that’s installed perpendicular to and atop the joists — we rip 2x4s down the middle into long strips approximately 13/4 inches wide. You could use 2x2s, but the quality of those usually isn’t great. Plus, the halved 2x4s are 1/4 inch thicker.
I like to install the lath 6 inches on-center, which provides just enough shade and looks neither too spindly nor too heavy. That spacing also helps to control joist bowing and warping. We face-nail the lath to the top of the joists with 10d hot-dipped galvanized ring-shank nails.
Building for a Load
In the towns in Georgia where we work, none of the building departments have ever raised questions about our arbors, so it’s up to us to provide a safe structure for our customers. For the most part, an arbor has no live load exerted on it, but homeowners may later decide to hang plants or a hammock from it, or set up a planter with decorative vines. Some woody vines, such as wisteria, can exert tremendous force, pulling apart trim and porches — even lifting roofs.
There are different ways to transfer an arbor’s load. Freestanding arbors transfer all their weight to the supporting posts, while those that are attached to a house on one end transfer weight to the building and to the posts at the other end. It’s not enough to simply nail an arbor to a fascia board or just notch the outer columns and rest them on a deck’s 2-by outer band joist, which is only nailed to the ends of the deck joists.
We frame decks with a single band joist and double or triple joists on each end of the floor system. If we know that a deck we’re building is going to support arbor posts, we will triple or even quadruple the joists under the posts’ locations. We set the posts directly on the deck framing, making sure they bear on the joists and not just on the band joist, and then we install the decking around them.
For arbors on decks built close to grade, we attach the posts to concrete footings with post bases. Where possible, we also through-bolt the posts to the deck’s floor joists.
Attaching to the House
We prefer to design arbors without diagonal bracing between the vertical columns and the horizontal beams. It’s challenging to use these stabilizers in a way that looks appealing and they detract from the otherwise-simple perpendicularity of the design. Therefore, most of the arbors we build are attached to a house, usually close to the height of the second-floor band joist.
When possible, we attach a ledger board directly to the building as if we were installing a ledger for a deck. An arbor ledger is treated as a finished piece of trim, though, not as rough framing that will be covered with decking. Self-drilling ledger bolts make quick work of ledger attachment, but remember that the bolt heads and their attachment pattern will be visible from below.
Depending on the height of the arbor and the house’s wall height, you might not be able to attach the ledger directly to the band joist. If that’s the case, it’s best to attach the arbor ledger to solid headers or double studs below windows. Driving a large-diameter ledger bolt into the 11/2-inch-wide edge of a single stud requires good aim, however — if you miss or blow out the side of the stud, you’ve compromised the holding power of the bolt.
Also keep in mind that anytime you penetrate the exterior wall of a house, flashing needs to be installed above the arbor ledger, similar to how you’d flash a deck ledger.
In the past, we used to nail a 2×2 sub-ledger to the bottom edge of the house ledger. Then we’d notch the arbor joists, set them on the sub-ledger, and toenail them to the house ledger. We never had a problem with this method, but recently, due to increased concerns (ours and the homeowners’) about liability and safety, we’ve starting using galvanized joist hangers to attach arbor joists to the house ledger. With careful installation and a coat of paint, the hardware is not too noticeable.
Freestanding Arbors
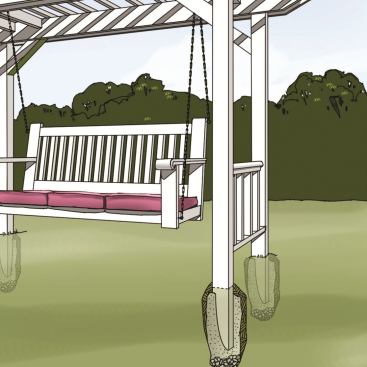
The advantage of attaching an arbor to a house is that even a single connection point gives the structure more stability. But our customers often want freestanding arbors, which require a combination of elements to work together to provide that stability. The grid made by the joists and lath, for instance, adds to the rigidity of an arbor, as does a well-built railing system between the posts. Though in general I try to avoid diagonal bracing, I will often use it on freestanding arbors over 10 feet tall or on large arbors without a guardrail system.
For a stand-alone arbor that can’t be tied to a deck’s framing — one located out in a backyard, for example — we’ll dig 3-foot-deep postholes with 12- to 14-inch diameters and set the posts in gravel or concrete. To prevent rot on cedar posts, we paint them with aluminum paint up to grade level.
Materials
We build most of our arbors from treated lumber, which we finish with a solid stain. Since the structural pieces are also the trim pieces, we choose material carefully. We think of it as finish framing.
If you call in a lumber order to be delivered, chances are you’ll get boards pulled off the top of the pile without regard for quality. It takes more time, but it pays off to go to the yard and personally select the pieces. If we do have to call in an order, we tell the supplier what we’re building and that we need select wane- and blemish-free lumber. And we add an extra three to four joists to the order as insurance.
End Cuts and Overhangs
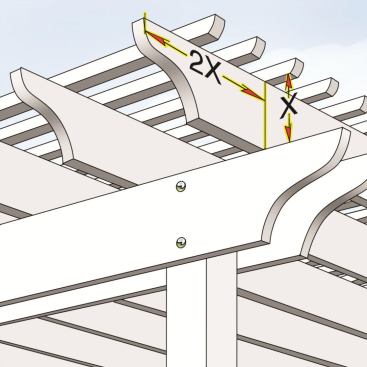
The right amount of overhang for the beams, joists, and lath makes a big impact on the overall look of an arbor, as do decorative end cuts on the beams and joists.
For beams and joists, the basic formula I use to determine overhangs is to add twice the nominal board width to each end. So, for instance, a 2×8 beam would extend 16 inches past the columns that support it, and a 2×6 joist would extend 12 inches past the outside edge of the beams that support it.
Lath pieces should extend no more than 4 to 5 inches past the edge of the outer joists. More than that and you’re just asking for the lath to bow and twist over time.
For the decorative joist and beam ends, I draw what I think will look good, cut a pattern from 1-by stock, and then trace it onto the lumber. You can find endless design ideas online by searching for images of “decorative rafter tails.” We then use a heavy-duty jigsaw to make the cuts and a belt sander to finish them.
Contributing editor Bobby Parks owns Peachtree Decks and Porches in Alpharetta, Ga.


