
Every once in a while, my custom-home building company gets a call to do a small job, which we almost always decline. It’s not that we don’t like smaller projects, but with our overhead, we usually find that we’re priced out of the small-job market. Additionally, these jobs end up costing me more than they are worth because we tend to incorporate expensive details into everything we build. Unless the customer has way too much money—and they never do—it just isn’t worth our effort.
But this call was different. No, this client didn’t have an endless supply of money, but she did have a purpose for doing this job that is near and dear to me. Her husband has Alzheimer’s disease, and she wanted to add a covered porch to her home to provide a little shelter from upstate New York’s rain or snow. And why is that special to me? My mom has Alzheimer’s too, so I understand the desire to do everything possible to make a loved one feel safe and comfortable. I took the job.
Developing the Plan
An added bonus for me was that, in addition to wanting the practical benefits of a covered entry, the owner wanted her porch to look nice. She was looking for something that would stand out, yet blend both aesthetically and proportionally with the home she loves.
To come up with a design, I asked her to send me photos of porches that she liked. Based on those photos, I sketched out a few options, and we quickly settled on a basic plan. After tweaking the final design and coming to terms on price, my company got down to work.
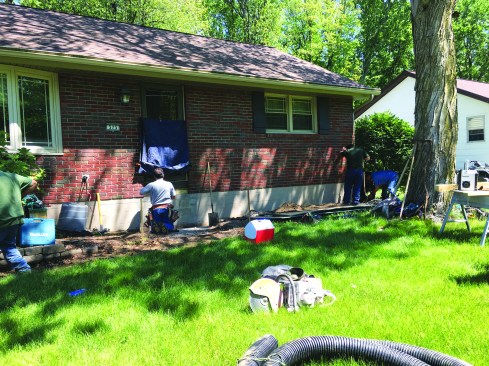
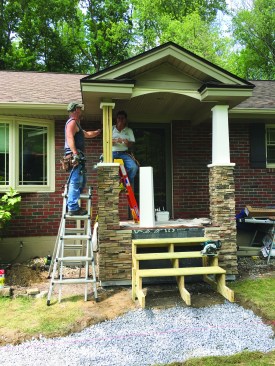
After the existing precast concrete stairway was removed, the author prepped the framing under the entry door to receive the new ledger.
Helical Pier Foundation
I pulled a permit at the local building department and called Dig Safely New York (811), the underground utility marking service, and then I contacted our local Techno Metal Post installer. I like its helical piles for this type of project for several reasons. For one thing, I’m 62 years old, and I like to avoid digging deep holes by hand. Even better, helical piles are super strong and have a verifiable bearing load. They’re “fast and quick,” as I like to say, and once they’re installed, you’re immediately ready to start building. Finally, building inspectors like them because they come with a report from the installer stating the load capacity, depth, and all the necessary information that allows an inspector to sleep well at night.
To keep rodents from burrowing under the enclosed porch, 12-inch-wide strips of diamond lath were nailed to the bottom of the framing and buried in the ground before the plywood sheathing was installed.
After we demolished the old concrete steps and the Techno Post crew had installed their two P2 piers, we ran a 4-inch-diameter solid drainpipe along the foundation behind where the new porch would be located. We needed to be able to collect the rainwater that would have been collected from the gutters that would now be interrupted by the new porch roof. We connected the pipe into an existing drain that is connected to the town storm sewer.
Framing
To create a solid attachment point for the porch ledger, I removed the old siding and trim from under the door, exposing the rim joist and a ledge formed in the foundation to support the brick cladding. I also removed the old rim joist, so I could more easily tuck the top flap of my SAF membrane under the door threshold. Then I replaced the rim with new PT material, securely fastening it to the house framing with lag screws and covering the assembly with SAF membrane, lapping the top flap over the lower layer.

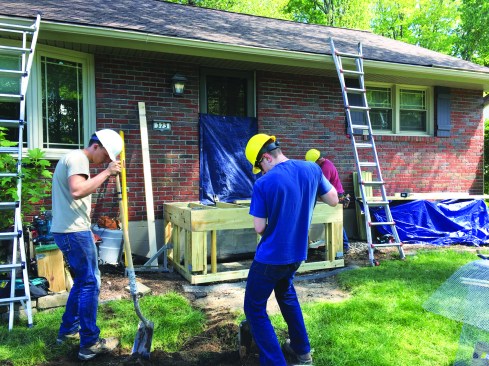
The porch framing was sheathed with PT plywood, wrapped with both SAF membrane and felt paper, and then covered with diamond lath prior to installation of the stone veneer cladding.
To minimize twisting and warping, the porch columns were framed with three 2x6s laminated together, rather than solid PT posts.
Next, I lag-bolted two 2×10 PT boards to the rim joist to build the assembly out flush with the brick face, followed by a third 2×10 ledger equal in length to the width of the porch. This ledger extends beyond the door opening by 16 inches on either side over the brick cladding, with the ends of the ledger supported by PT 2×4 cleats anchored to the block foundation with expansion bolts. This way, we avoided placing any loads on the brick cladding.
We framed the porch floor using typical deck construction and flashing details, though with oversized framing considering the deck’s small proportions. For example, we used 6×6 rather than 4×4 posts to support the triple 2×10 flush rim beam. And even though the joist span was only 84 inches, we used 2×10 joists 16 inches on-center so that the porch would feel solid and sturdy underfoot.
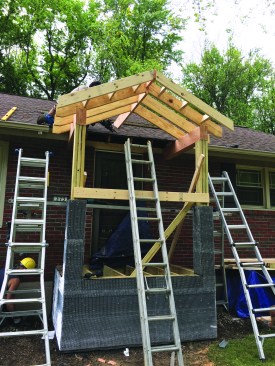
Part of the eaves had to be removed and pockets cut into the brick cladding to allow the headers that support the roof framing to be securely connected to the house’s double top plate with inset joist hangers and lag bolts.
We like to plan for the fact that wet pressure-treated wood will shrink after installation. One of our strategies is to stockpile as much PT lumber as we can at my warehouse so that we’ll always have some dry boards for our exterior stairs, headers and beams, and other critical framing members.
When we have to work with wet lumber, we frame with shrinkage in mind. For example, we framed the flush rim beam so that its elevation was only 1⁄4 inch lower than the ledger rather than 3⁄4 inch. This was because we anticipated that the wet 9 3⁄4-inch-wide 2x10s would shrink to 9 1⁄4 inches wide once they dried out, giving us our desired 3⁄4-inch pitch. It’s a bit of a gamble. The first winter following completion, there was some pooling on the deck, as the joists lost their moisture before the triple header did, but by summer, the rim beam finally dried out and stabilized at our anticipated dimension, eliminating the pooling.
We planned to wrap the porch and the bottom half of the columns supporting the porch with cultured stone veneer cladding. In preparation for the cladding, we framed a short knee wall underneath the rim beam and two outside joists, stapling up foot-wide strips of diamond lath around the base to keep rodents out. Then we sheathed the wall with 3⁄4-inch-thick pressure-treated plywood glued and screwed to the framing (which also helped to reinforce the cleats supporting the ledger). To keep the plywood flat and dry, we stored it in our warehouse for several weeks prior to installation.
We wrapped the plywood with Grace Ice & Water membrane, followed by a layer of 15-pound felt paper. Since the cladding would extend halfway up the triple 2×6 PT columns supporting the porch roof, we used the same detail there. Then we installed the diamond lath, fastening it to the plywood with stainless steel roofing nails.
Porch Roof
To install the side headers, we had to cut away part of the eaves and create a couple of pockets in the brick cladding and 1-by shiplap wall sheathing. After lining the pockets with flashing membrane, we slipped the triple 2×8 headers into place, using metal hardware and lag screws to fasten them to the house’s double 2-by top plate. Then we framed the roof with 2×8 rafters sheathed with 5⁄8-inch CDX plywood.
I like classical details and typically build cornice returns on almost all my houses. We dried the returns in with SAF membrane and copper flashing and finished them with some asphalt shingles that we had taken off the roof.
Next, we dried in the rest of the roof with SAF membrane, slipping the membrane under the existing shingles, which were only a year or two old. Then we called in our metal-roofing sub, who added his own brand of underlayment over ours and tied his valleys into the existing roof.
As we trimmed out the porch, we tried to match the home’s soffit and eaves details as much as possible. We finished the porch ceiling with beaded vinyl, capping the ceiling at the gable end with a decorative arch cut from 3⁄4-inch PVC trim. Then we Z-flashed the arch, and finished the gable with a couple of pieces of leftover vinyl siding and matching aluminum coil stock.
While we turned the standing-seam-metal-roof installation over to a sub, we tackled the stone veneer cladding that gives the porch such a distinctive look ourselves. One of our crew members worked for 18 years as a mason, so we often install stone veneer cladding like this on our projects.
Finally, we fabricated tapered columns out of PVC trim, which we installed over the built-up PT posts.
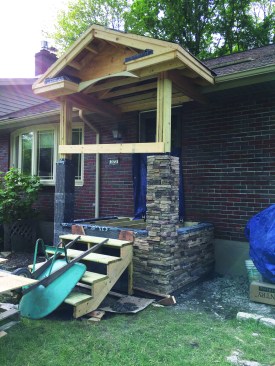
Tapered PVC column wraps dress up the triple 2×6 posts that support the gabled porch roof, which features nicely detailed cornice returns.
Floor and Stairs
People with Alzheimer’s tend not to be very sure on their feet, so we researched our porch flooring choices carefully, focusing particularly on the COF (coefficient of friction), or slip resistance. In the end, we chose Koma’s Plantation PVC porch flooring, a reversible 1×4 tongue-and-groove profile with a smooth surface on one side and a textured wood-grain finish on the other. The company was very helpful, sending me a testing report and allowing me to speak directly with a tester so that I could put our client at ease with our choice.
On the stairs, we installed 2×12 PT stair treads with premilled grooves, later adding sand to the stain finish for even more traction. We temporarily supported the stringers with blocking while we assembled the stairs, then poured a concrete walkway with a stained finish that extends under the stairs to create a smooth and solid landing.
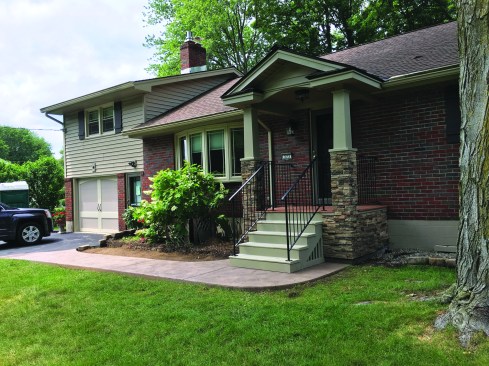
Along with a new poured concrete walkway and slip-resistant stair treads, the covered porch creates a safe and welcoming entry to the home.
A local welding shop custom-fabricated the wrought-iron railings. During framing, we had made it a point to install proper blocking so that the railing attachment points would be rock solid.
This was a good and worthy project, and the owners love the result. Based on the amount of traffic during the project, the locals love it, too. It does the job of keeping the owners safe and dry and gives them something nice to look at, too.
Photos Courtesy Constantine Builders


