
International Code Council
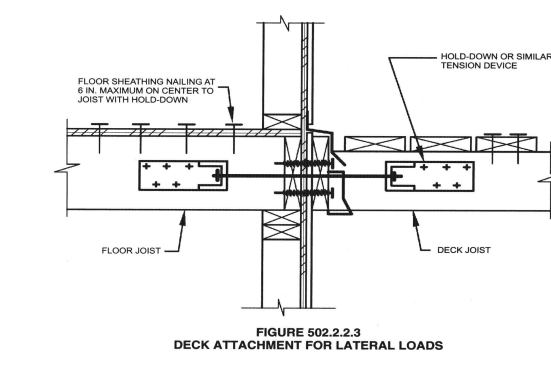
This detail from the 2009 International Residential Code shows o…
I’ve been installing lateral-load hardware on my decks for several years and have taught more than two dozen workshops on the topic. It’s only a matter of time before building departments require such connections, so I’d suggest being proactive and learning how to install them now (see Question & Answer). The best jobs to start with are decks where both the interior floor joists and the deck joists are perpendicular to the house’s rim joist. Once you’re comfortable doing those, you can move on to more complicated jobs.
Installing lateral-load hardware entails working both inside and outside a house. For the most part, when you’re working outside you won’t be able to reach or even see the hardware inside the house, and vice versa. One person can handle the work alone, but plan on several back-and-forth trips to sort out joist positions, drill holes, and install blocking.
Deck Joists Parallel to House Joists
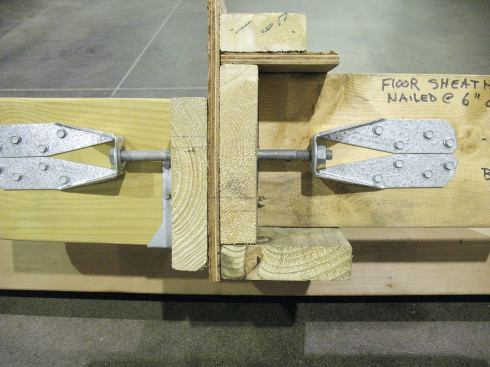
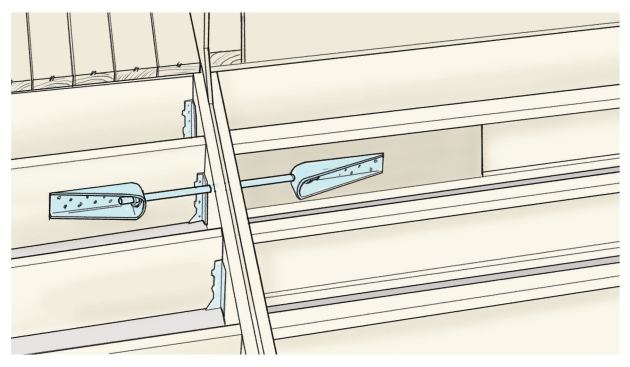
The prescriptive drawing in the International Residential Code (IRC) for a lateral-load connection shows a simple scenario: solid-sawn-lumber framing with the deck joists perpendicular to the house’s rim joist and parallel to the house joists. Connectors capable of handling 1,500 pounds mount to a house joist and a deck joist, and a bolt or threaded rod links them together. In addition, the detail calls for the subfloor sheathing to be nailed 6 inches on-center along the house joist that the hardware mounts to. Two of these connection assemblies per deck fulfills the code regardless of a deck’s size.
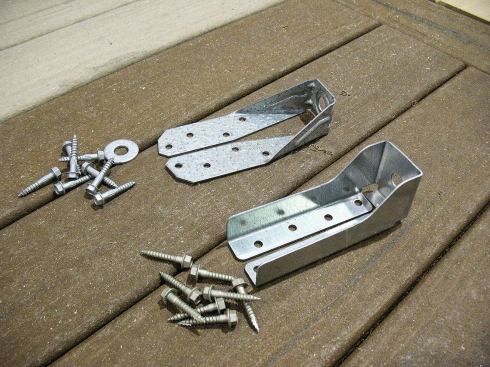
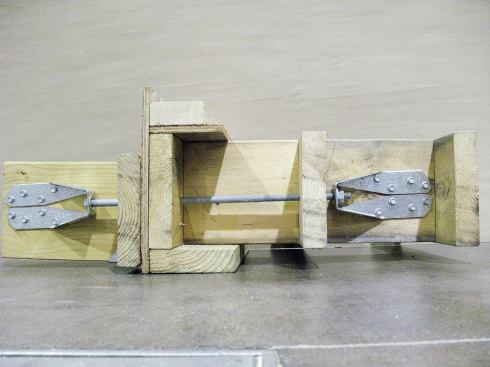
Hardware. Two models of hardware that are designed for the code detail and meet the 1,500-pound rating are the Simpson Strong-Tie DTT-2Z (800/999-5099, strongtie.com) and the USP DTB-TZ (800/328-5934, uspconnectors.com). Both come packaged with a 1/2-inch heavy-duty washer and structural screws for fastening the brackets to the joists. You just have to supply the 1/2-inch hex-head machine bolt or threaded rod. The cost for two brackets and the threaded rod or bolt is about $20.
The hardware takes me less than an hour to install on homes with unfinished ceilings. Putting the hardware together isn’t difficult, but locking pliers are invaluable — I like Irwin Vise-Grips (800/464-7946, irwin.com). I clamp them onto the part of the bolt or threaded rod that extends outside the building to keep it from spinning when I’m inside the house threading a nut on the other end.
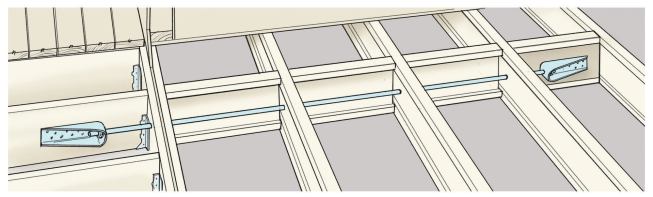
Joist layout. Probably the easiest approach is to lay out the deck joists so that some of them align with the house joists. There are two ways to do this: You can match the deck-joist layout to the house-joist layout, or you can lay out the deck joists without regard to the house joists and then insert two additional deck joists aligned with two house joists.
Alternatively, the hardware can be installed on joists that are offset up to 4 1/2 inches. Simpson has a detail showing an offset of 1 1/2 inches when the hardware is installed on the same sides of the deck joist and house joist. When the hardware is installed on facing sides of a deck joist and a house joist, the joists can be offset by an additional 3 inches (gained from the joist thickness and the hole offset from the side of the hardware).
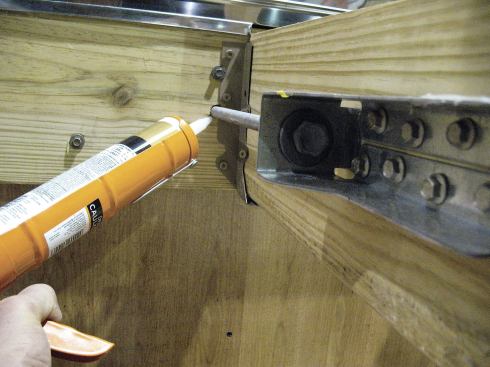
Work from the inside out. I start inside the house. After drilling a hole through the rim joist and ledger, I run a 16- to 18-inch-long 1/2-inch bolt through a washer and a bracket, then out through the hole. I mount a bracket to the floor joist 6 to 8 inches back from the rim joist. Generally speaking, keeping a 6- to 8-inch space between the brackets and the rim, ledger, or blocking leaves me enough room to work a wrench or drill/driver. Also, that extra space gives me room to get a caulk-tube nozzle close to the hole I drilled in the rim joist so I can caulk it to prevent water or insect infiltration.
Next, on the outside of the house, I slide a bracket and washer onto the bolt and run a nut up the threads at least 1/2 inch in from the end. Then I pull the bracket tight against the washer and nut, and screw it to the deck joist. Finally, I run the nut up the rod or bolt finger-tight, and snug it up two or three revolutions with a wrench. There’s no advantage to overtightening the nuts — and definitely don’t crank them up so tight that you deform the brackets.
Perpendicular Framing Requires Blocking
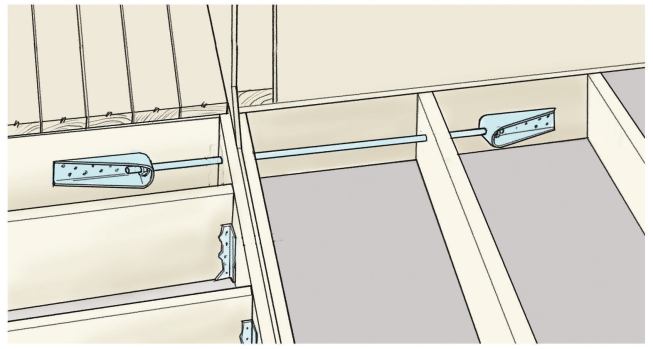
What happens when the house joists are parallel to the house rim joist and perpendicular to the deck joists? The IRC doesn’t provide a detail but Simpson Strong-Tie does. Its technical bulletin T-DeckLatLoad11 (strongtie.com/literature) shows solid wood blocking between the rim joist and the first and second inboard floor joists, with a bracket mounted to the block that’s between the two floor joists. The floor sheathing is fastened with six 8d common nails into each block.
I start outside the house this time, drilling a hole along one side of a deck joist through the ledger and rim joist. I slide a washer and a bracket onto the outside end of a threaded rod, but I don’t attach the bracket to the deck joist yet. I push the rod through to the inside of the house (since the threaded rod is some two feet long or longer, it has to enter from the outside).
Next, I go inside and use the rod to pinpoint where it needs to penetrate the floor joist and drill a hole there. I nail blocks in place in the first two joist bays, right next to the hole.
I usually position the face of the inside bracket against the floor joist and screw it to the second inboard block, then spin on the nut. Instead of gripping the nut with locking pliers, clamp them onto the rod between the rim joist and first inboard floor joist. This will keep the rod from spinning when you return outside.
After sliding on the outside bracket and washer, I spin a nut 1/2 inch up the end. I pull the outside bracket tight along the rod and screw it to the deck joist. The final step is to go back into the house and tighten the nut on the inside.
Retrofits
If the house you’re working on has finished floors and ceilings, it’s going to take some time to install brackets, blocking, and fasteners, but there are work-arounds for some situations.
It’s not practical to remove finish flooring just to inspect the subfloor nailing pattern or to drive more nails. However, wall-to-wall carpeting can usually be popped up, then relaid after you check the subfloor nails. When you can’t access the subfloor nailing from the top, Simpson Strong-Tie calls for fastening four angle brackets with 1/2-inch screws to join the subfloor to the joist. This work-around can be used to secure either a joist or blocking to the subfloor.
Finish Ceiling Tricks
No one wants to cut through finish ceilings to install hardware, but sometimes you have to. I’ve used three approaches when faced with a finish ceiling. The best case is to access the framing through existing openings, such as those for recessed lights or HVAC grilles. If that’s not possible, I install small access panels, or I cut, patch, and paint.
A conventional recessed light fixture within a few feet of the outside wall serves as an easy access point. After removing the can sleeve, I have just enough room to reach in with a small right-angle drill/driver and screw a bracket to a joist. If you are using angle brackets to secure a joist to the subfloor, they can also be installed this way. Sometimes HVAC supply or return grilles and flex duct can be removed to access joist bays in a similar fashion.
When there’s no other way into a ceiling, I install small plastic access panels that measure at least 6 inches by 9 inches and no more than 9 inches square. They’re usually stocked in the plumbing section at building supply dealers and cost around $10. One type I use has a mounting ring that you screw through the side, and a panel that snaps in place. Another type has a spring-loaded sliding back leg that clamps the panel to a hole in the drywall. Both have a low profile and a clean, finished look. Metal versions are also available, but they’re heavy and require solid blocking to secure them to a ceiling.
I install the panels about 4 inches in from the exterior wall and alongside a floor joist. This gives me plenty of working room to mount the hardware. When I’m finished, the low-profile plastic covers can be painted to match the ceiling, and they look no more obtrusive than HVAC grilles, light fixtures, or smoke detectors.
When the interior joists run perpendicular to the exterior deck joists, however, I’m forced to cut a couple of large holes (6 inches by 36 inches) so I can add blocking between joists. This approach is messy, disruptive, time-consuming, and costly. When you’re faced with this option, it’s worth investigating an engineered alternative.
Engineered Floor Systems
I-joist and truss-floor systems present challenges for lateral-load connections.
The Wood I-Joist Manufacturers Association has deck connection details for both parallel and perpendicular floor framing on its website (i-joist.org). First, a 36-inch-long 2×6 block is clinch-nailed with 10d or longer spikes to the joist web. (Clinch-nailing is hammering over the protruding tips of the nails; it prevents nail pull-out.) The blocking provides the base for mounting the lateral-load bracket.
Perpendicular I-joist framing requires the installation of 2-by solid-wood blocking from the rim joist to a distance of at least 6 feet. Depending on the joist centers, this could require up to five pieces of blocking. The most challenging part of the process is locating a long length of 1/2-inch galvanized threaded rod from the deck ledger all the way to the innermost blocking 6 feet away.
I haven’t found any standard details for a lateral-load connection to an open web truss. If you run into a house with this type of floor system, an engineered design or a solution devised cooperatively with the local building official may be the only way to go.
Mike Guertin is a builder in East Greenwich, R.I., and a regular presenter at DeckExpo.


